Payment Method Approvals (NetSuite)
The Payment Method Approvals feature provides a robust and secure method for managing changes to payee bank account information within your ERP. This approval process ensures data accuracy, minimizes the risk of errors, and enhances security by requiring authorization for changes to your payee's banking data.
Enable Payment Method Approvals
Login to FISPAN Portal
An ERP administrator or ERP consultant must first access the FISPAN Portal by logging in at sys.fispan.live.
Enable Payment Method Approvals
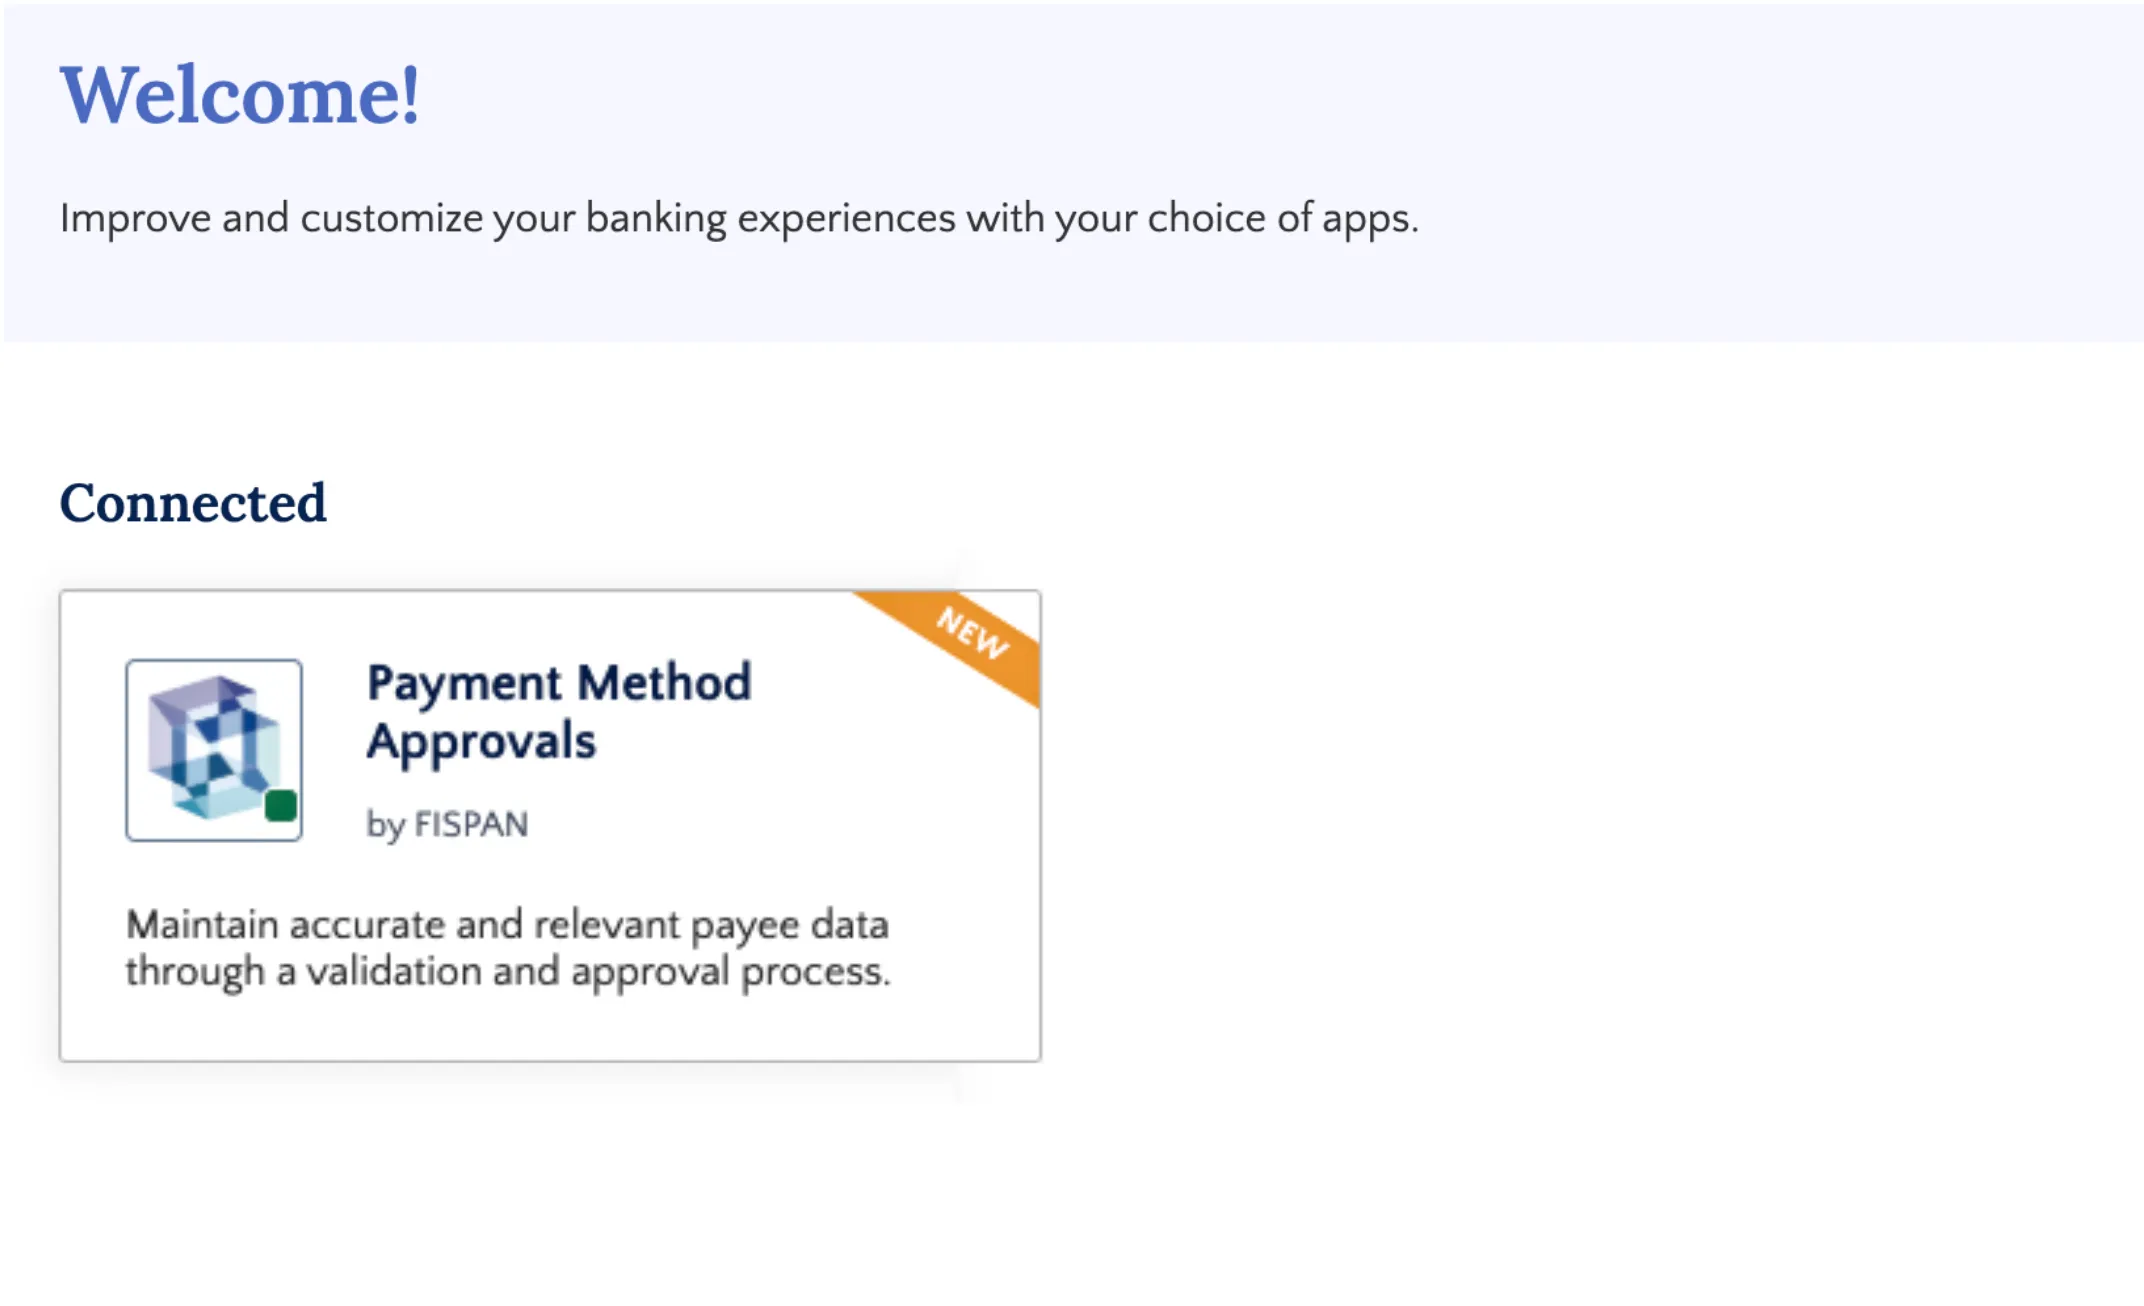
Click on the Payment Method Approvals tile.
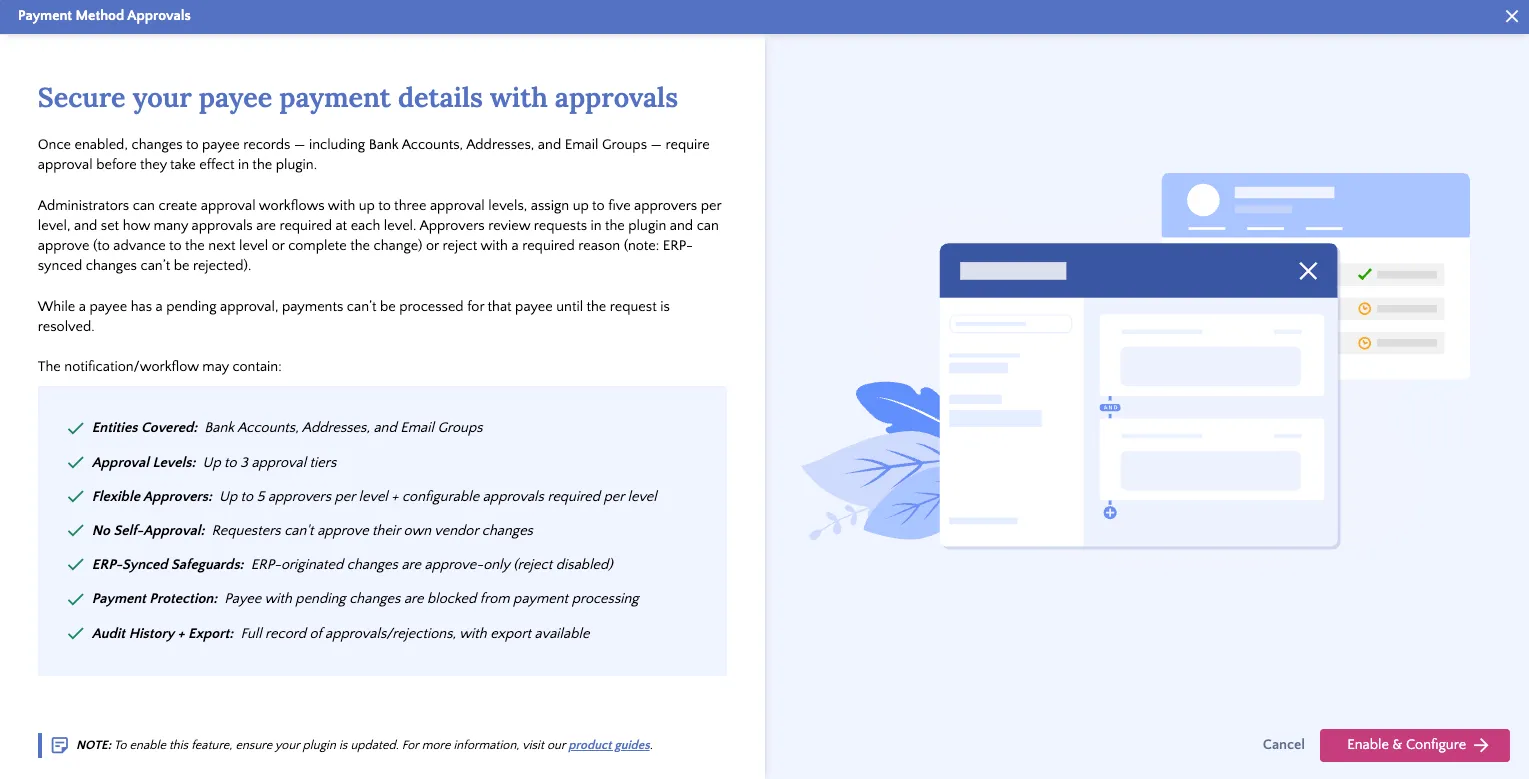
A summary pop-up will appear. Click Enable & Configure to complete the setup.
Once enabled, you will be prompted to begin creating your workflows.
Creating a Workflow
To create your Payment Method Approvals workflow for your ERP utilizing the plugin, please follow these steps.
Go to Payment Method Approvals
From the FISPAN Portal, click on the Payment Method Approvals tile. You'll then be prompted to start creating your workflows.
Create a Workflow
Once you are on the Payment Method Approvals page, click Let's Get Started.
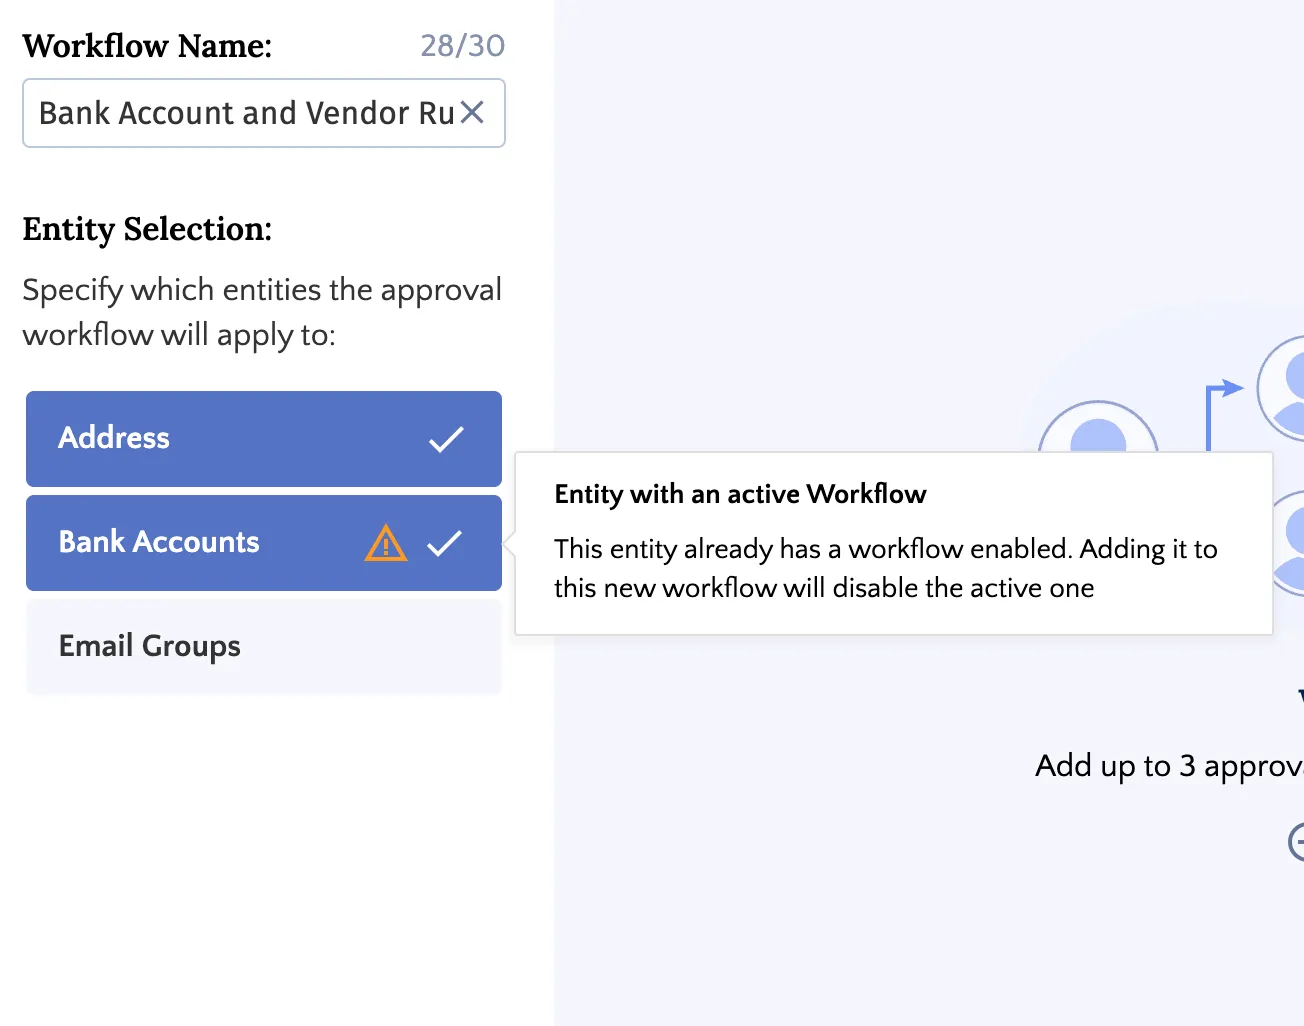
Start by giving your workflow a clear, descriptive name for easy identification later. Next, select the entities you want the approval workflow to apply to:
- Addresses: Applies to addresses added via the Payment Methods page or changes made to the native ERP payee record address.
- Bank Accounts: Applies to bank accounts added via the Payment Methods page or changes made to the native ERP payee record bank account.
- Email Groups: Applies to email groups added via the Payment Methods page or changes made to the native ERP payee record emails.
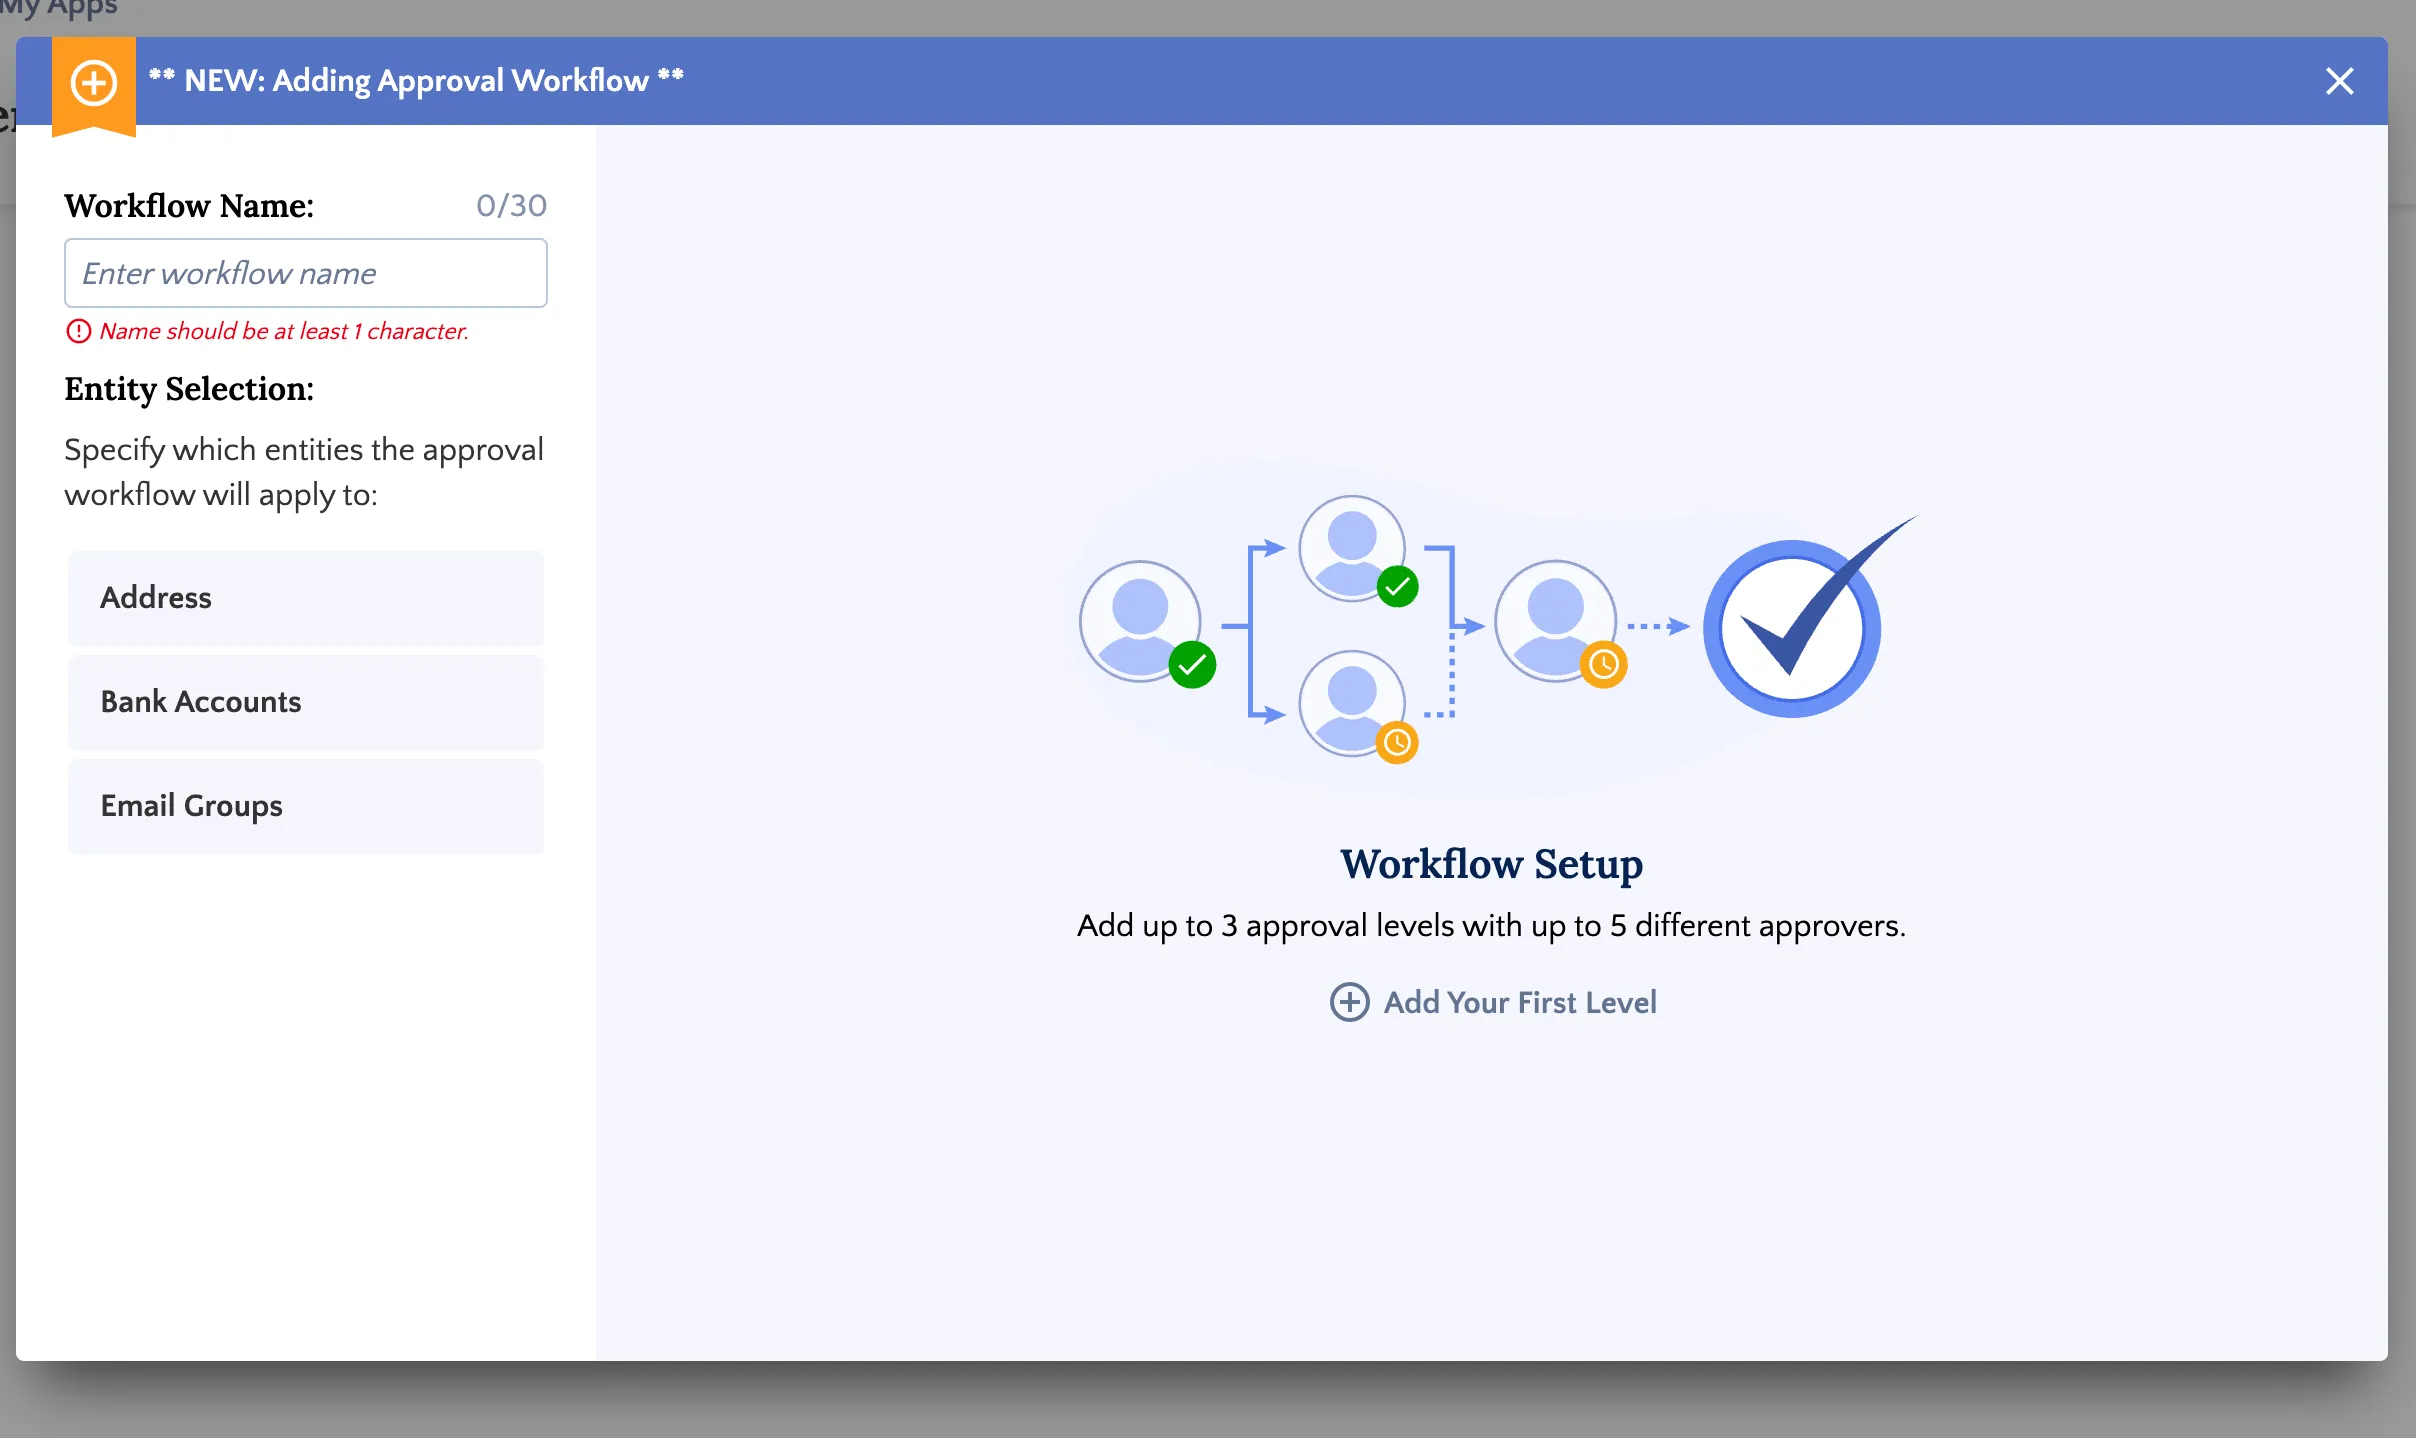
NOTE: Payment Method Approvals captures all payee changes by default—both changes made in the Payment Methods page and automated updates synced from your NetSuite environment for the configured entities. To exclude ERP-synced changes and only require approval for updates made in the plugin, contact FISPAN Support.
Add Approvers to Workflow
Next, you need to define the approvers for your workflow.
In the first level, enter the approver's email address exactly as it appears on their user record in the ERP system.
Add another level for approval and additional approvers, if needed. You can set up to three levels of approval.
At each level, you can add up to five potential approvers. You can also decide how many individual approvals are required per level (e.g. Level 1 requires 2 approvals, Level 2 requires 3 approvals, Level 3 requires 1 approval).
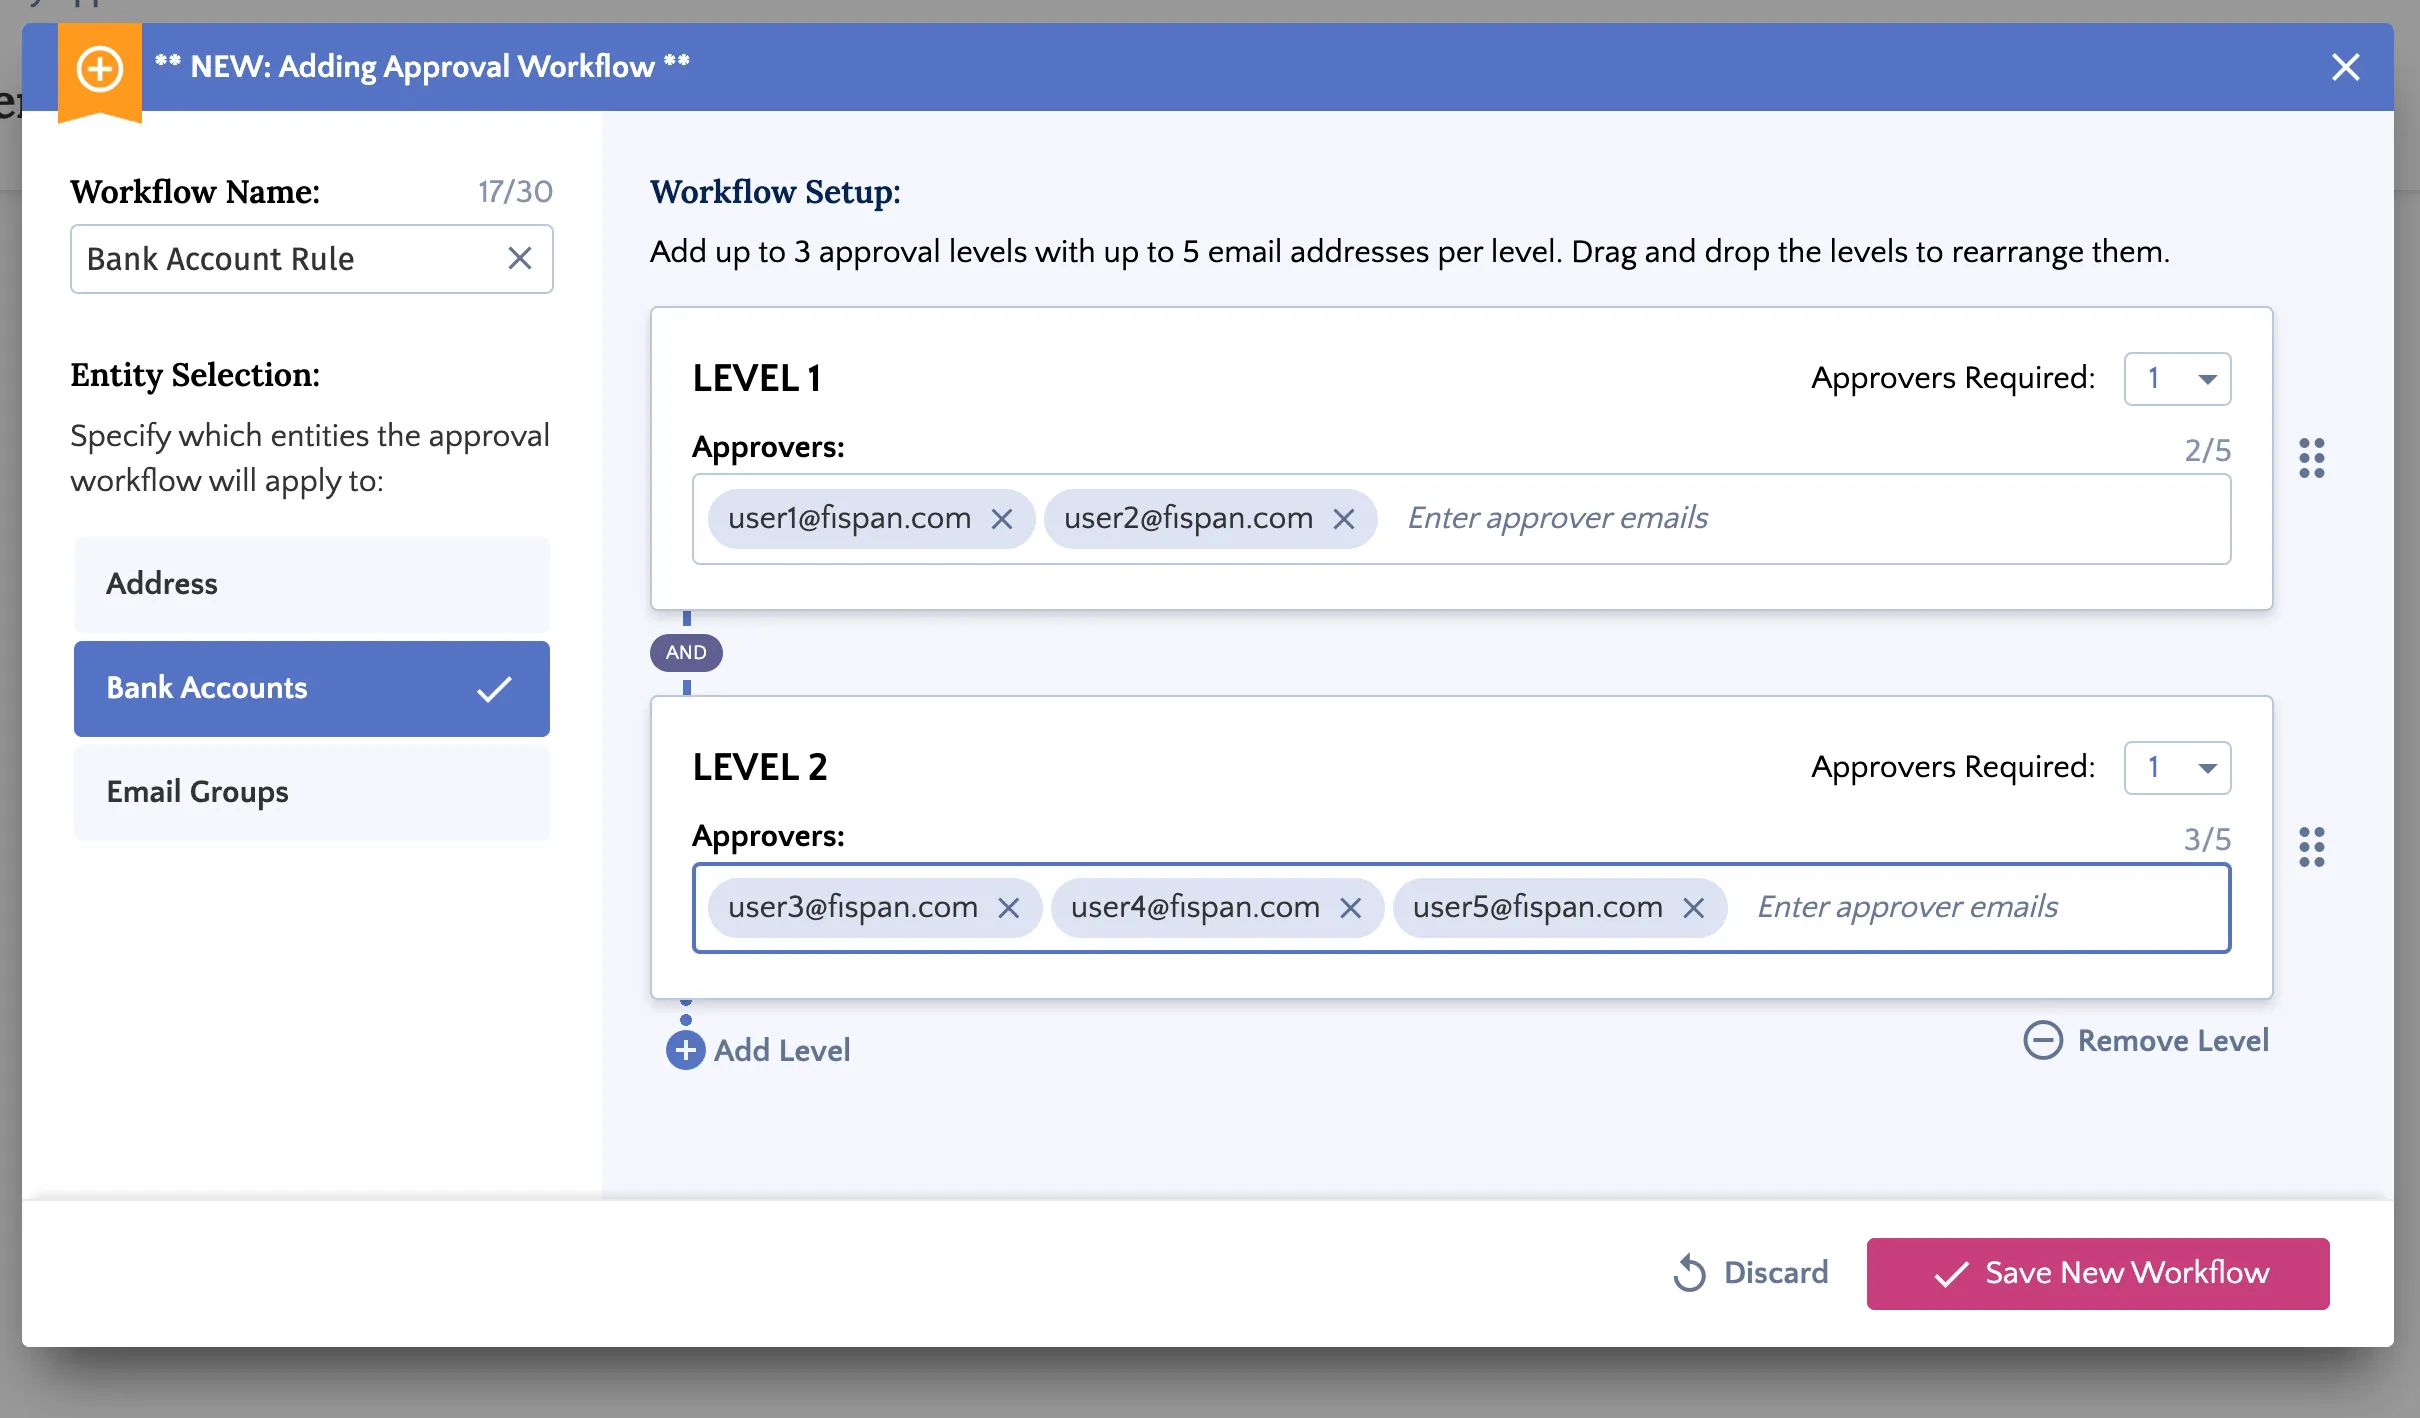
NOTE: Important Considerations:
- No Self-Approval. You cannot approve your own payees. Keep this in mind if a single user frequently acts as both the payee creator and an approver.
- Best Practice for Approvers. To avoid delays, we suggest:
- Avoid having a single approver in a level.
- Adding more approvers than the required approvals (e.g., include 4 approvers in a level that requires 2 approvals). This ensures the process can continue even if someone is unavailable.
IMPORTANT: To approve changes, users in the workflow must have both an ERP license and the necessary plugin permissions to view Payment Method Approvals, outlined in the Required Permissions section of this page.
Save Workflow
Once you have configured your workflow, click Save New Workflow.
Your workflow is now active. All changes made to payees through the CNB Pay will now follow this approval process.
Editing a Workflow
You can edit or delete a workflow, but only if there are no payee record changes pending approval for that workflow. This prevents any confusion or errors with changes currently going through the approval process. In the event you need to edit a workflow with associated open payee record changes, process or cancel any outstanding changes associated with the workflow.
Select Workflow
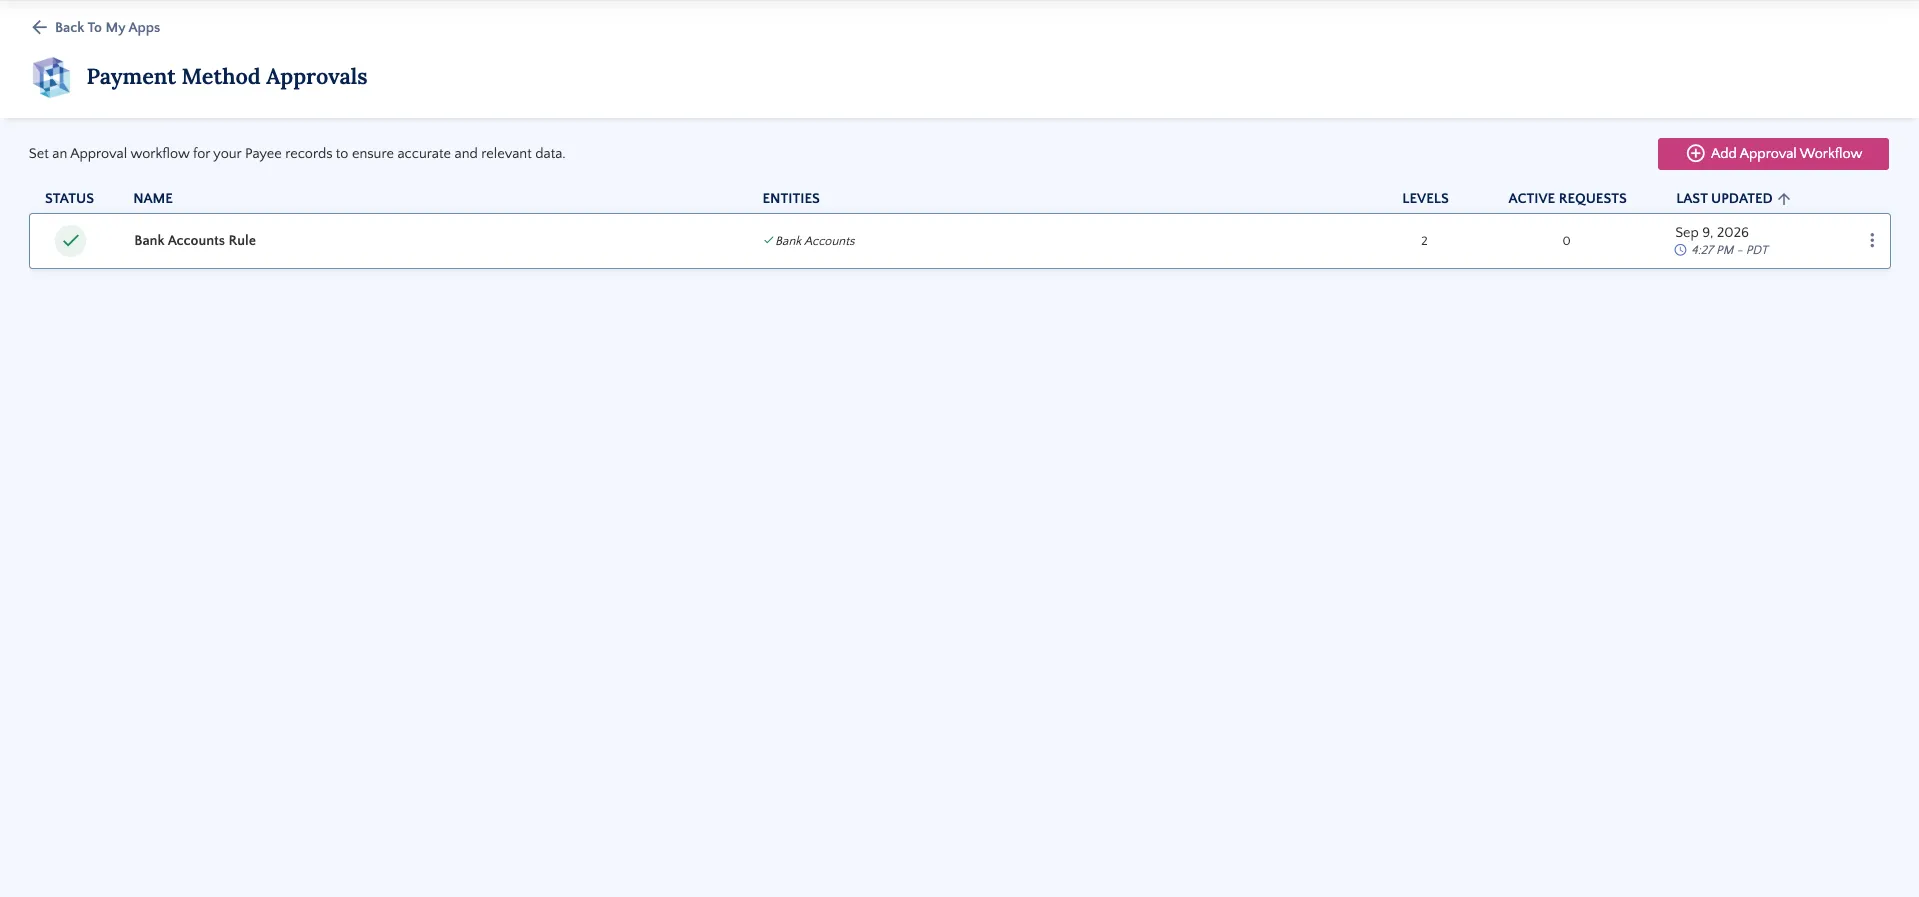
You can edit existing workflows to adjust them. Click on the workflow you would like to modify.
Edit Workflow
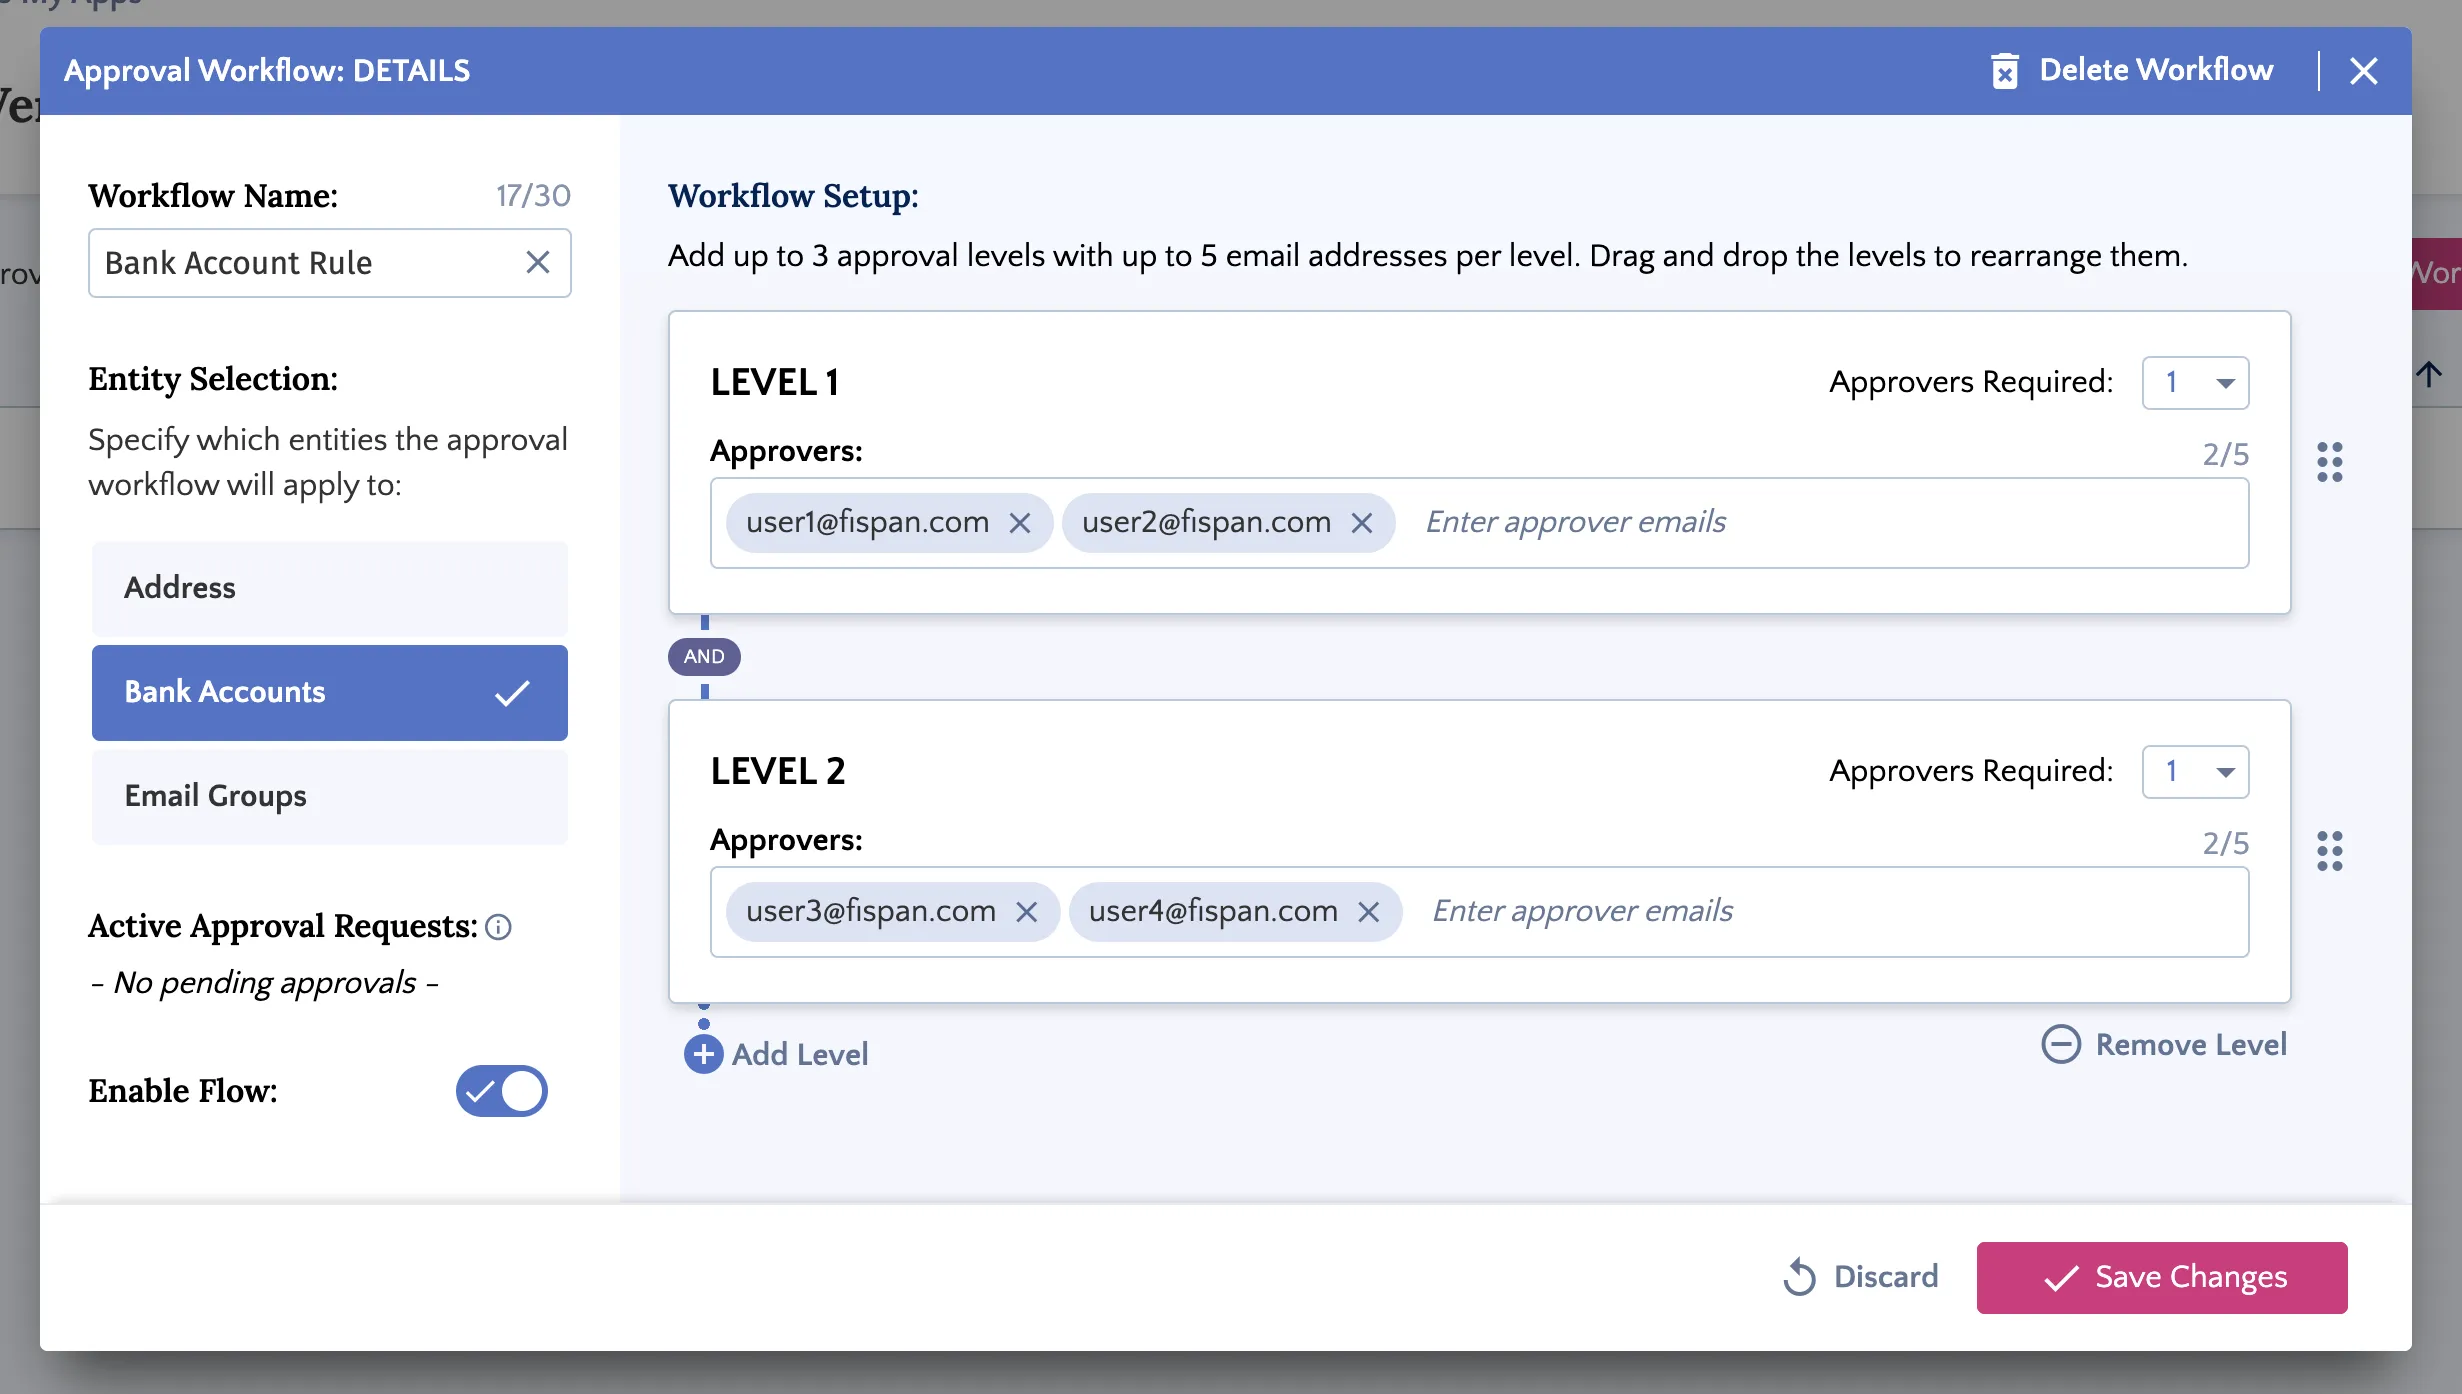
Make your desired modifications, and click Save Changes.
Editing Restrictions
Modifying the entities associated with a workflow will disable any other workflows that were previously applied to those entities. Similar to making edits to workflows, all future requests for these entities will go through the new workflow; existing requests will remain unaffected.
Deleting a Workflow
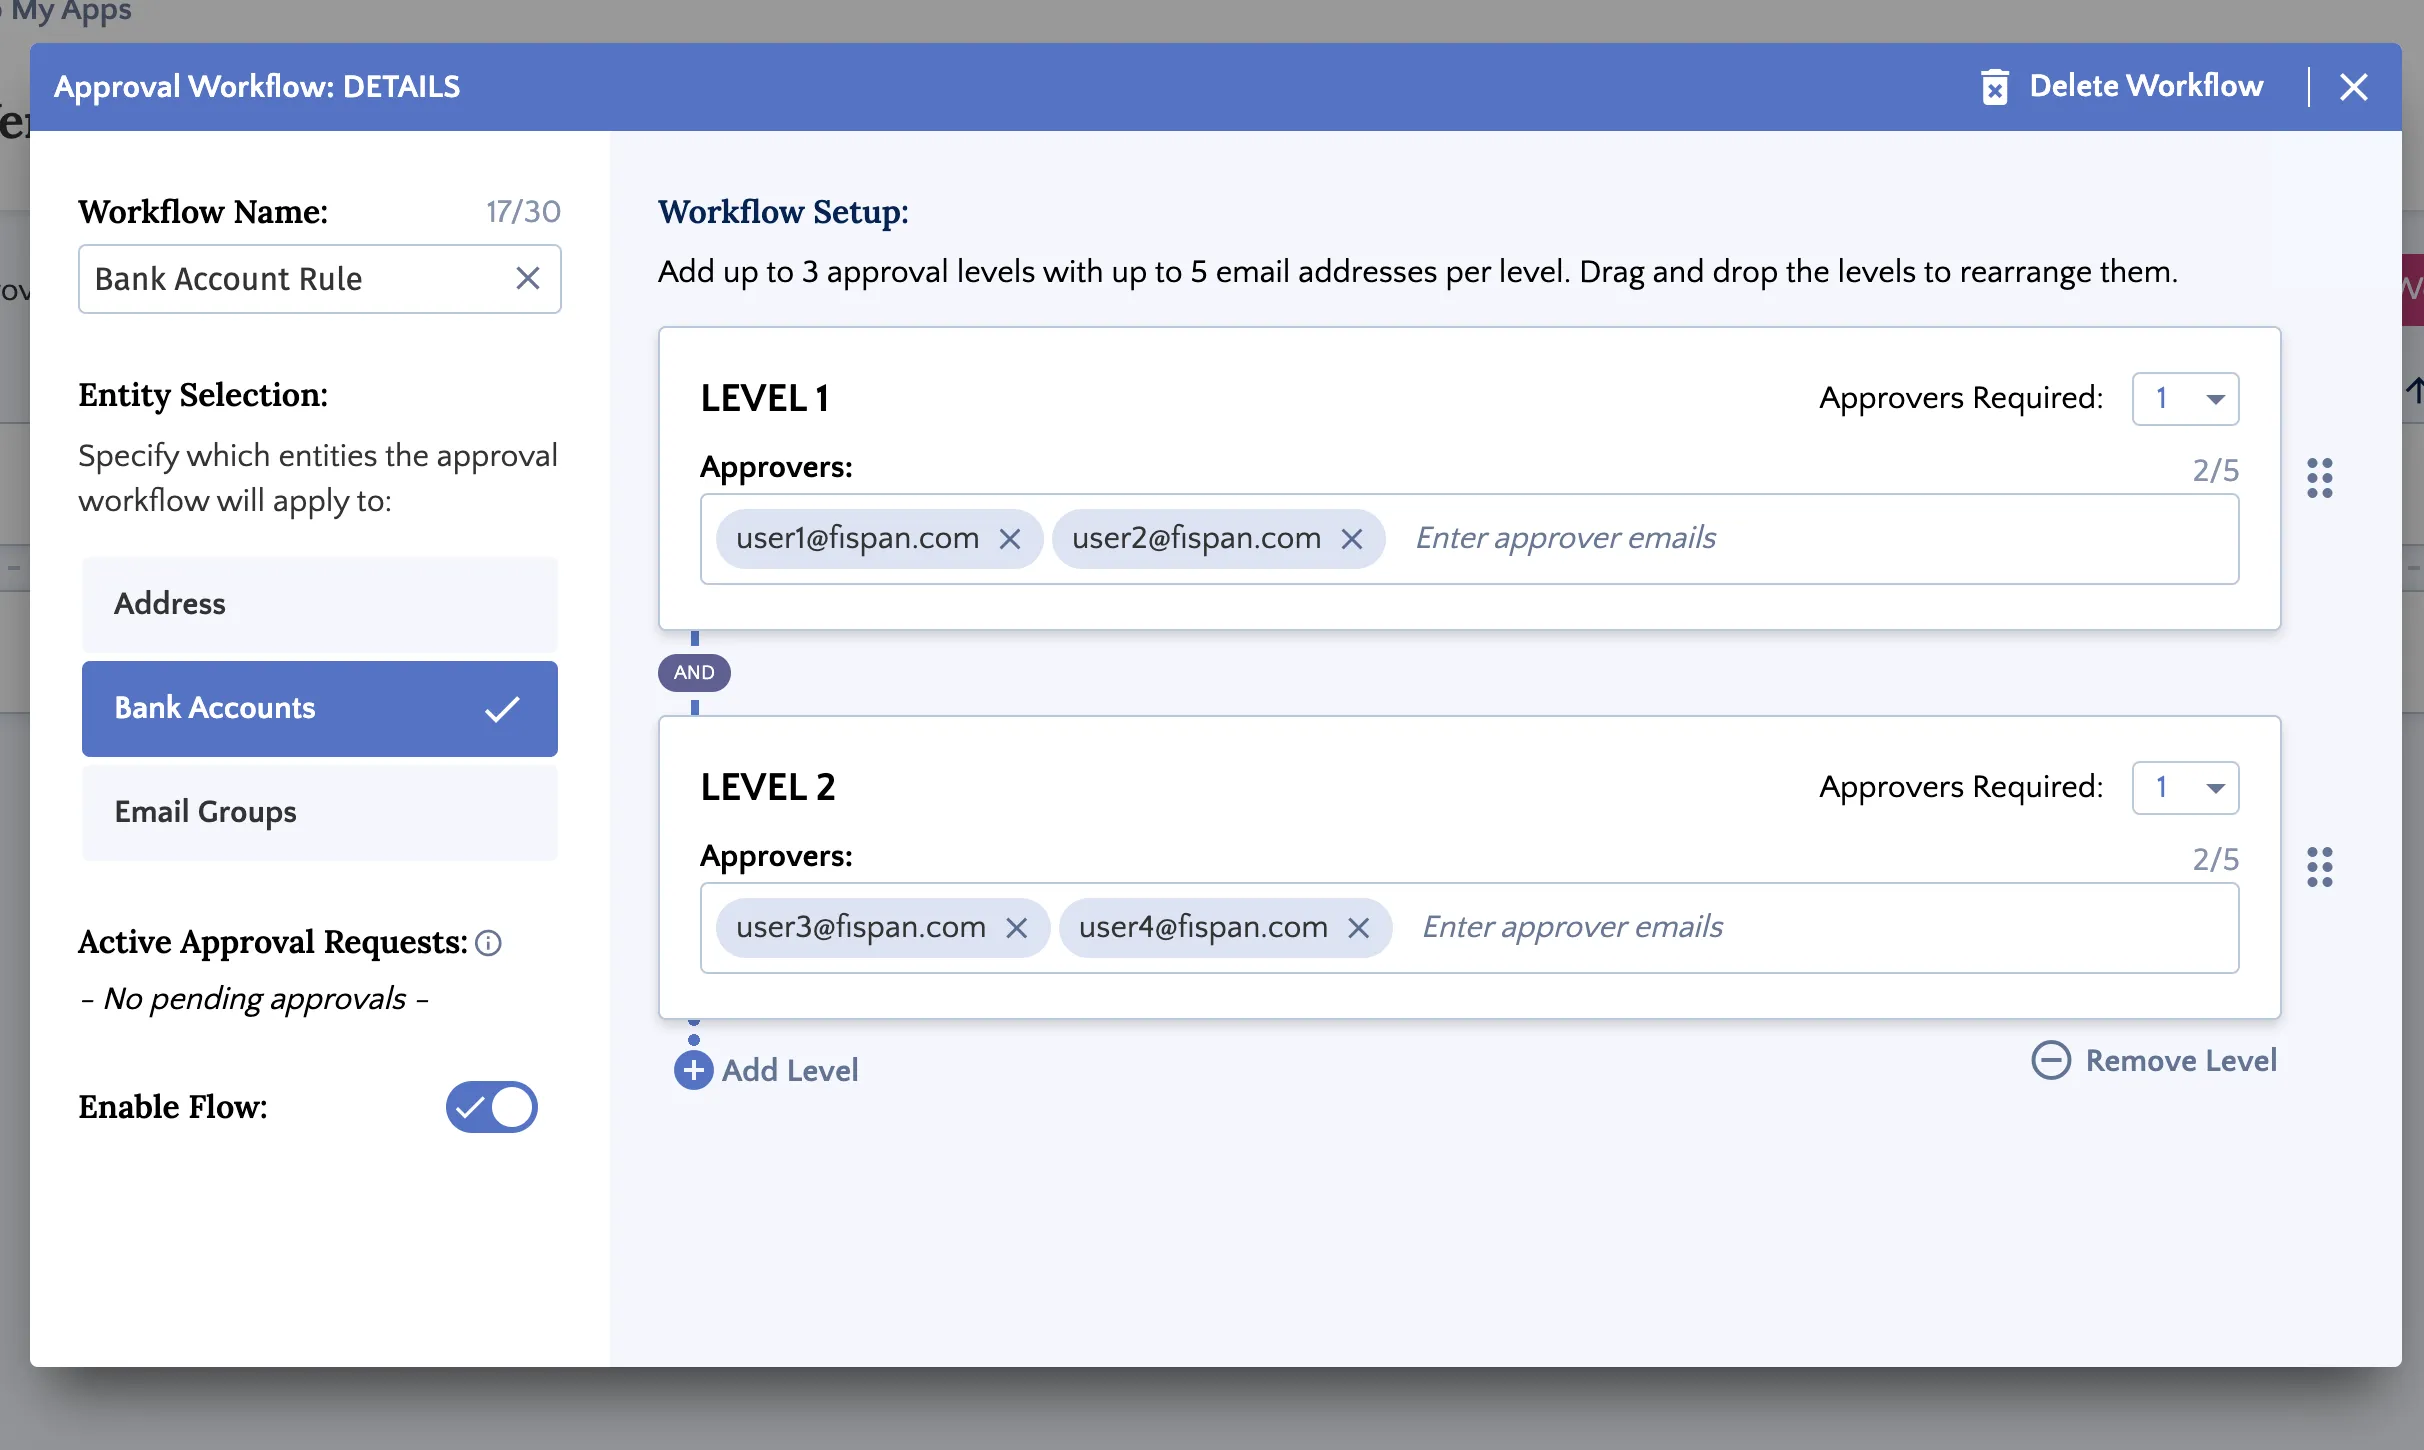
Workflows with pending approvals cannot be deleted until those approvals are resolved. Deleting an active workflow can be done following these simple steps.
Select Workflow
Select the workflow to delete. Then, click Delete Workflow.
Confirm Deletion
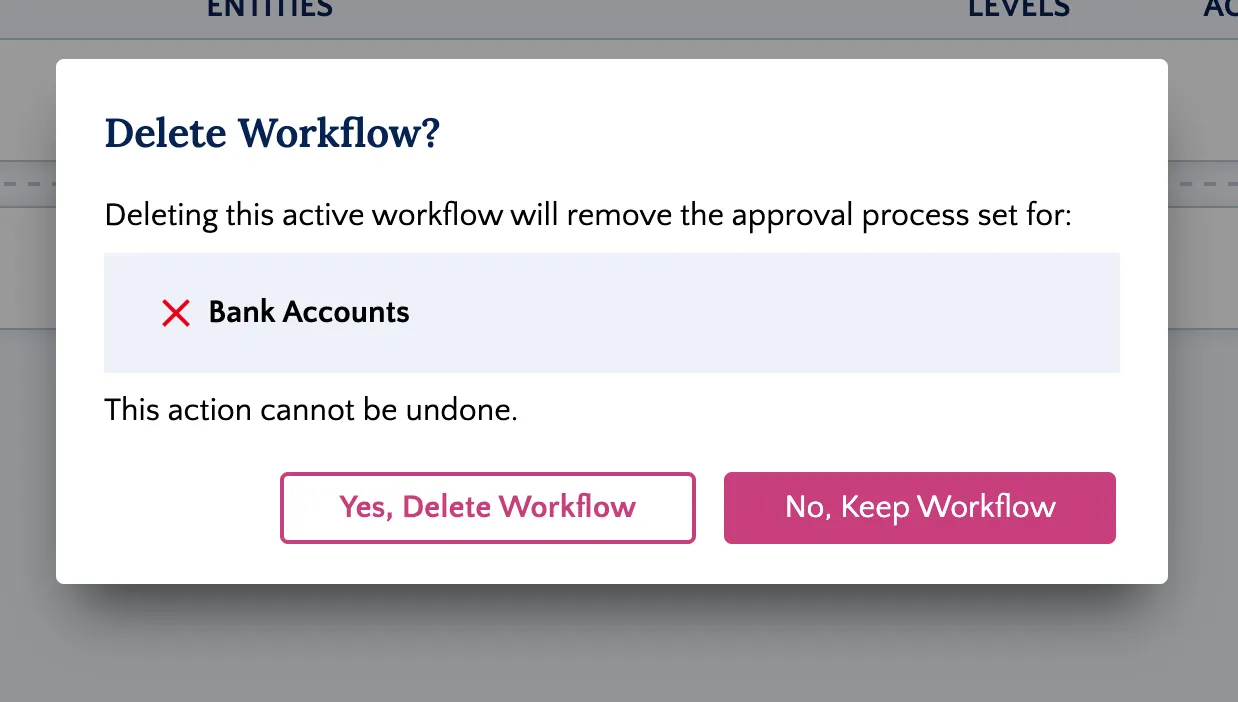
A pop-up will appear. Confirm deletion by clicking Yes, Delete Workflow.
Disabling a Workflow
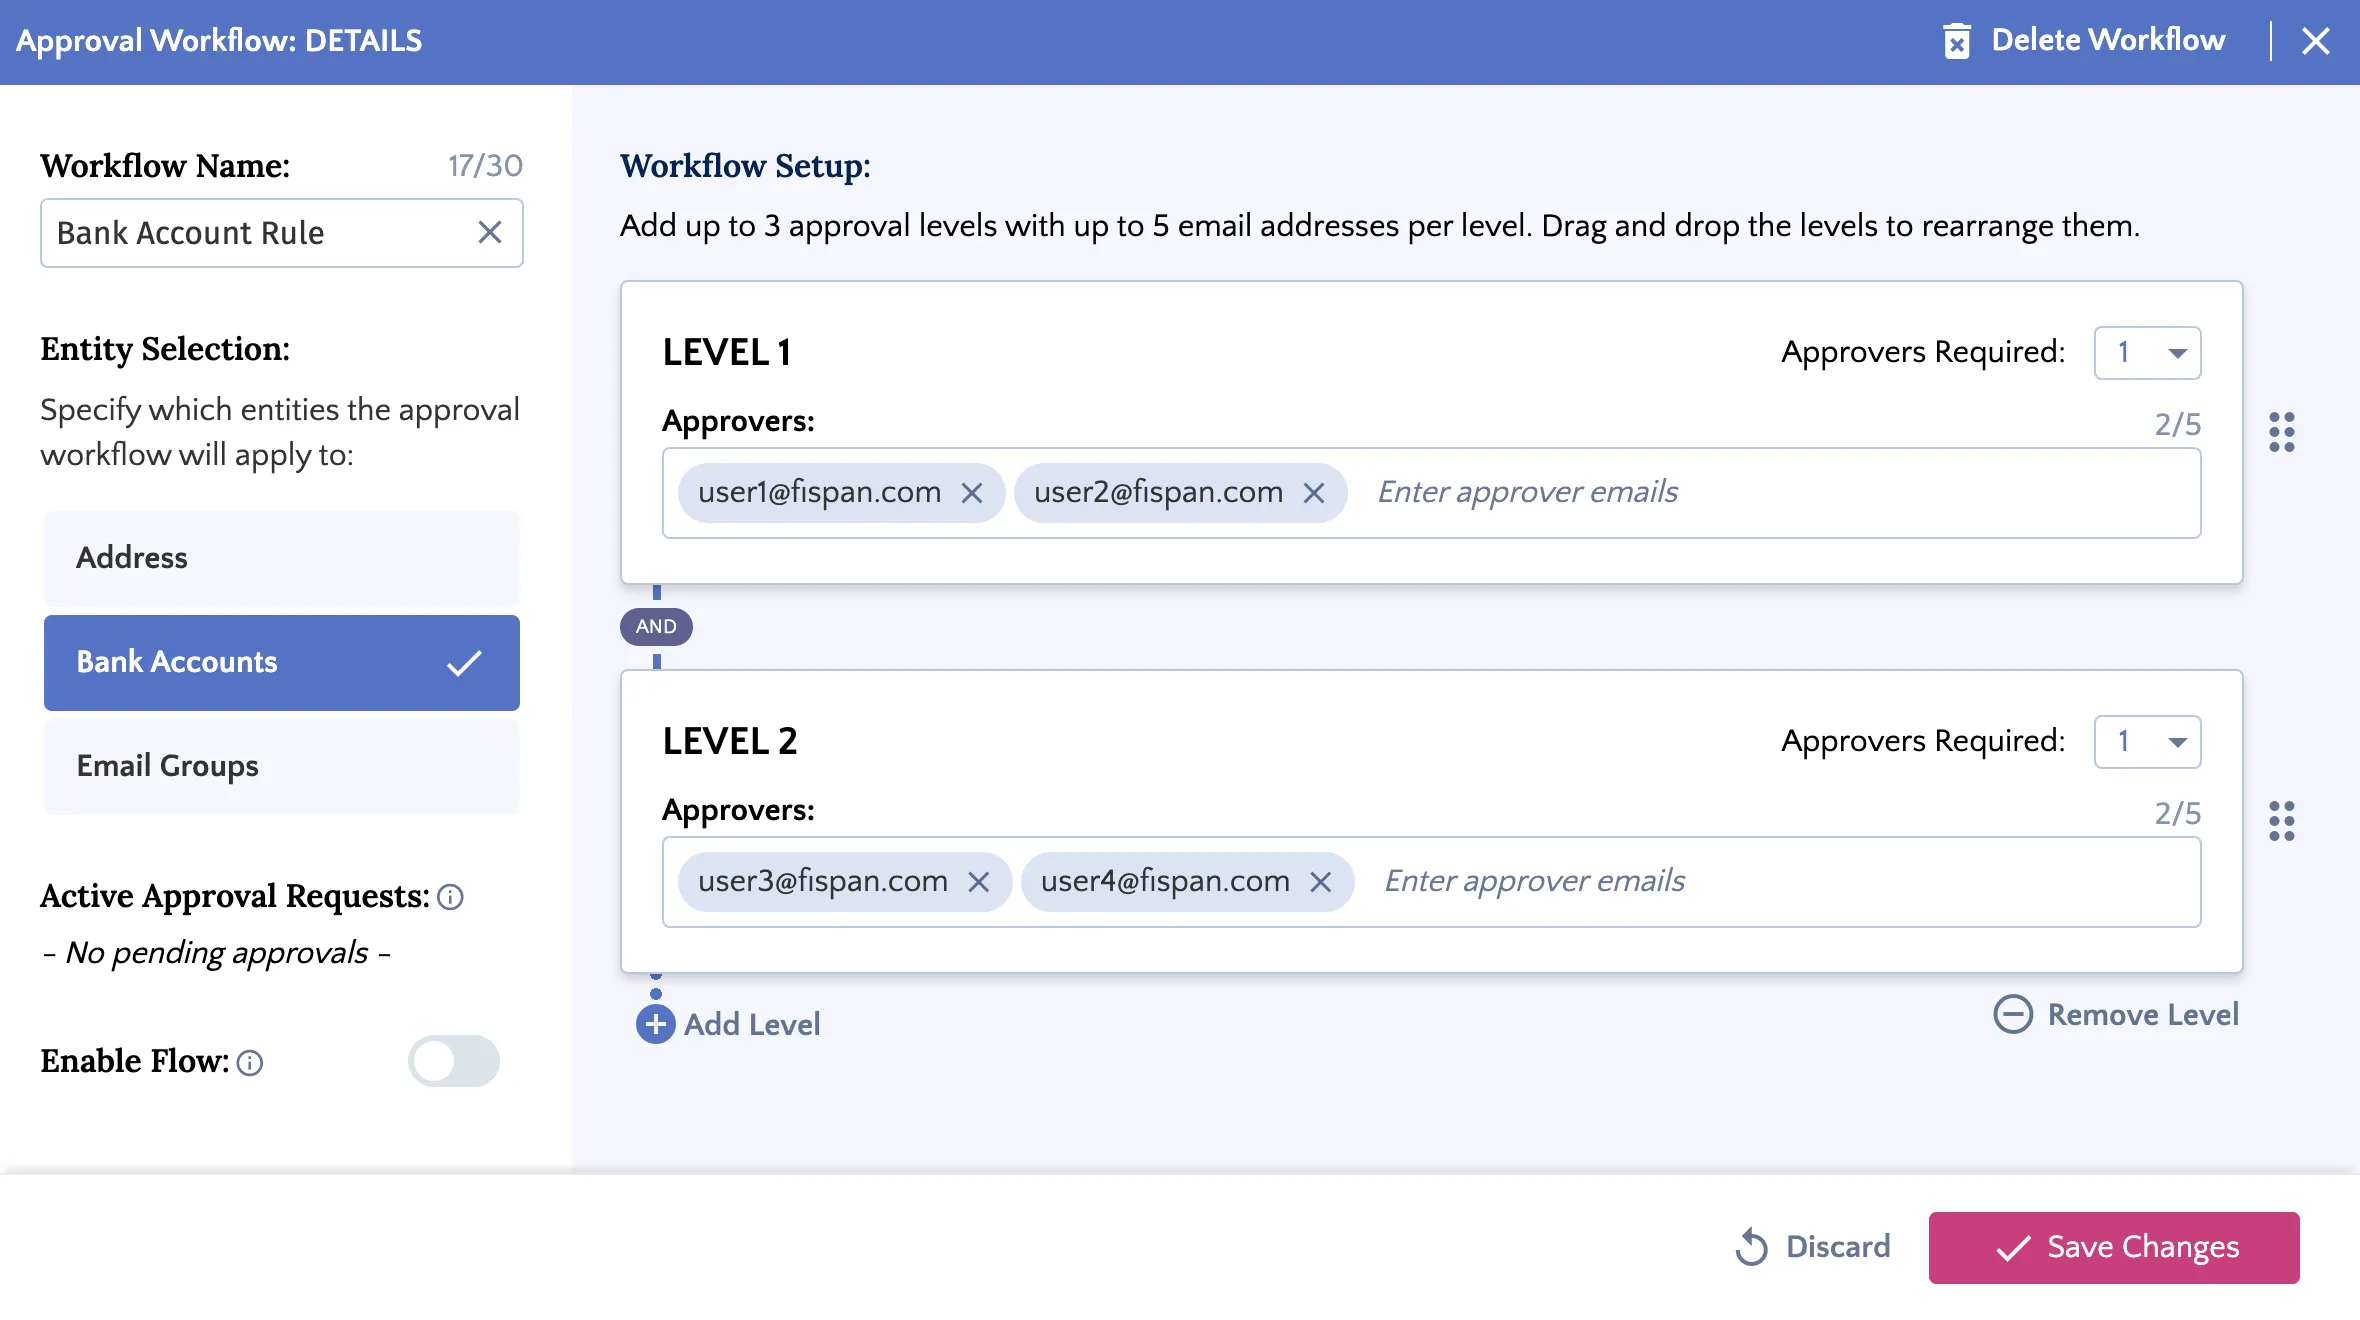
To disable a workflow, toggle Enable Flow. Then click Save Changes.
NetSuite Required Permissions
To get access to the Payment Method Approvals page, please have your ERP Administrator navigate to the role to Customization → Scripting → Script Deployment. Use the following filters:
- On the Type dropdown, select Suitelet
- On the API Version dropdown, select 2.1.
Edit the CNB Pymt Method Approvals Suitelet script and, under the Audience tab, add roles that require access to Payment Method Approvals.
Accessing Pending Approvals
Navigate to the Payment Method Approvals page within the ERP plugin. By default, you'll see all pending approval requests for your organization.
The Approvals page table provides a comprehensive overview of each payment request, with the following key details:
- Request Date: The precise date when the payment was initiated within the plugin.
- Payee: The name of the payee that had their record modified.
- Entity: The type of data changed. It will be either address, bank account or email group.
- User/Requested By: The name of the user who submitted the payment request.
- Source: Where the change was made. It will be either Plugin UI or ERP.
- Approval Progress: A tracker which provides context to where a payment is within the approval process.
To view only the requests assigned to you, click the Show Assigned To Me Only filter.
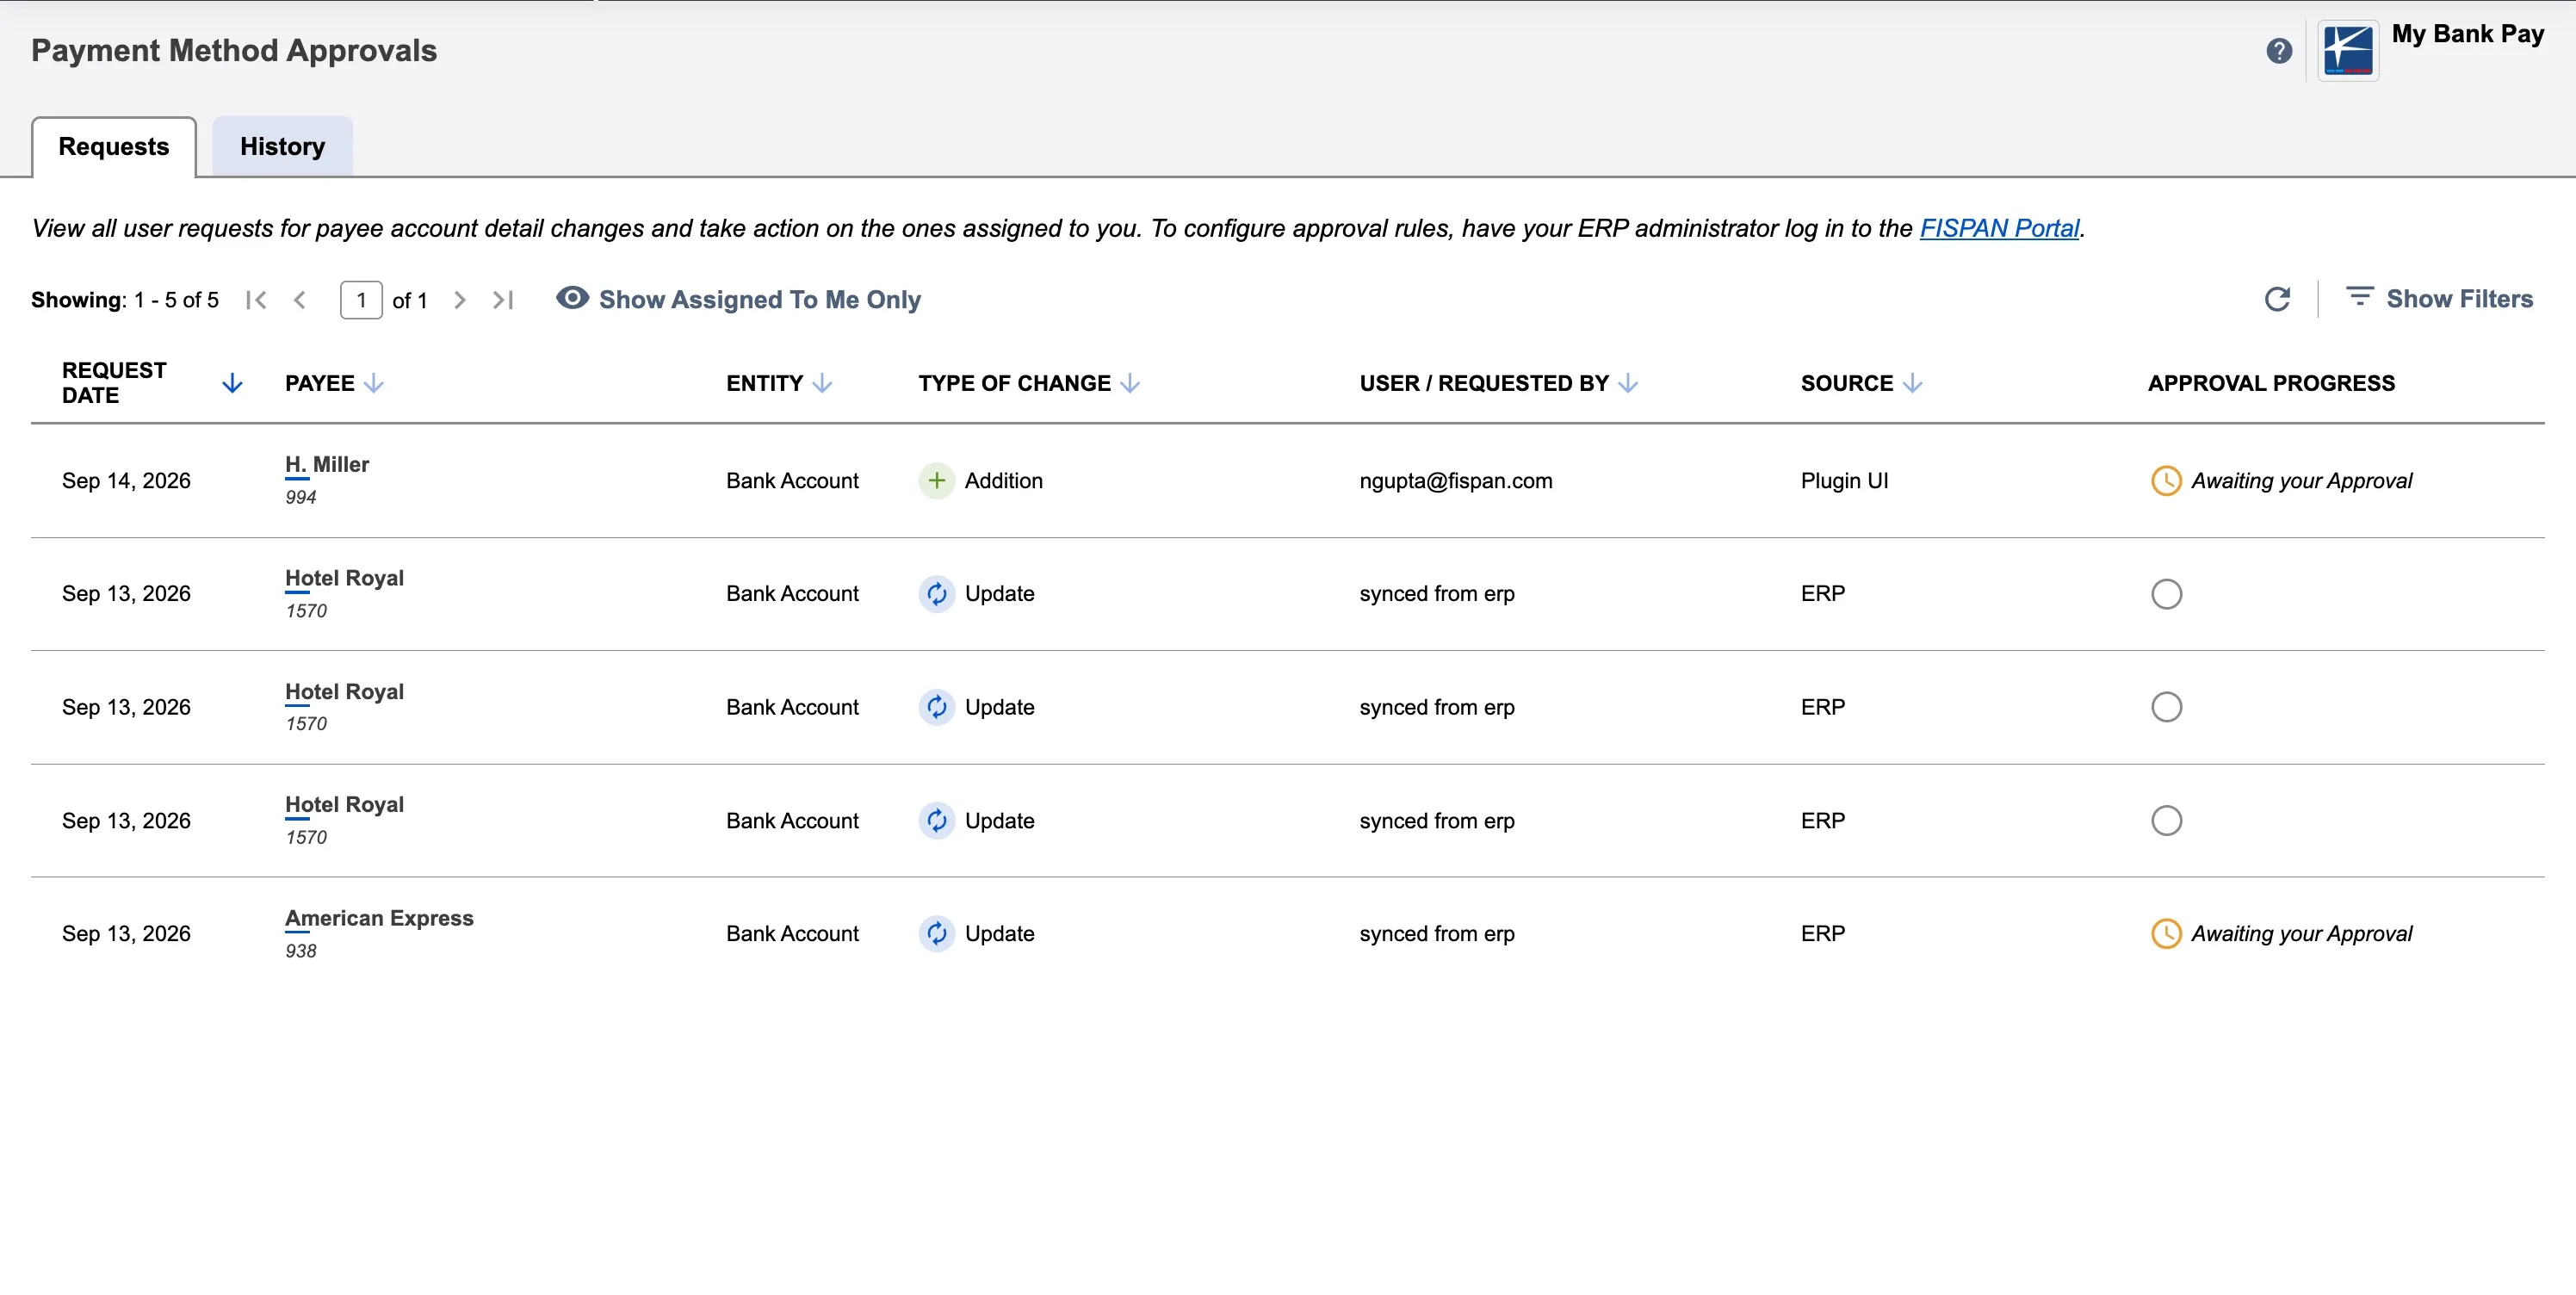
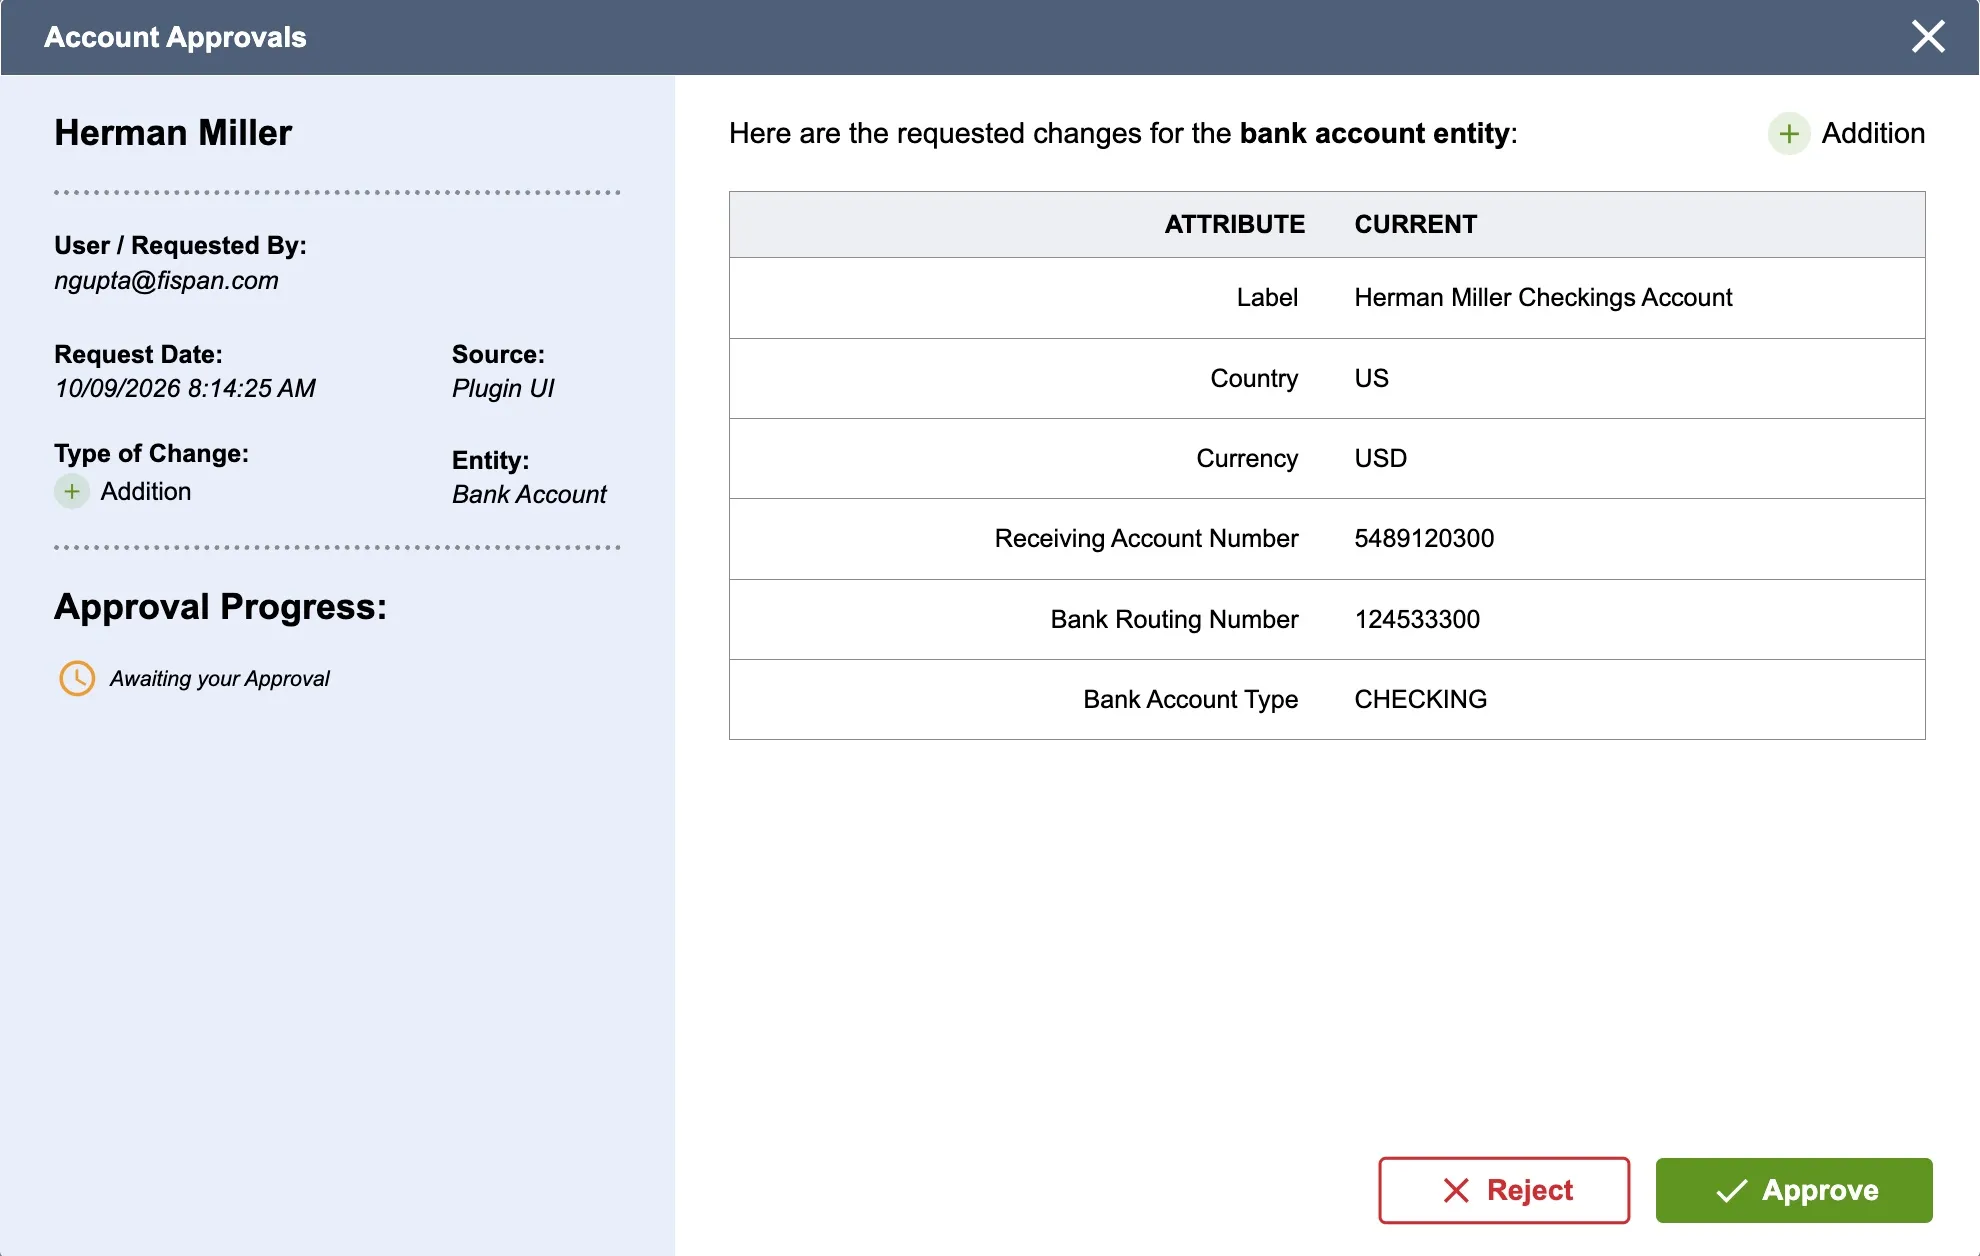
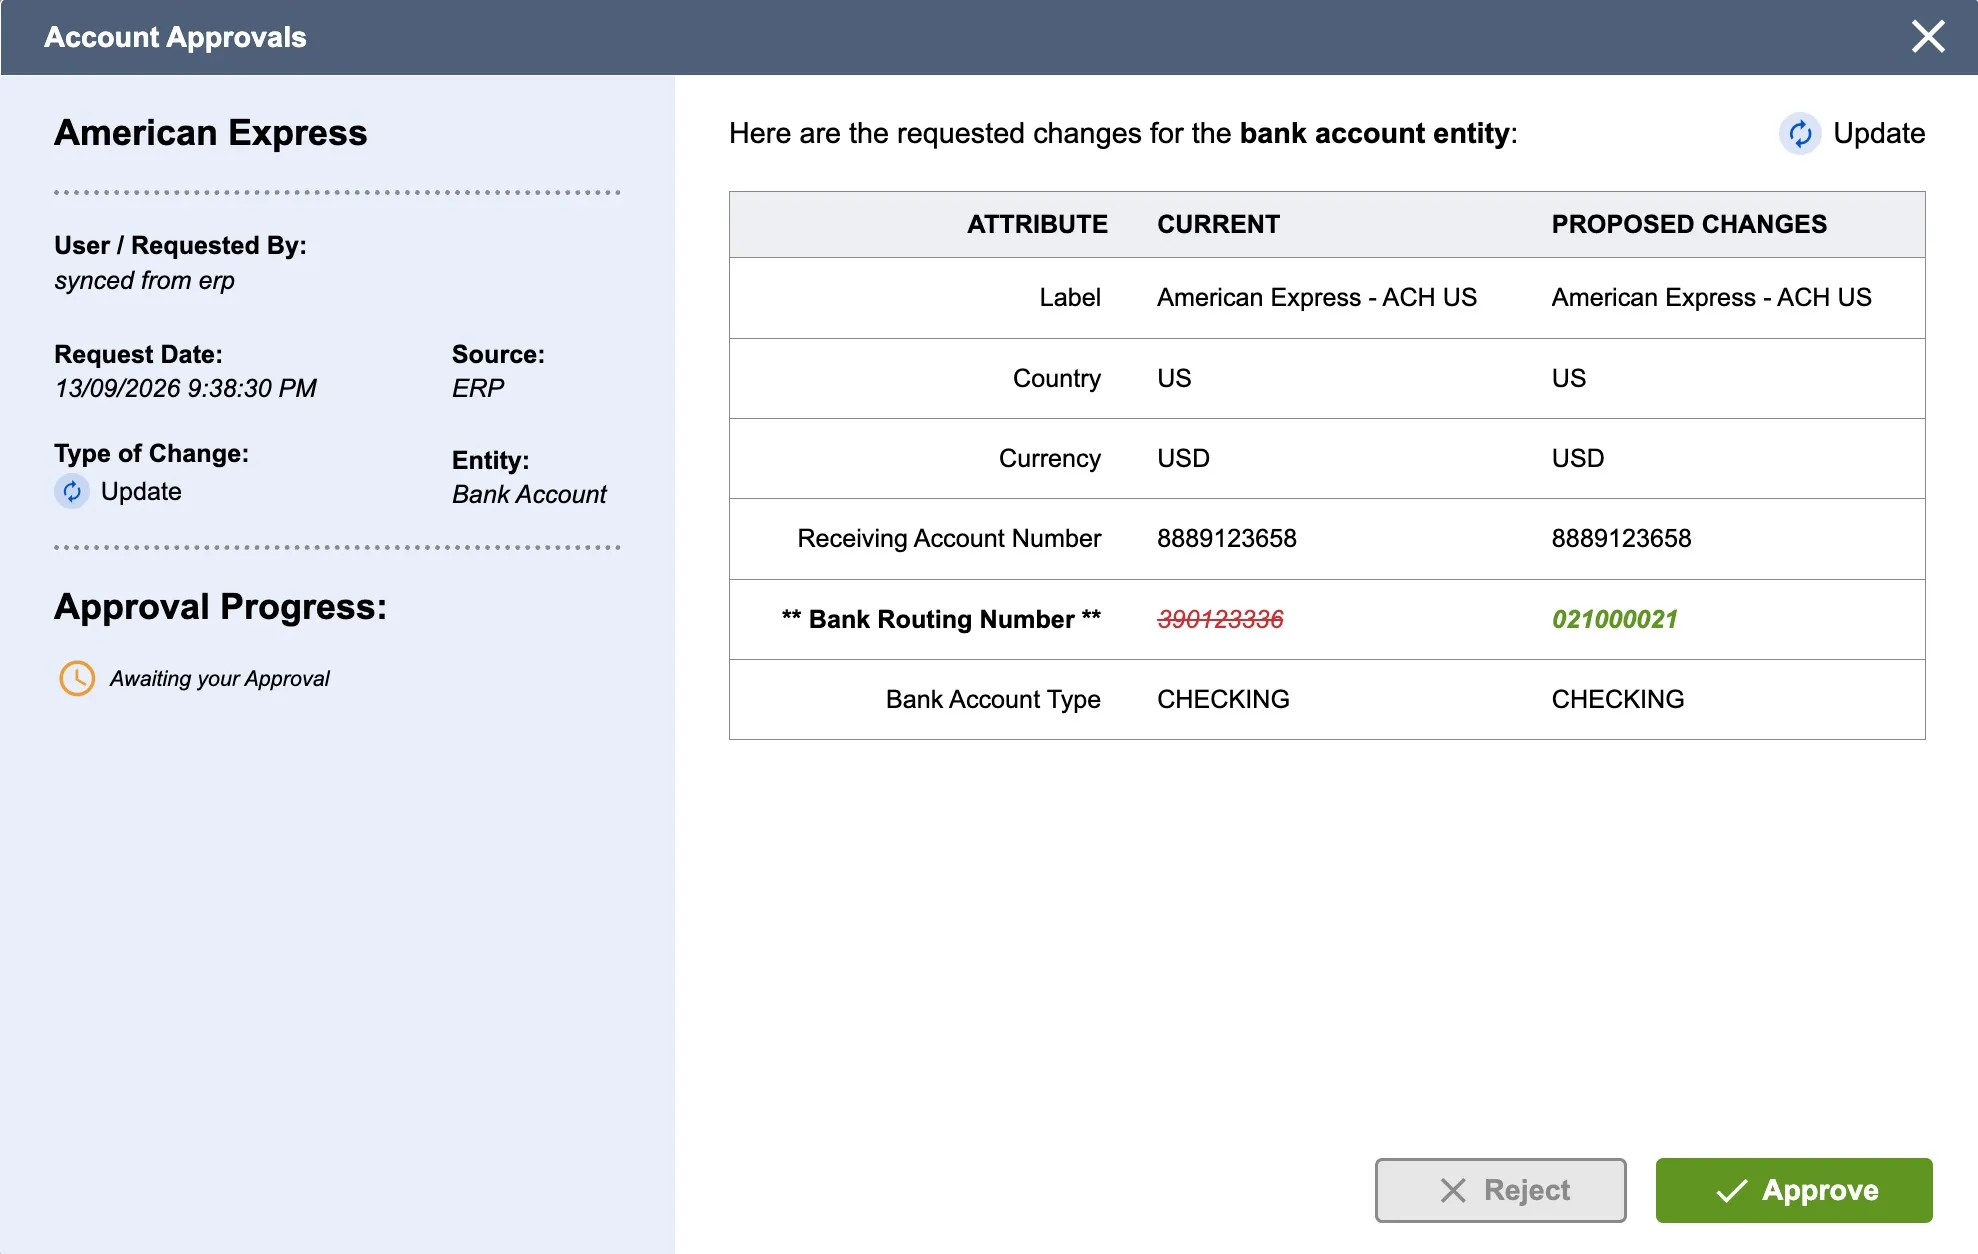
To review a specific request, click View. This will display key information such as:
- Type of Change: Whether it's an update to existing details, a new payee bank detail, or a deletion of a payee bank detail.
- Requested Date: The date and time the change was submitted.
- Requester: The user who initiated the change.
- Detailed Breakdown: A comprehensive view of the proposed changes, addition, or deletion to the payee's bank details.
Approval Process
To approve a request:
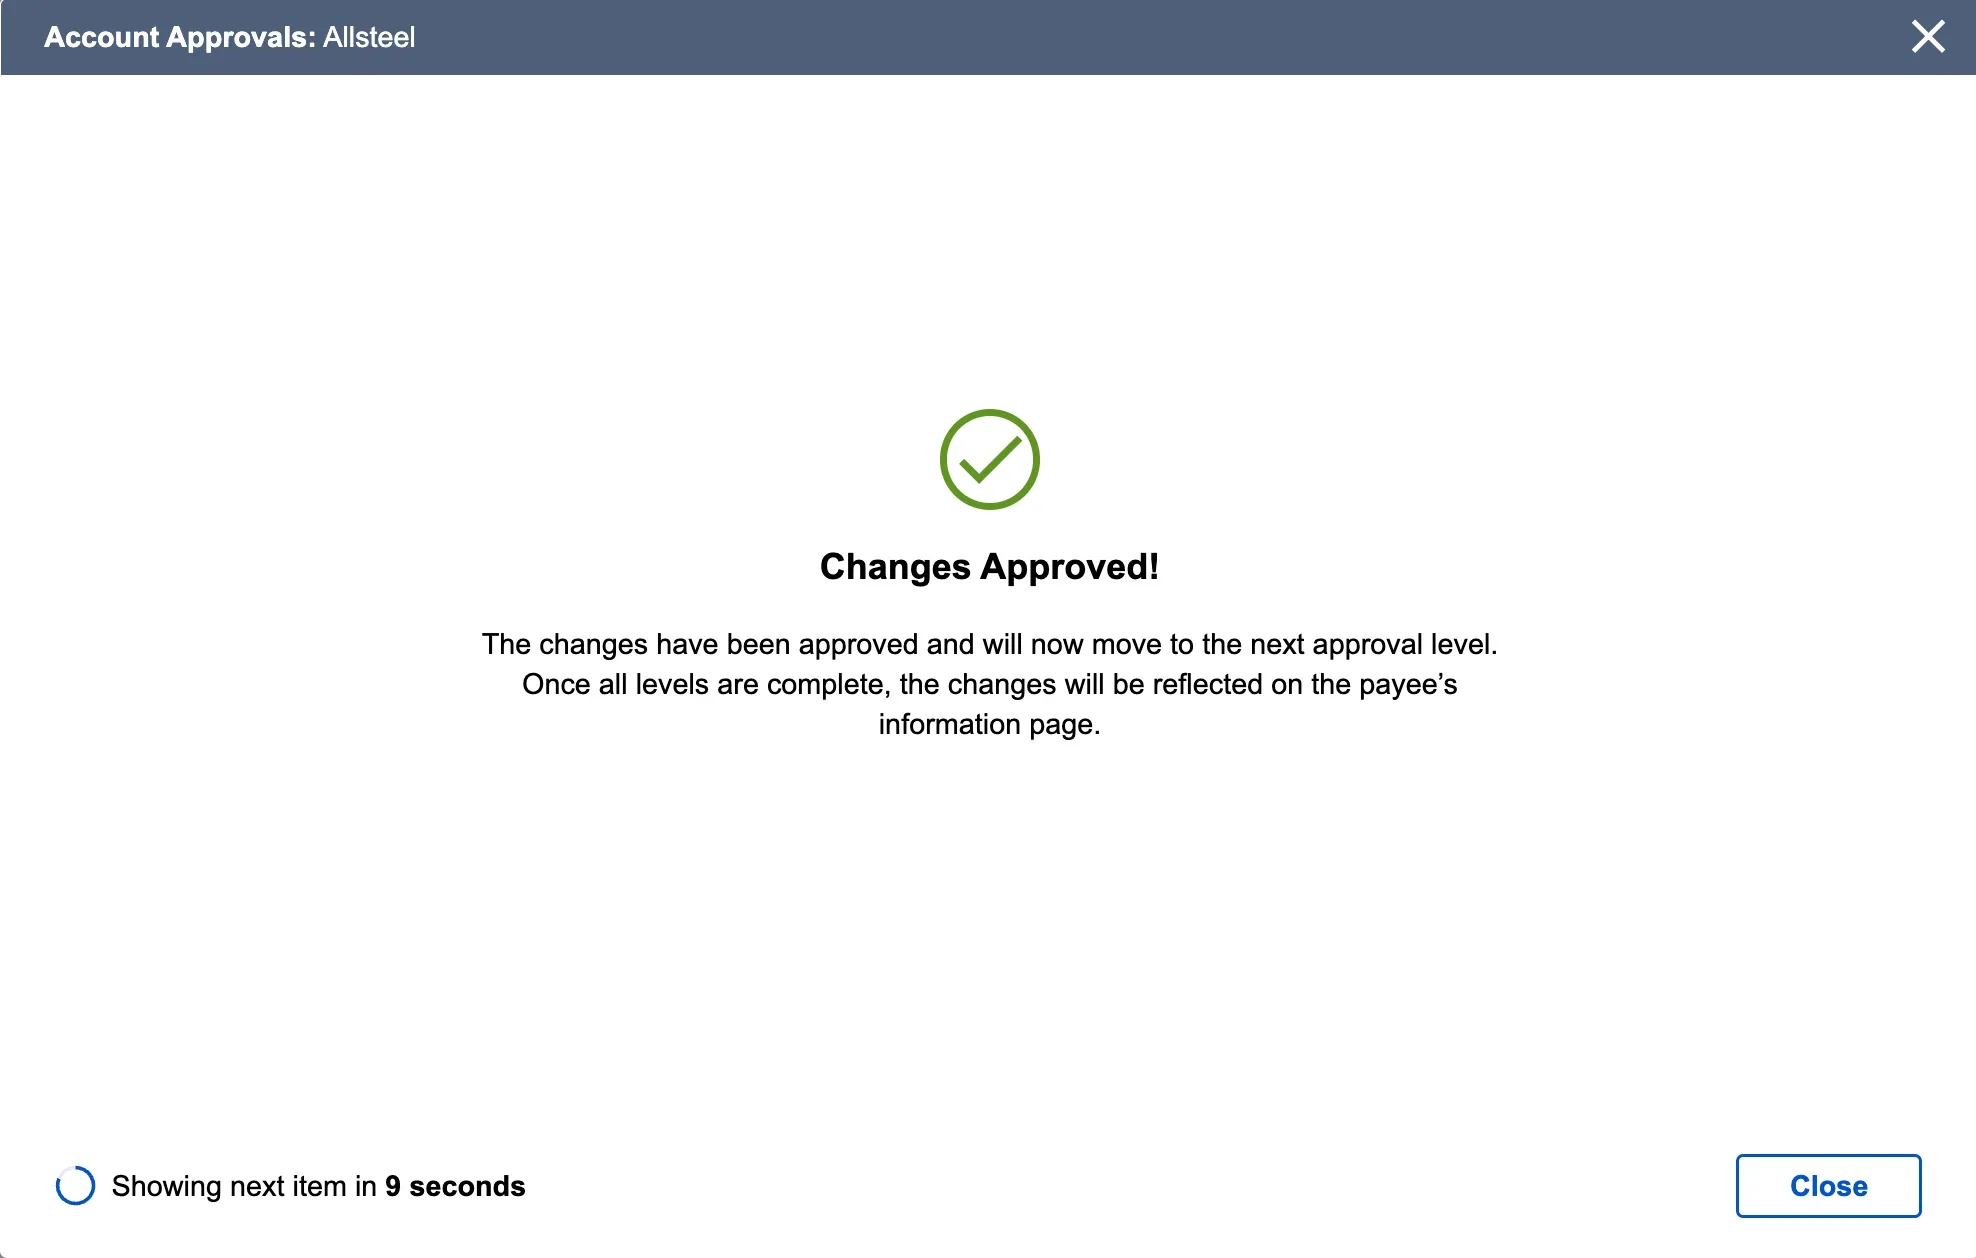
Click Approve to authorize the proposed changes.
The request will either progress to the next level in the approval workflow (if multiple tiers are configured) or, if you are the final approver, the payee's bank details will be updated accordingly in the Payment Methods page.
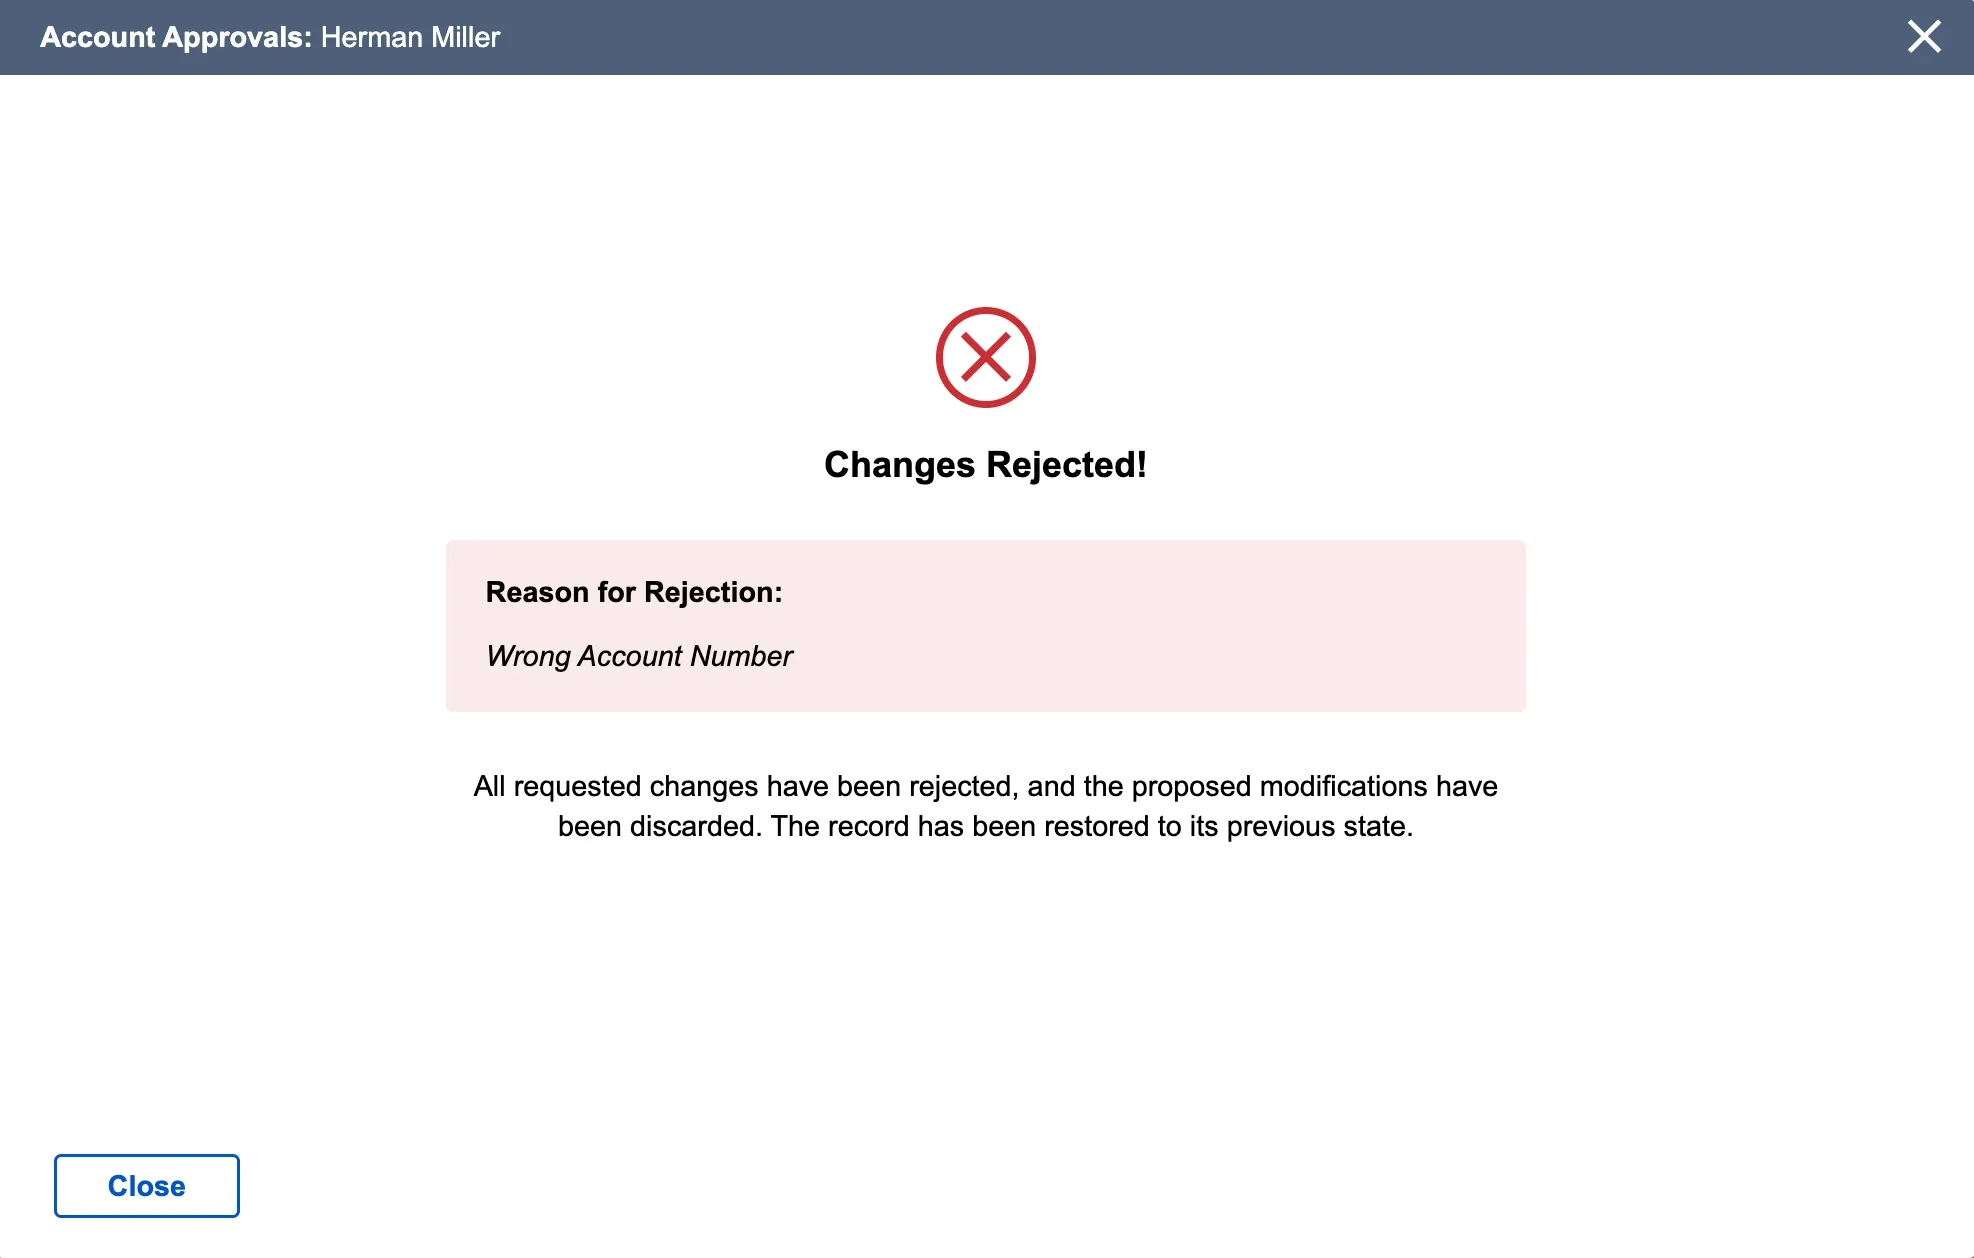
To reject a request:
Click Reject to deny the proposed changes.
Important: Rejection is a terminal action. If a change is rejected in error, the initiating user will need to resubmit the request.
You will be required to provide a rejection reason.
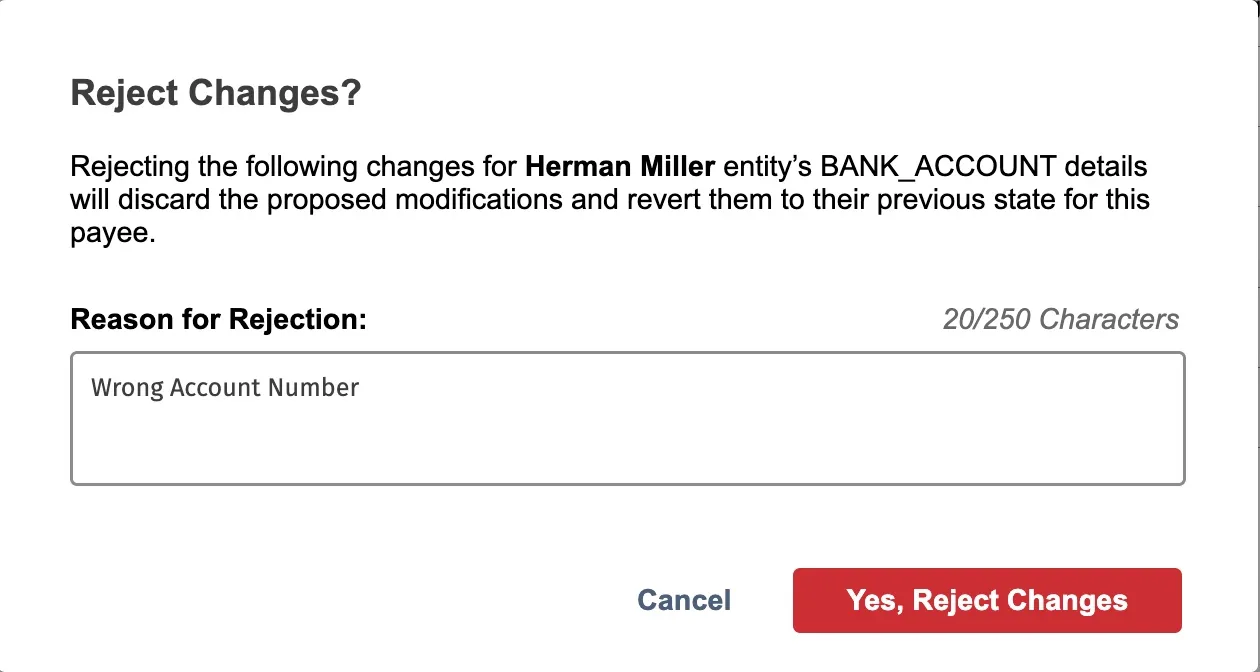
Since rejections are terminal, the request will not be routed to any other approvers and the proposed changes will be reverted.
ERP Synced Changes
- Rejection Disabled: For changes that originate from your ERP system (ERP-synced changes), the "Reject" button will be disabled.
- Rationale: This restriction is in place to prevent accidental overwrites or conflicts with the data in your ERP. Maintaining consistency between the plugin and your ERP is crucial.
- Resolution: If an ERP-synced change needs to be reversed or modified, the initiating user must make the necessary adjustments directly within the ERP system.
Note: If you would like ERP synced changes to not be eligible for Approval, please reach out to the support team.
Impact on Workflows
When an approval request is created by modifying a payee's payment information, the following updates happen within your plugin.
Payments/Expense Reimbursements Page
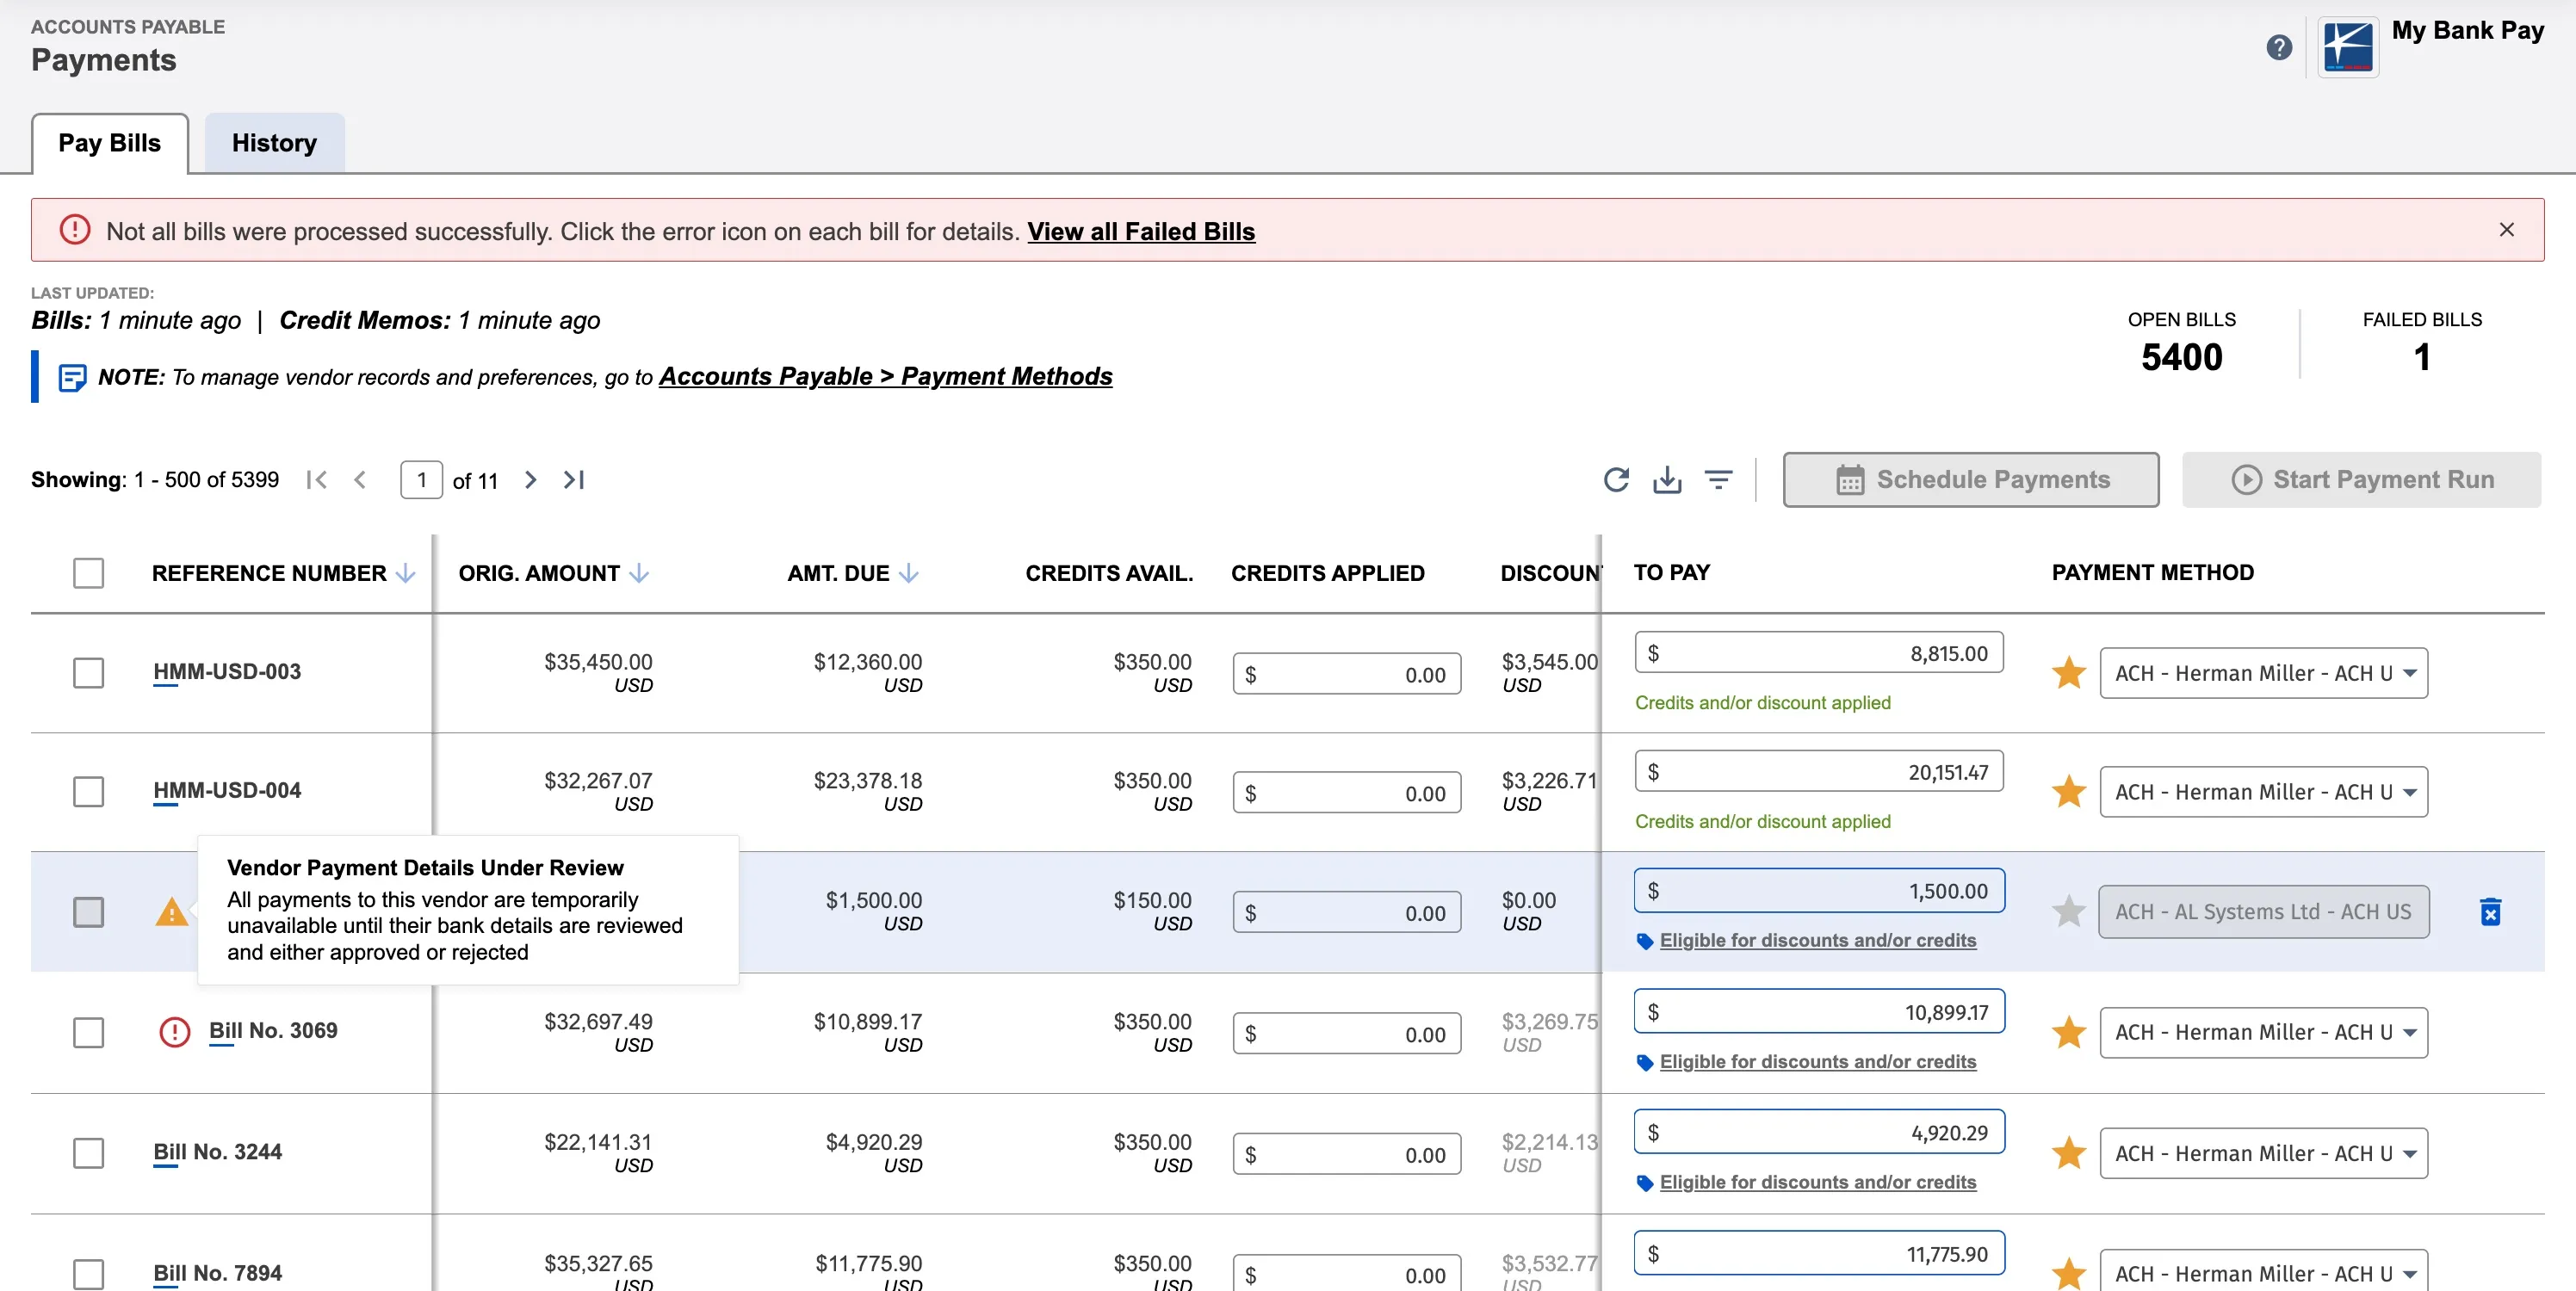
When a payee has a pending change, payments cannot be processed for this payee. This is to ensure that the payee has the most up-to-date information before payments are processed.
A warning icon and greyed out checkbox will prevent these payees from being paid.
Payment Methods Page
On the Payment Methods page, the payee will have an icon identifying that there are pending changes.
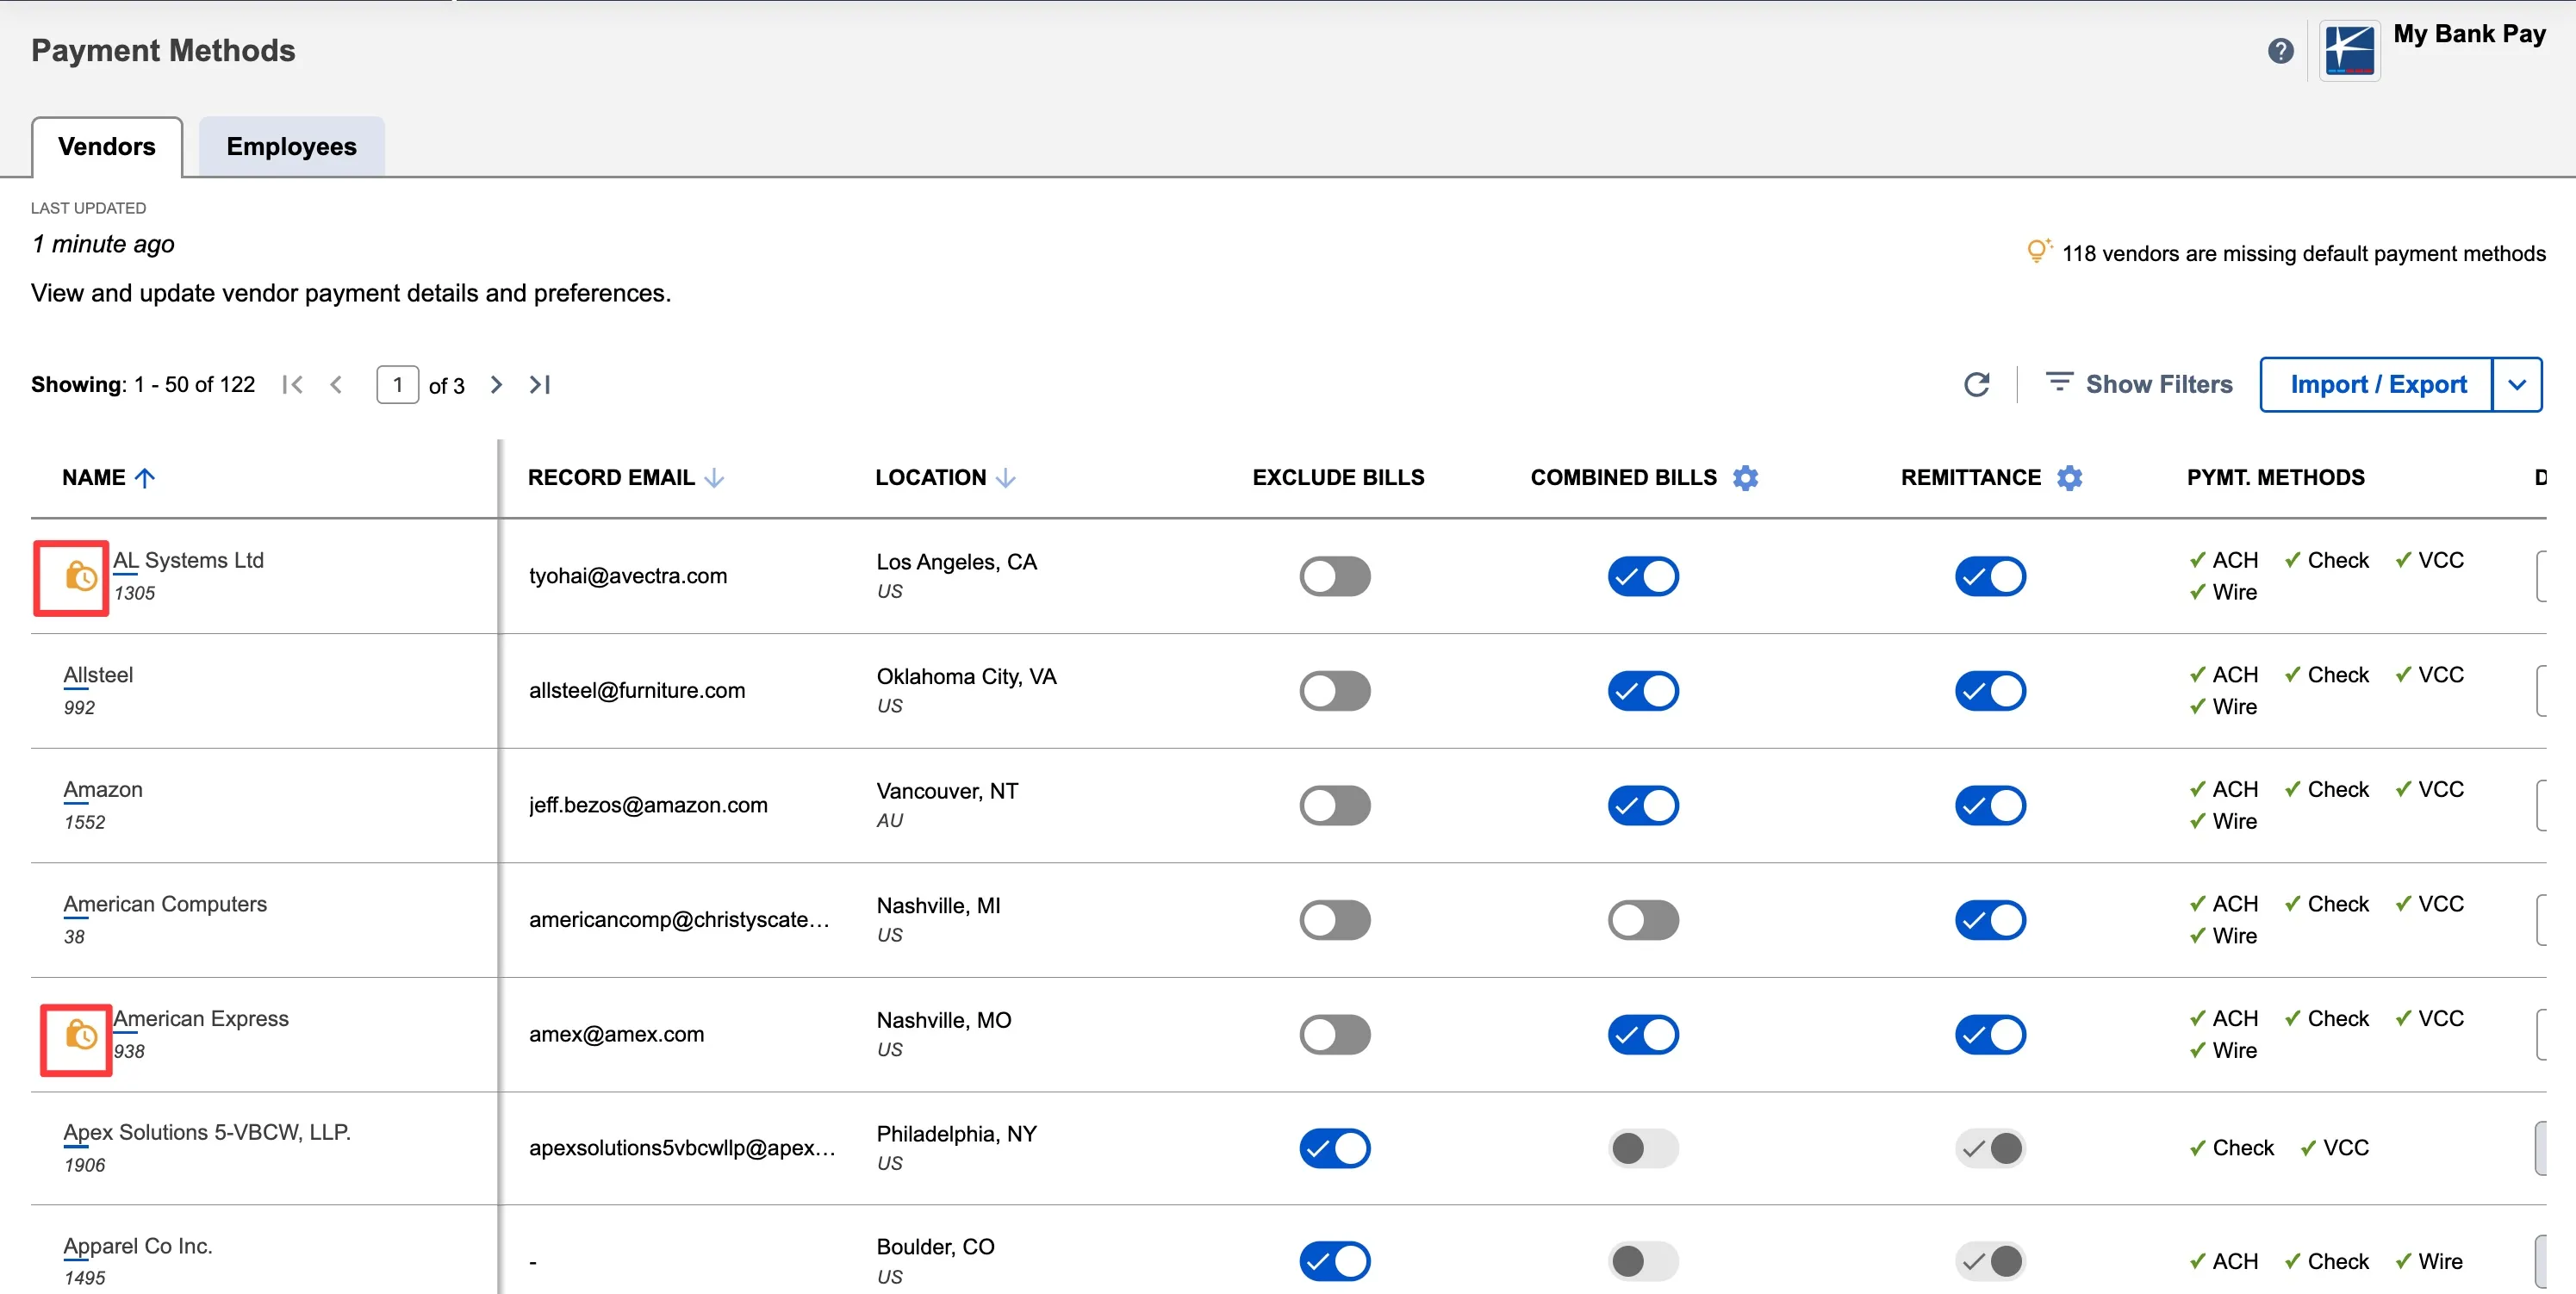
If you click on the payee, you will see that the record that has been changed is highlighted.
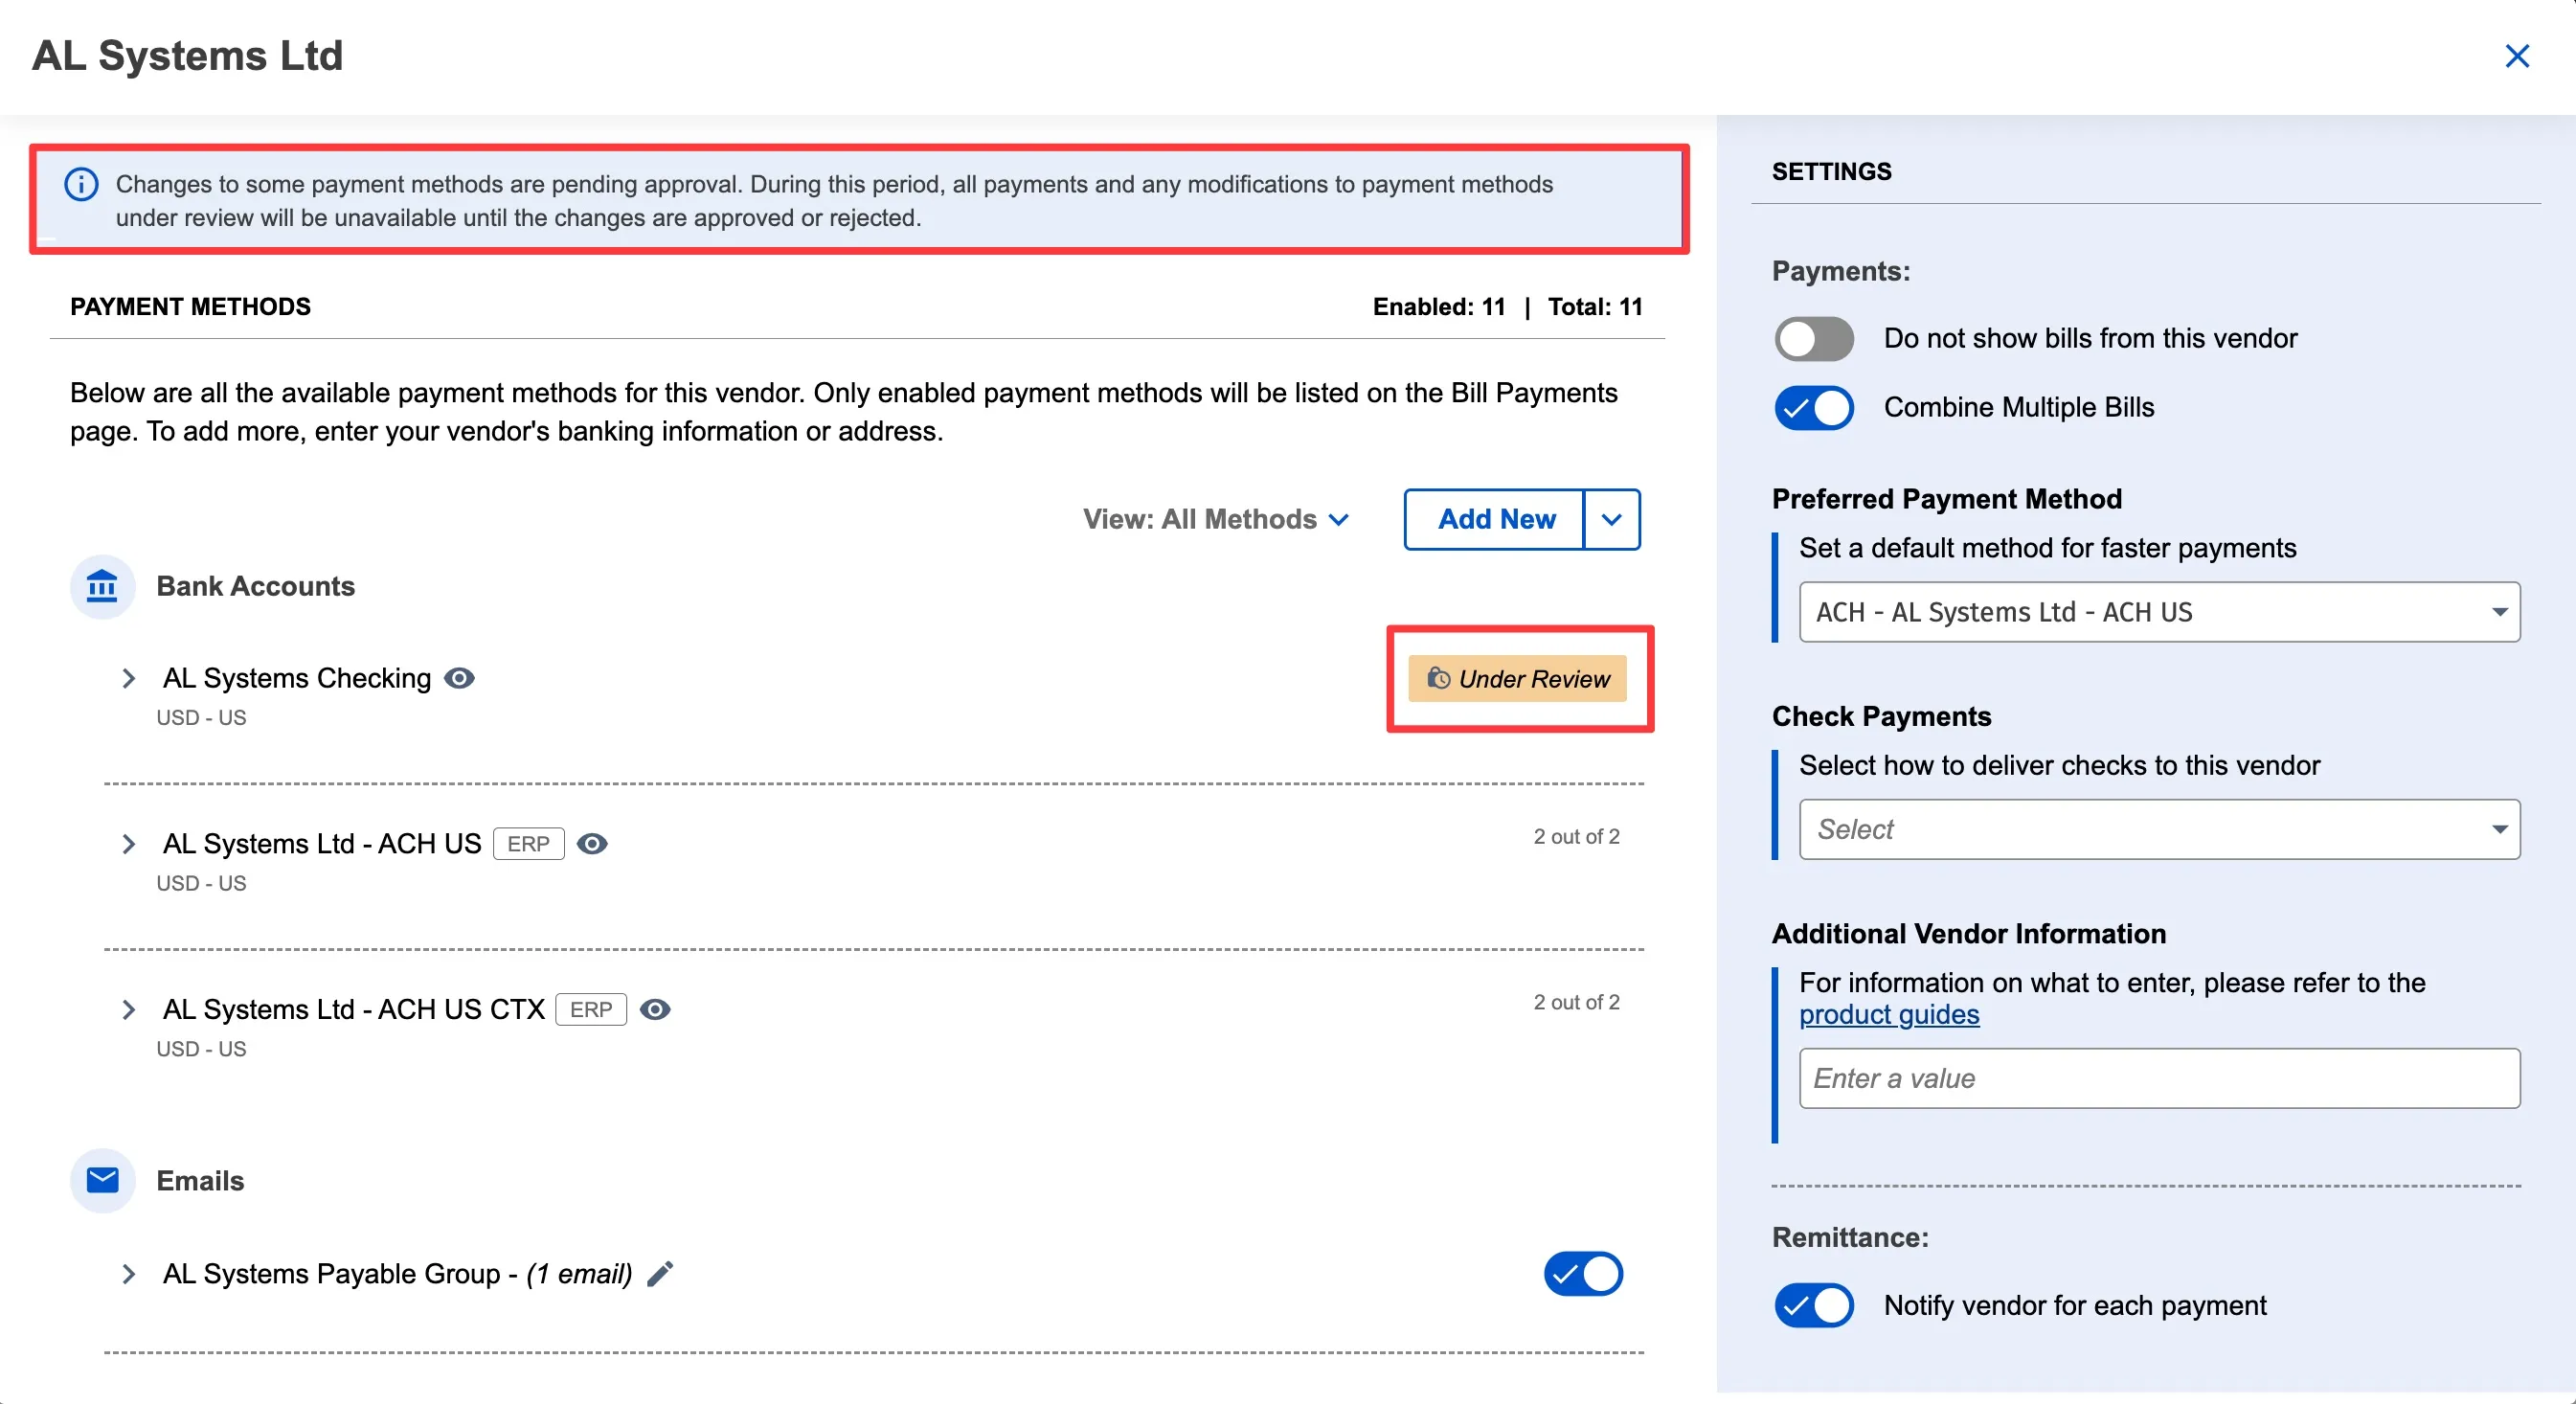
Furthermore, if you open the record, you will see that all fields are greyed out and cannot be edited.
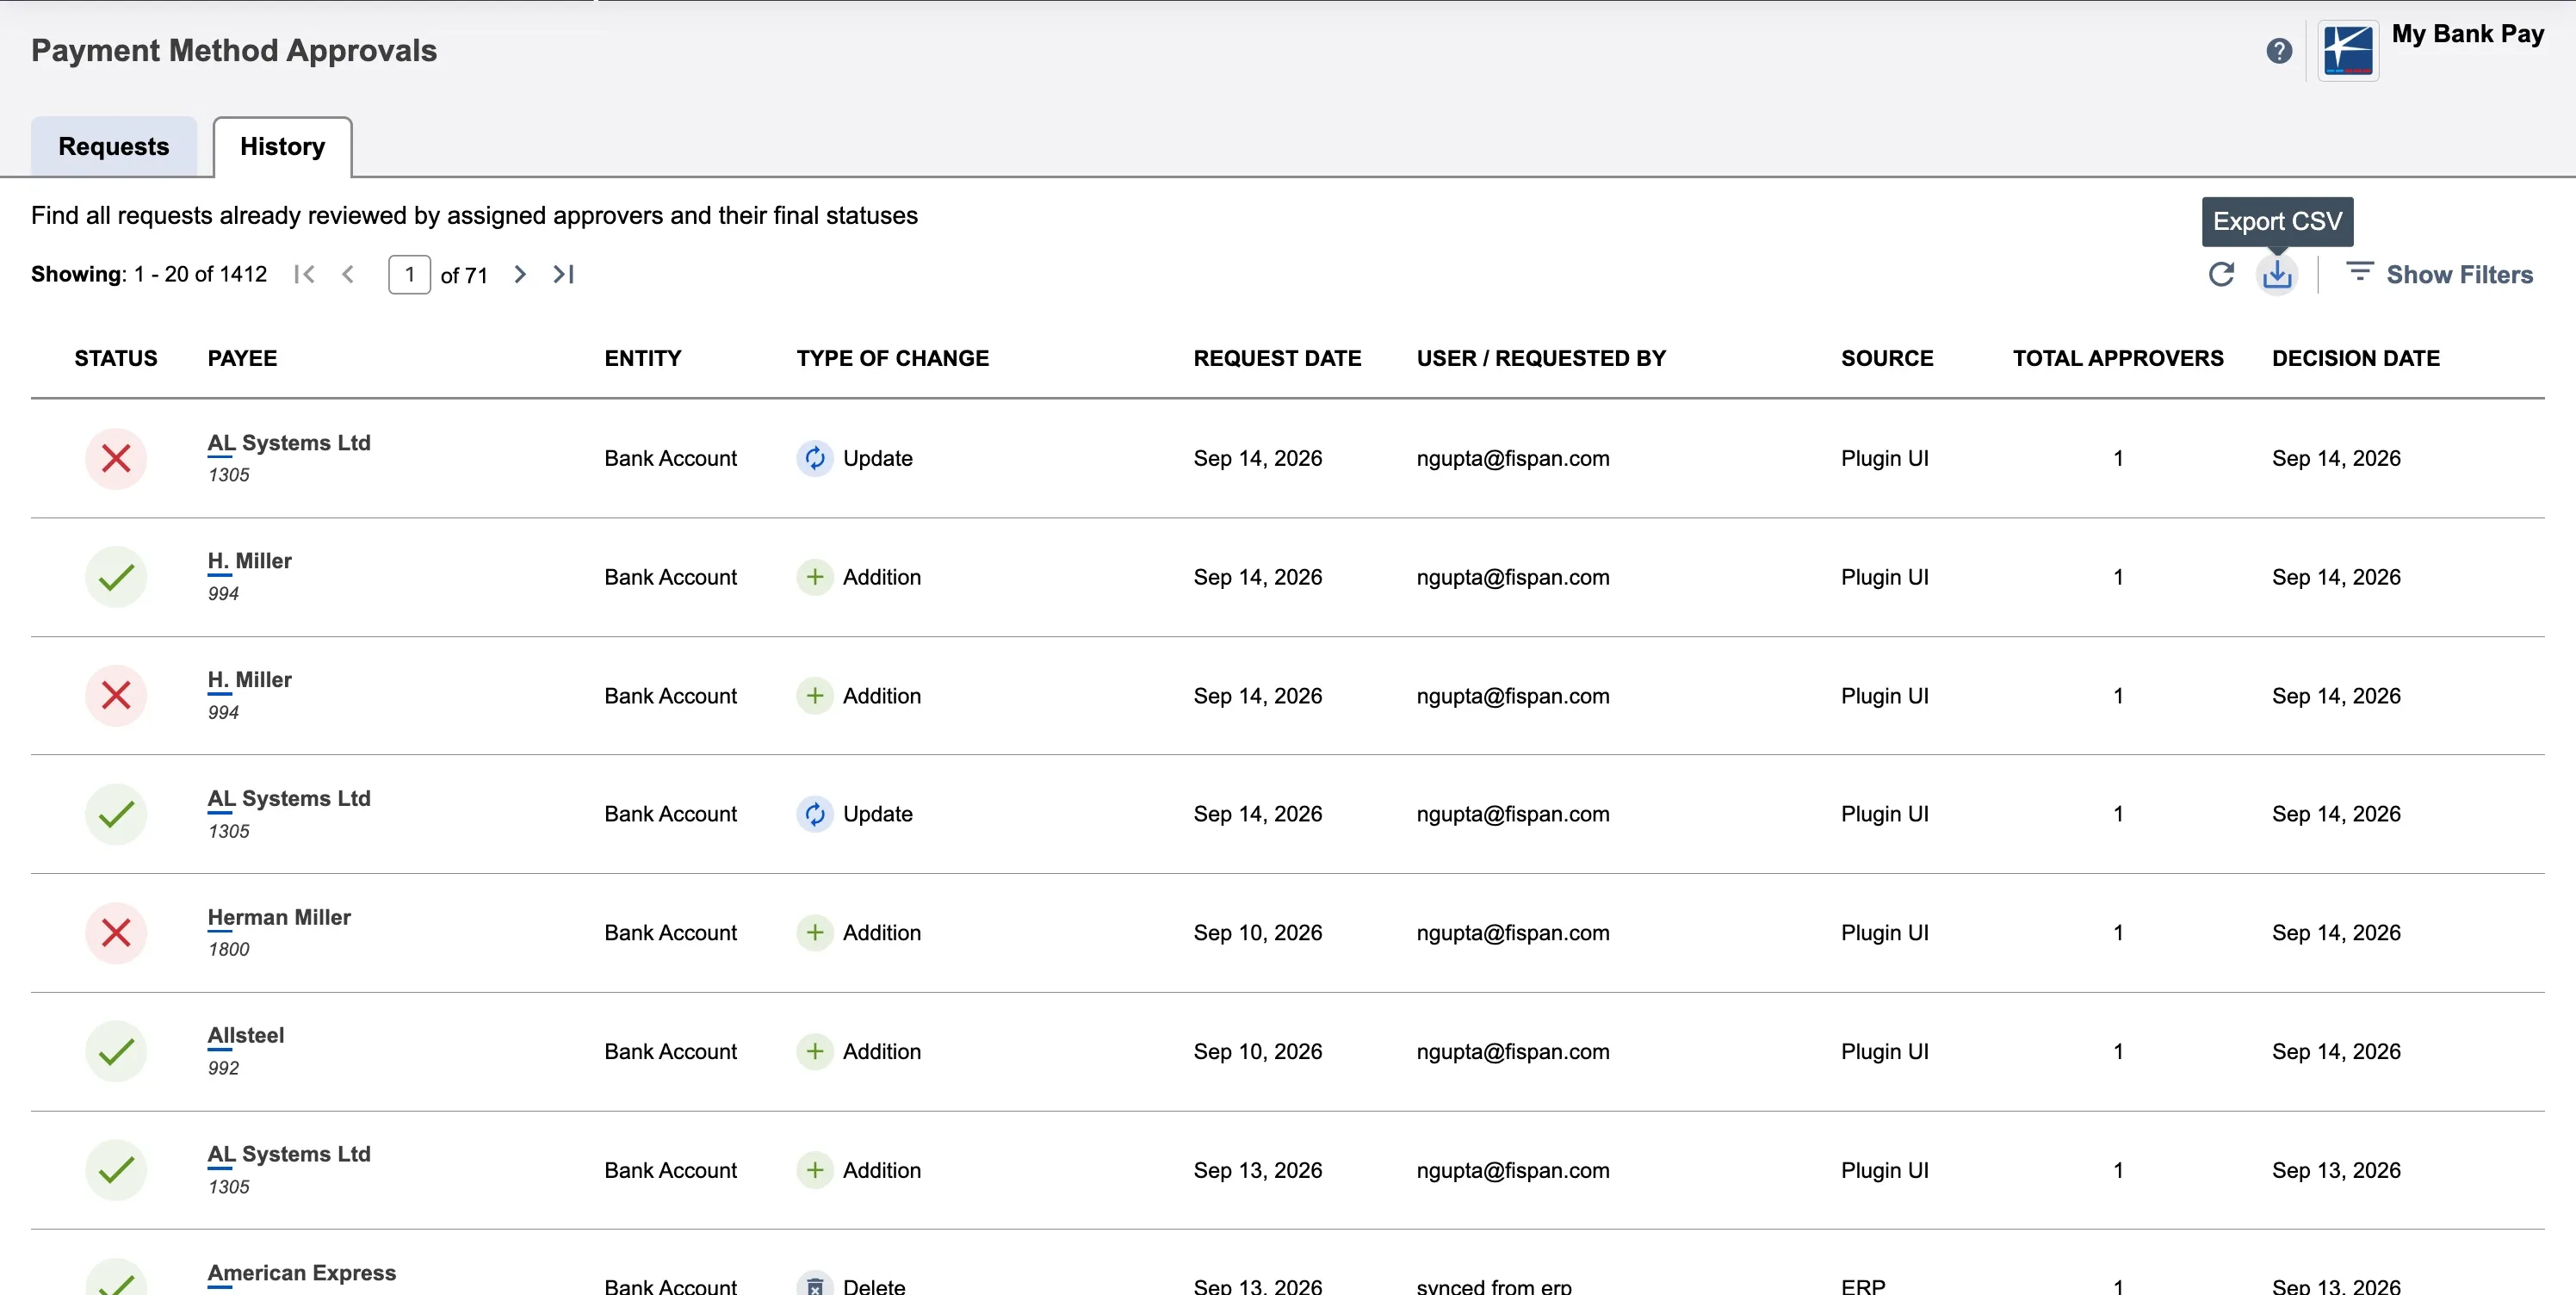
Approvals History
The Approvals History page maintains a comprehensive log of all approval requests, including both those that were approved and those that were rejected.
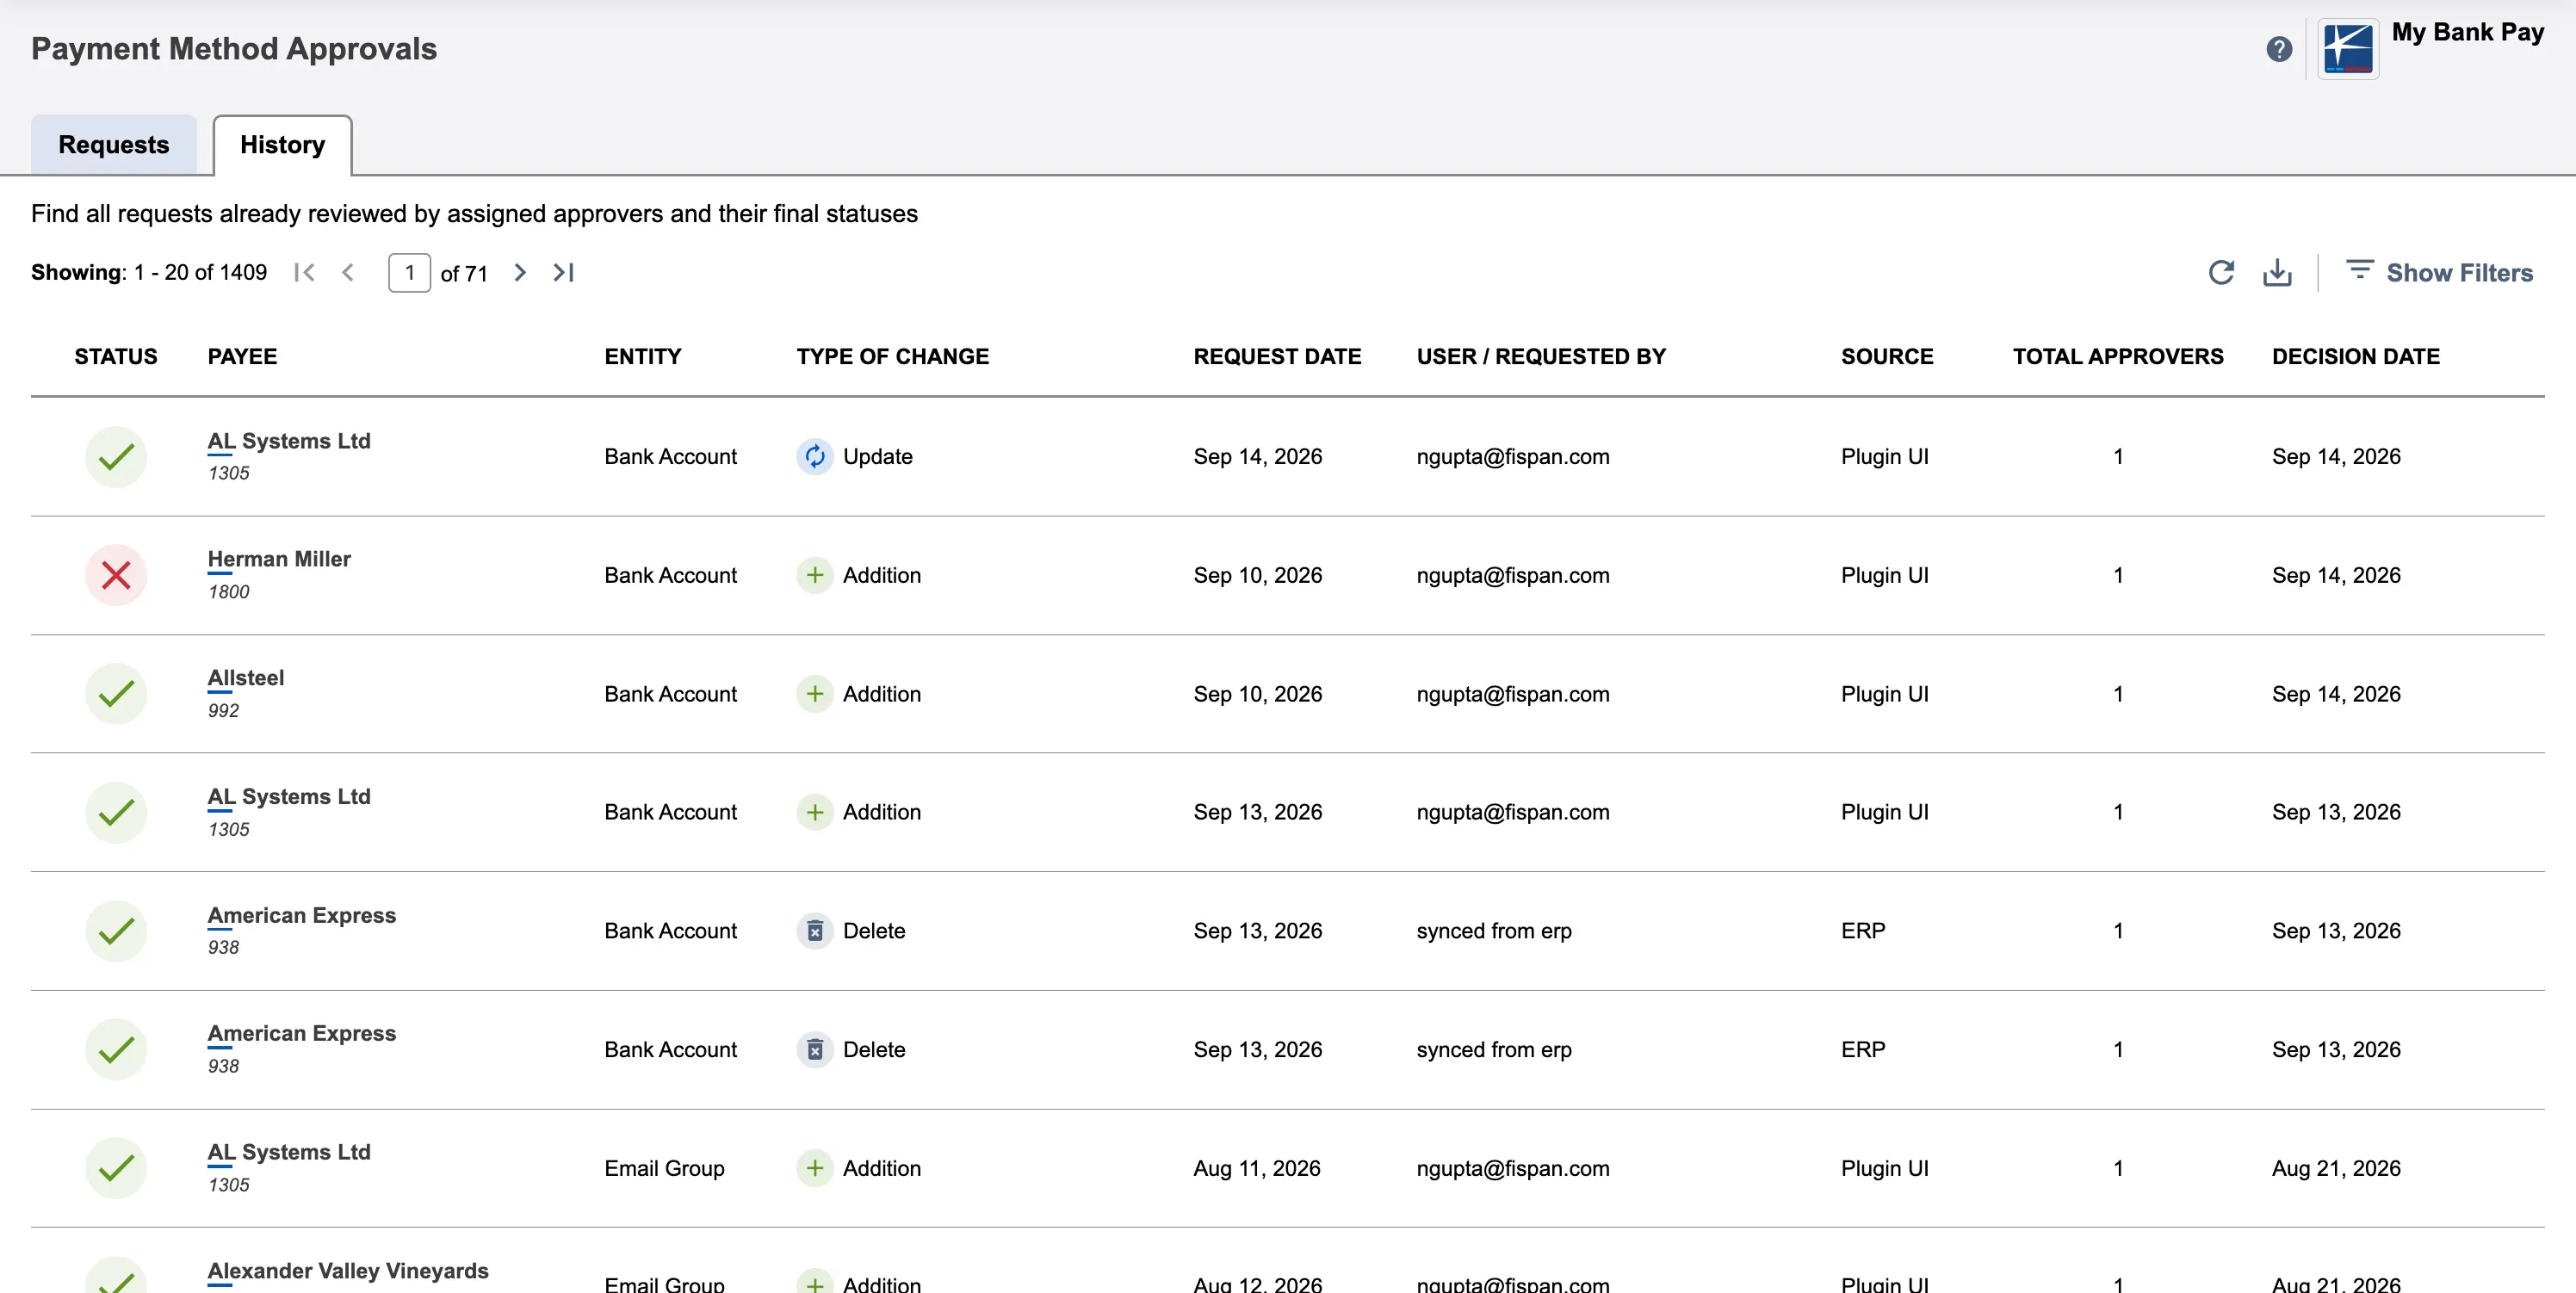
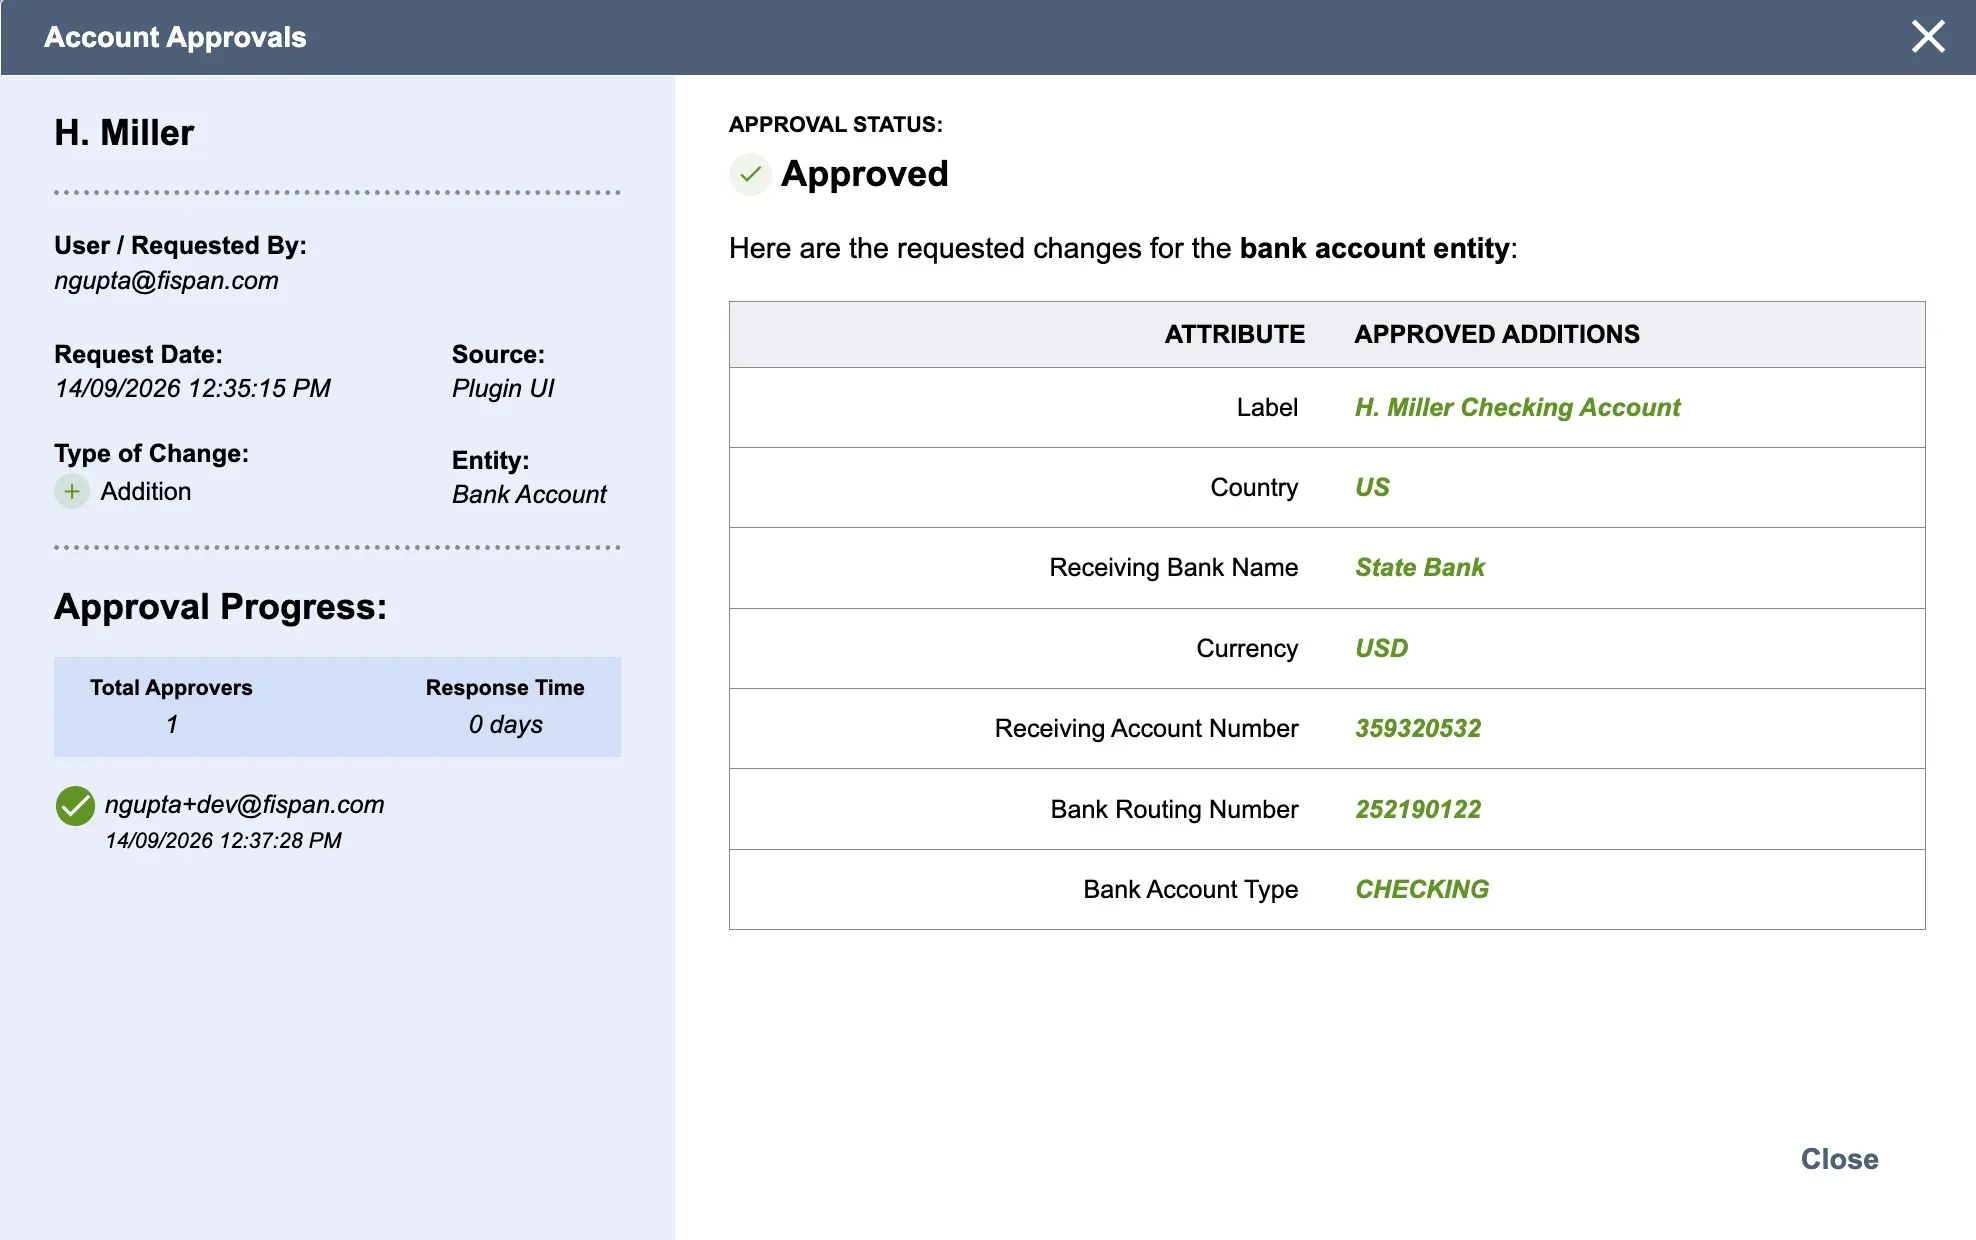
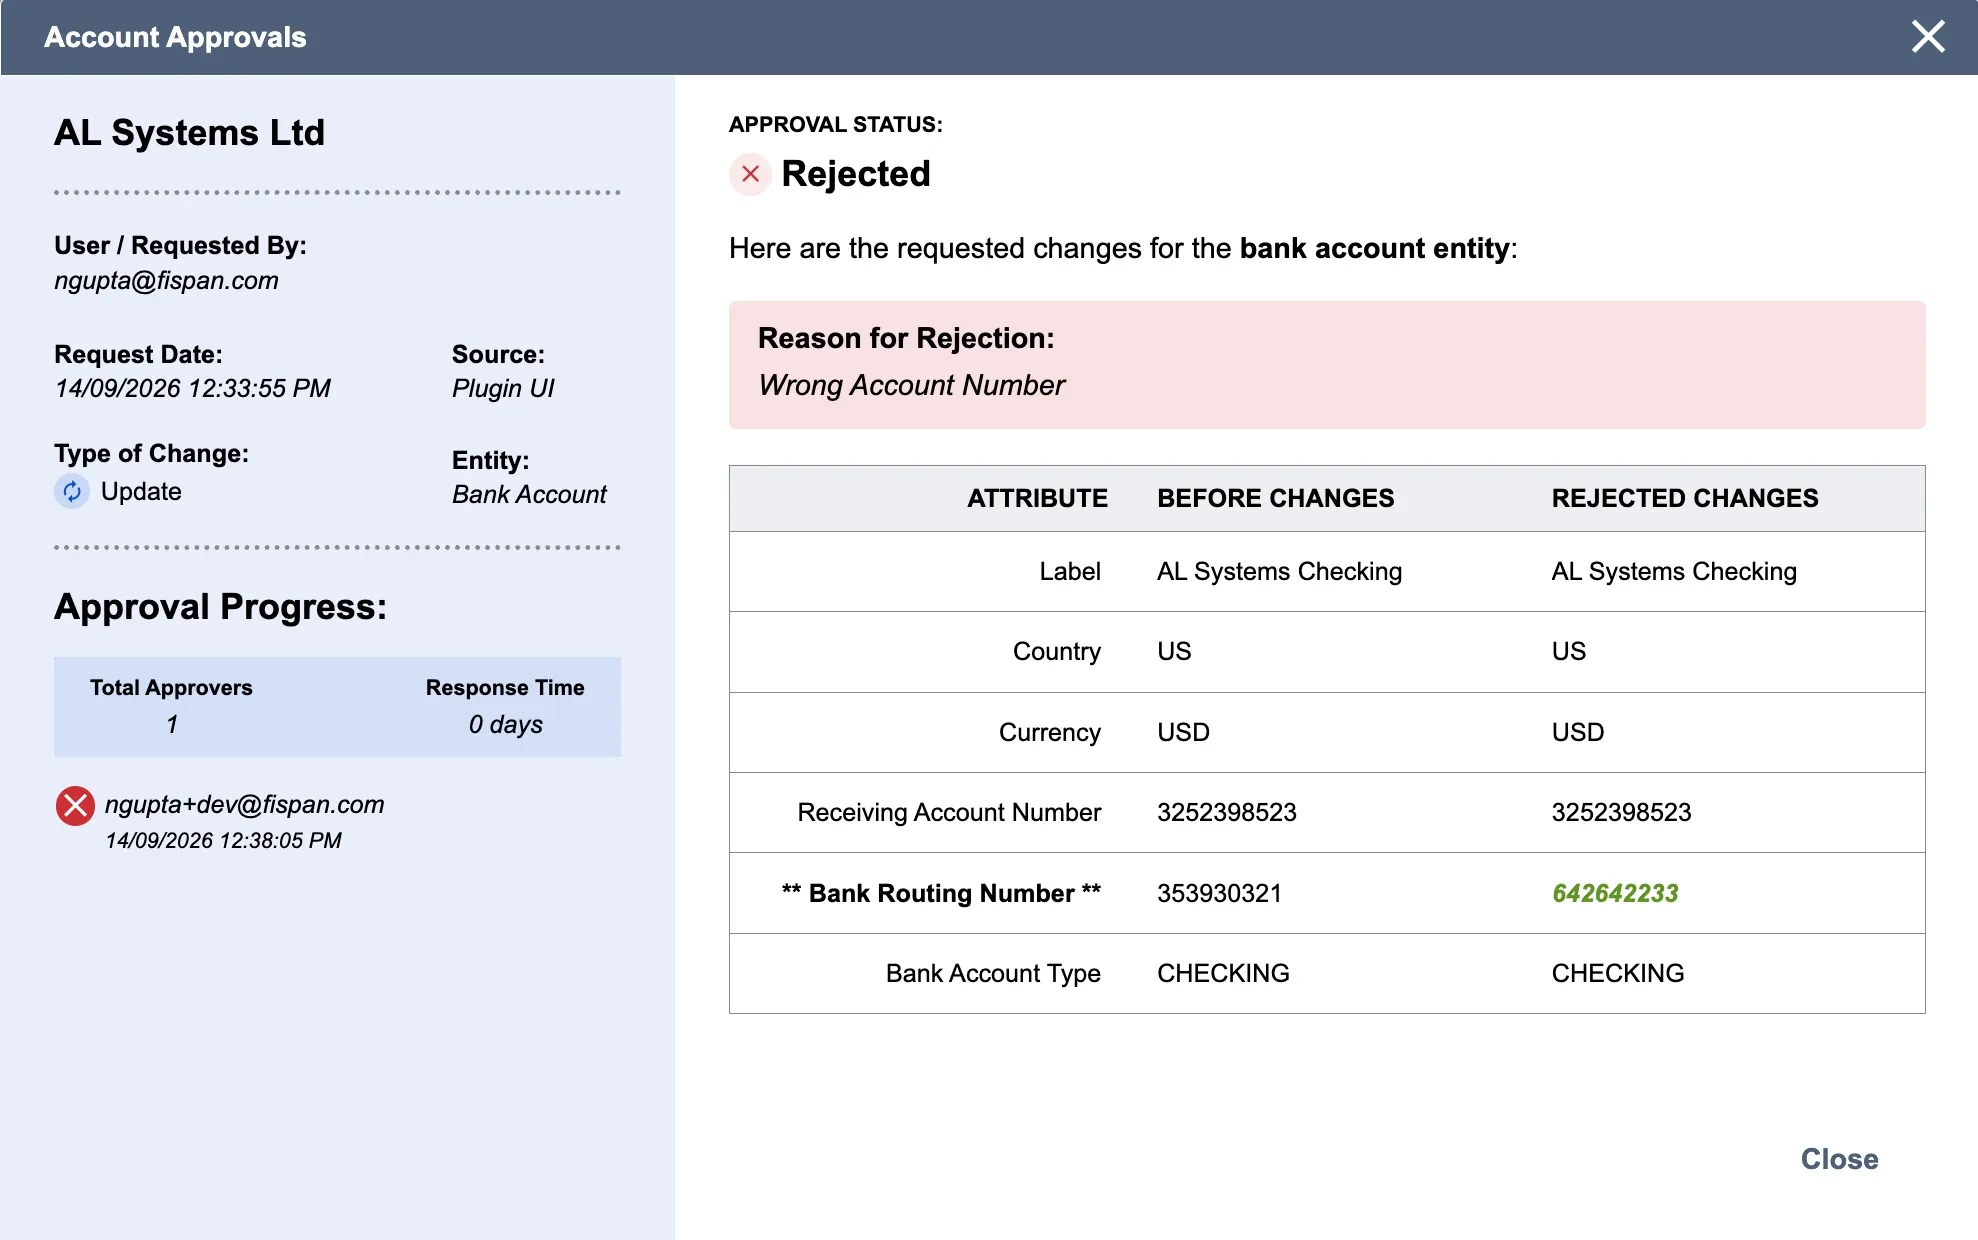
To view more details about a request, you can click View and see the following:
- Date and Time: When the approval or rejection occurred.
- User: The individual who approved or rejected the request.
- Reason: Any comments or explanations provided for the decision.
- Source: The origin of the change request (e.g., manual update, import).
Approvals History Export
You can export the Approvals History for record-keeping or analysis. The export file includes:
- Modified On: Date the change was made
- Payee: Payee Name
- Type of Change: Updated, Added, Deleted
- User Email: User who initiated the change
- Reviewed By: User emails who approved or rejected the change
- Approval/Rejection Time: Time when the final approving user reviewed the change or rejection was sent
- Status: Approved or Rejected
- Previous Entry: What the entry looked like before it was changed
- This would be EMPTY if the history log item is for a new record being created
- Proposed Entry: What the entry looks like after a change was initiated or rejected
- If entry was rejected, this is the change that was proposed
- If the entry was approved, this is the change that was accepted
- Reason for Rejection: The rejection reason provided by the rejecting user
- This will be empty if the record is an approved item
To generate this export, click the Export button on the Approvals History page.