Customizing Columns (NetSuite)
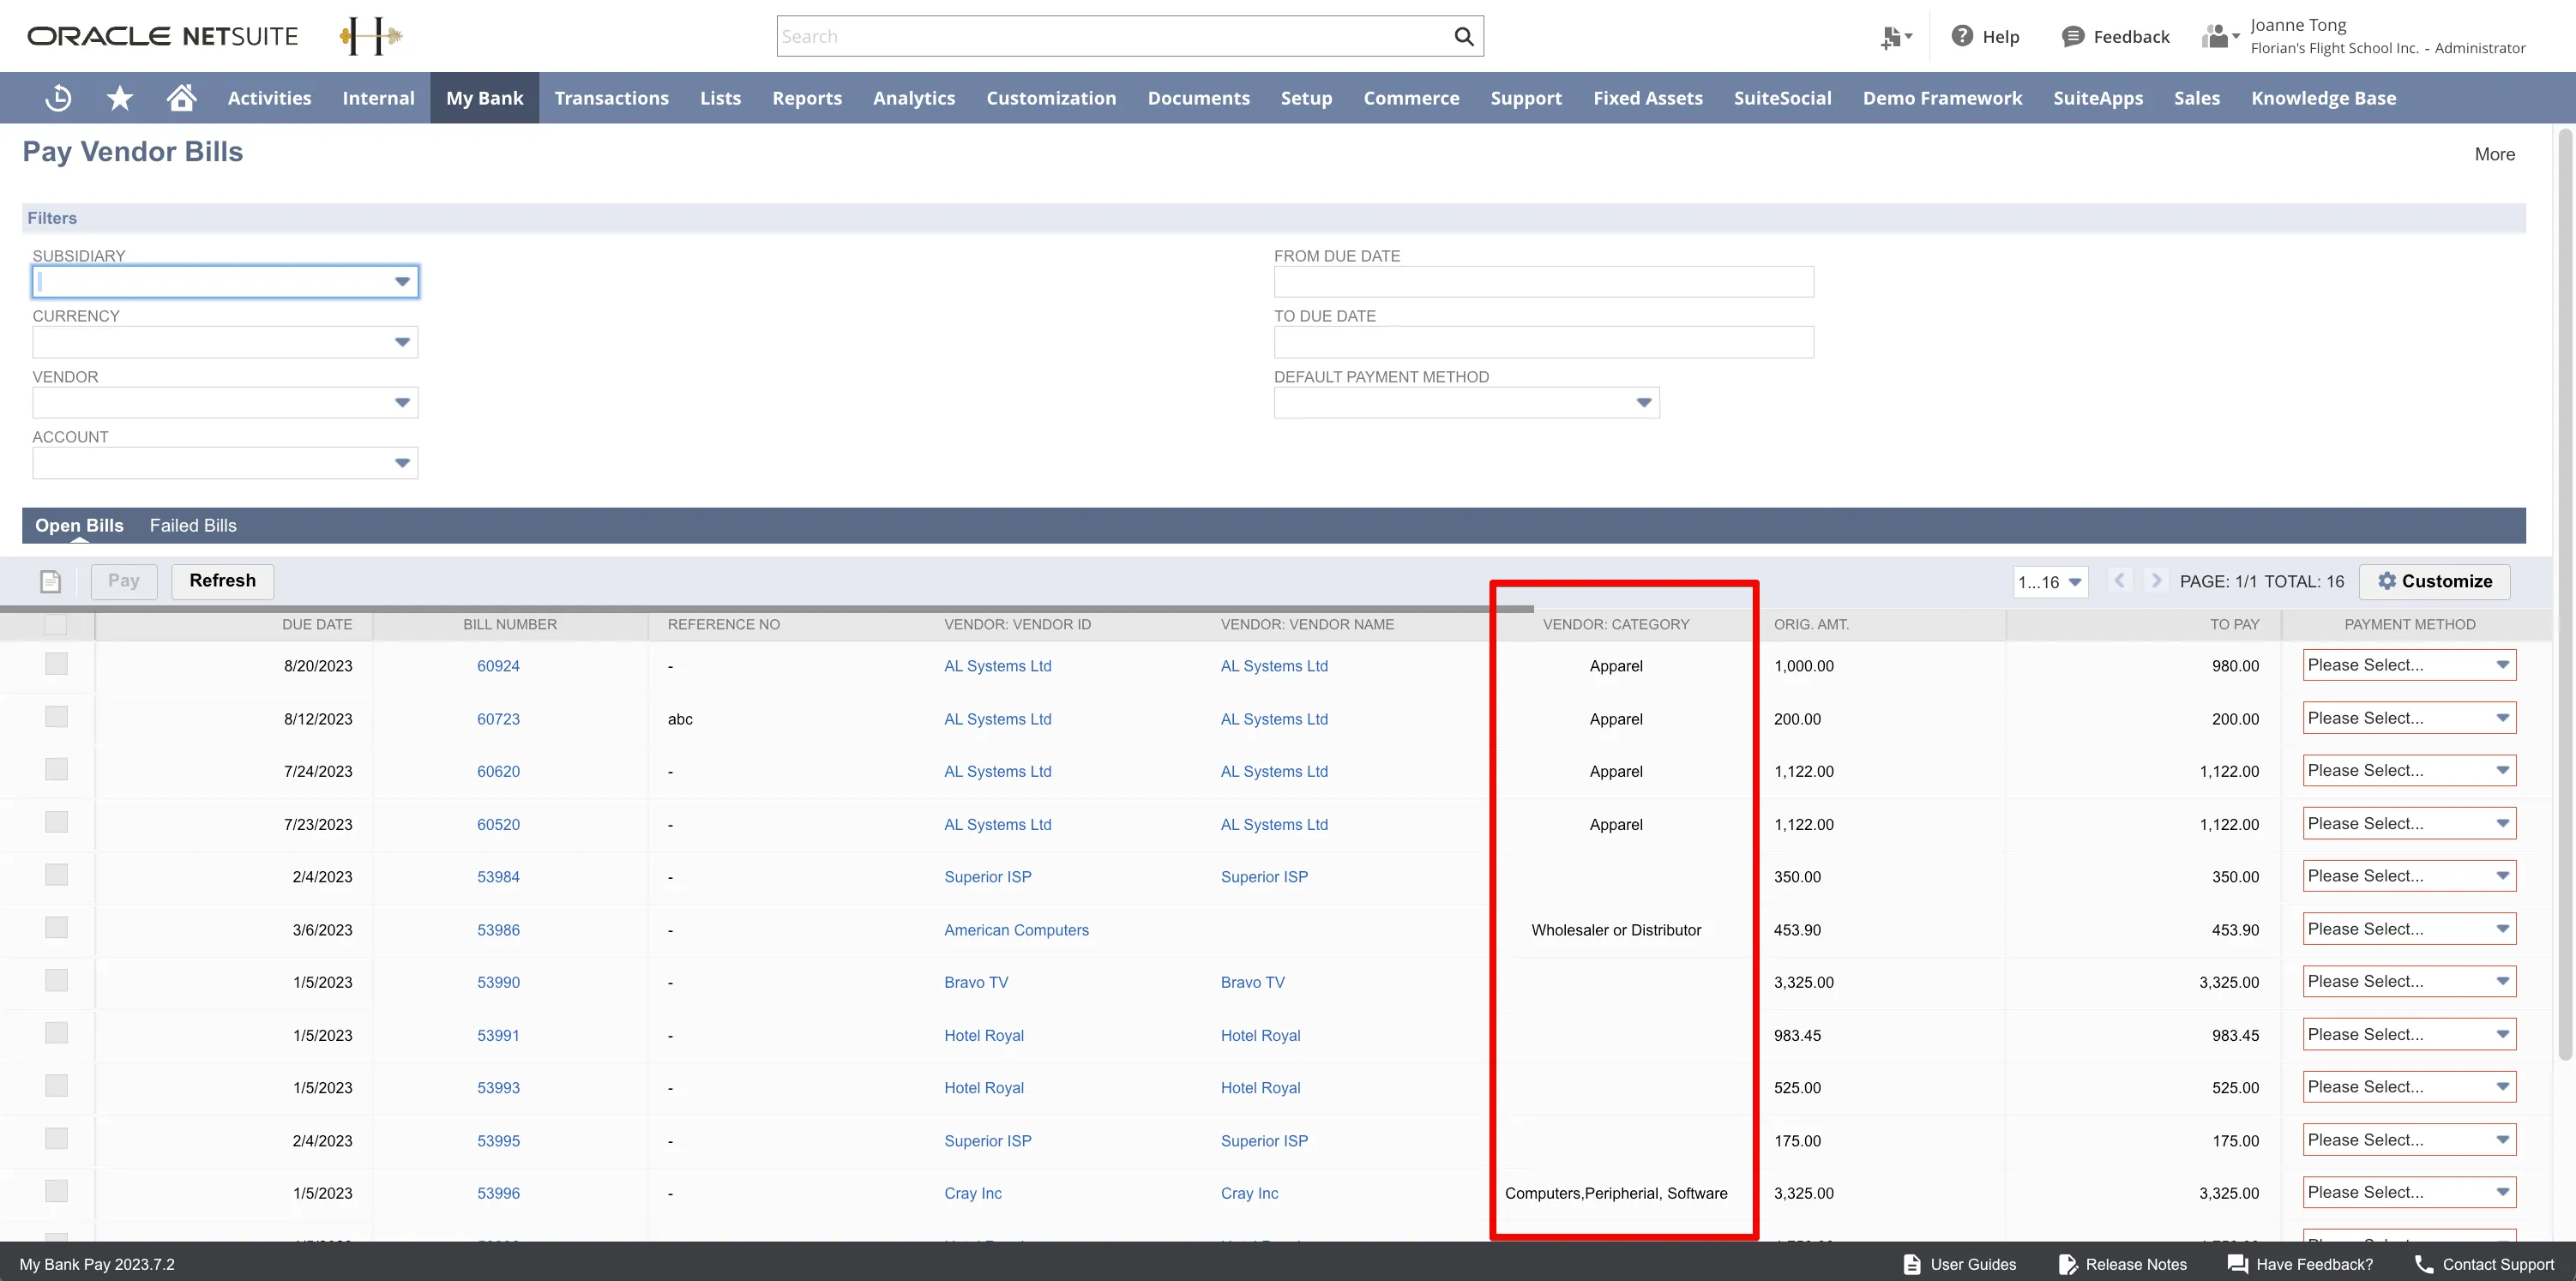
Customizable Columns give you more flexibility to personalize the vendor bill payment experience. You can easily add, rearrange, and remove the columns you see on the Open Bills and Failed Bills tabs of the Pay Vendor Bills page.
You can select standard fields from the Bill and Vendor records, as well as any custom transaction body fields on the Bill record, to display as a column.
All customizations you make are saved at the user level. This means your personalized column layout won't affect the Pay Vendor Bills page for any other user.
Keep in mind that enabling Customizable Columns requires additional permissions for user roles. Please check the Required Permissions section on this page for details.
Accessing the Customization Feature
Follow these steps to access the Customization feature on the Pay Vendor Bills Page.
Locate Customize Option
The customization page is accessible from the Pay Vendor Bills page by clicking on the Customize button.
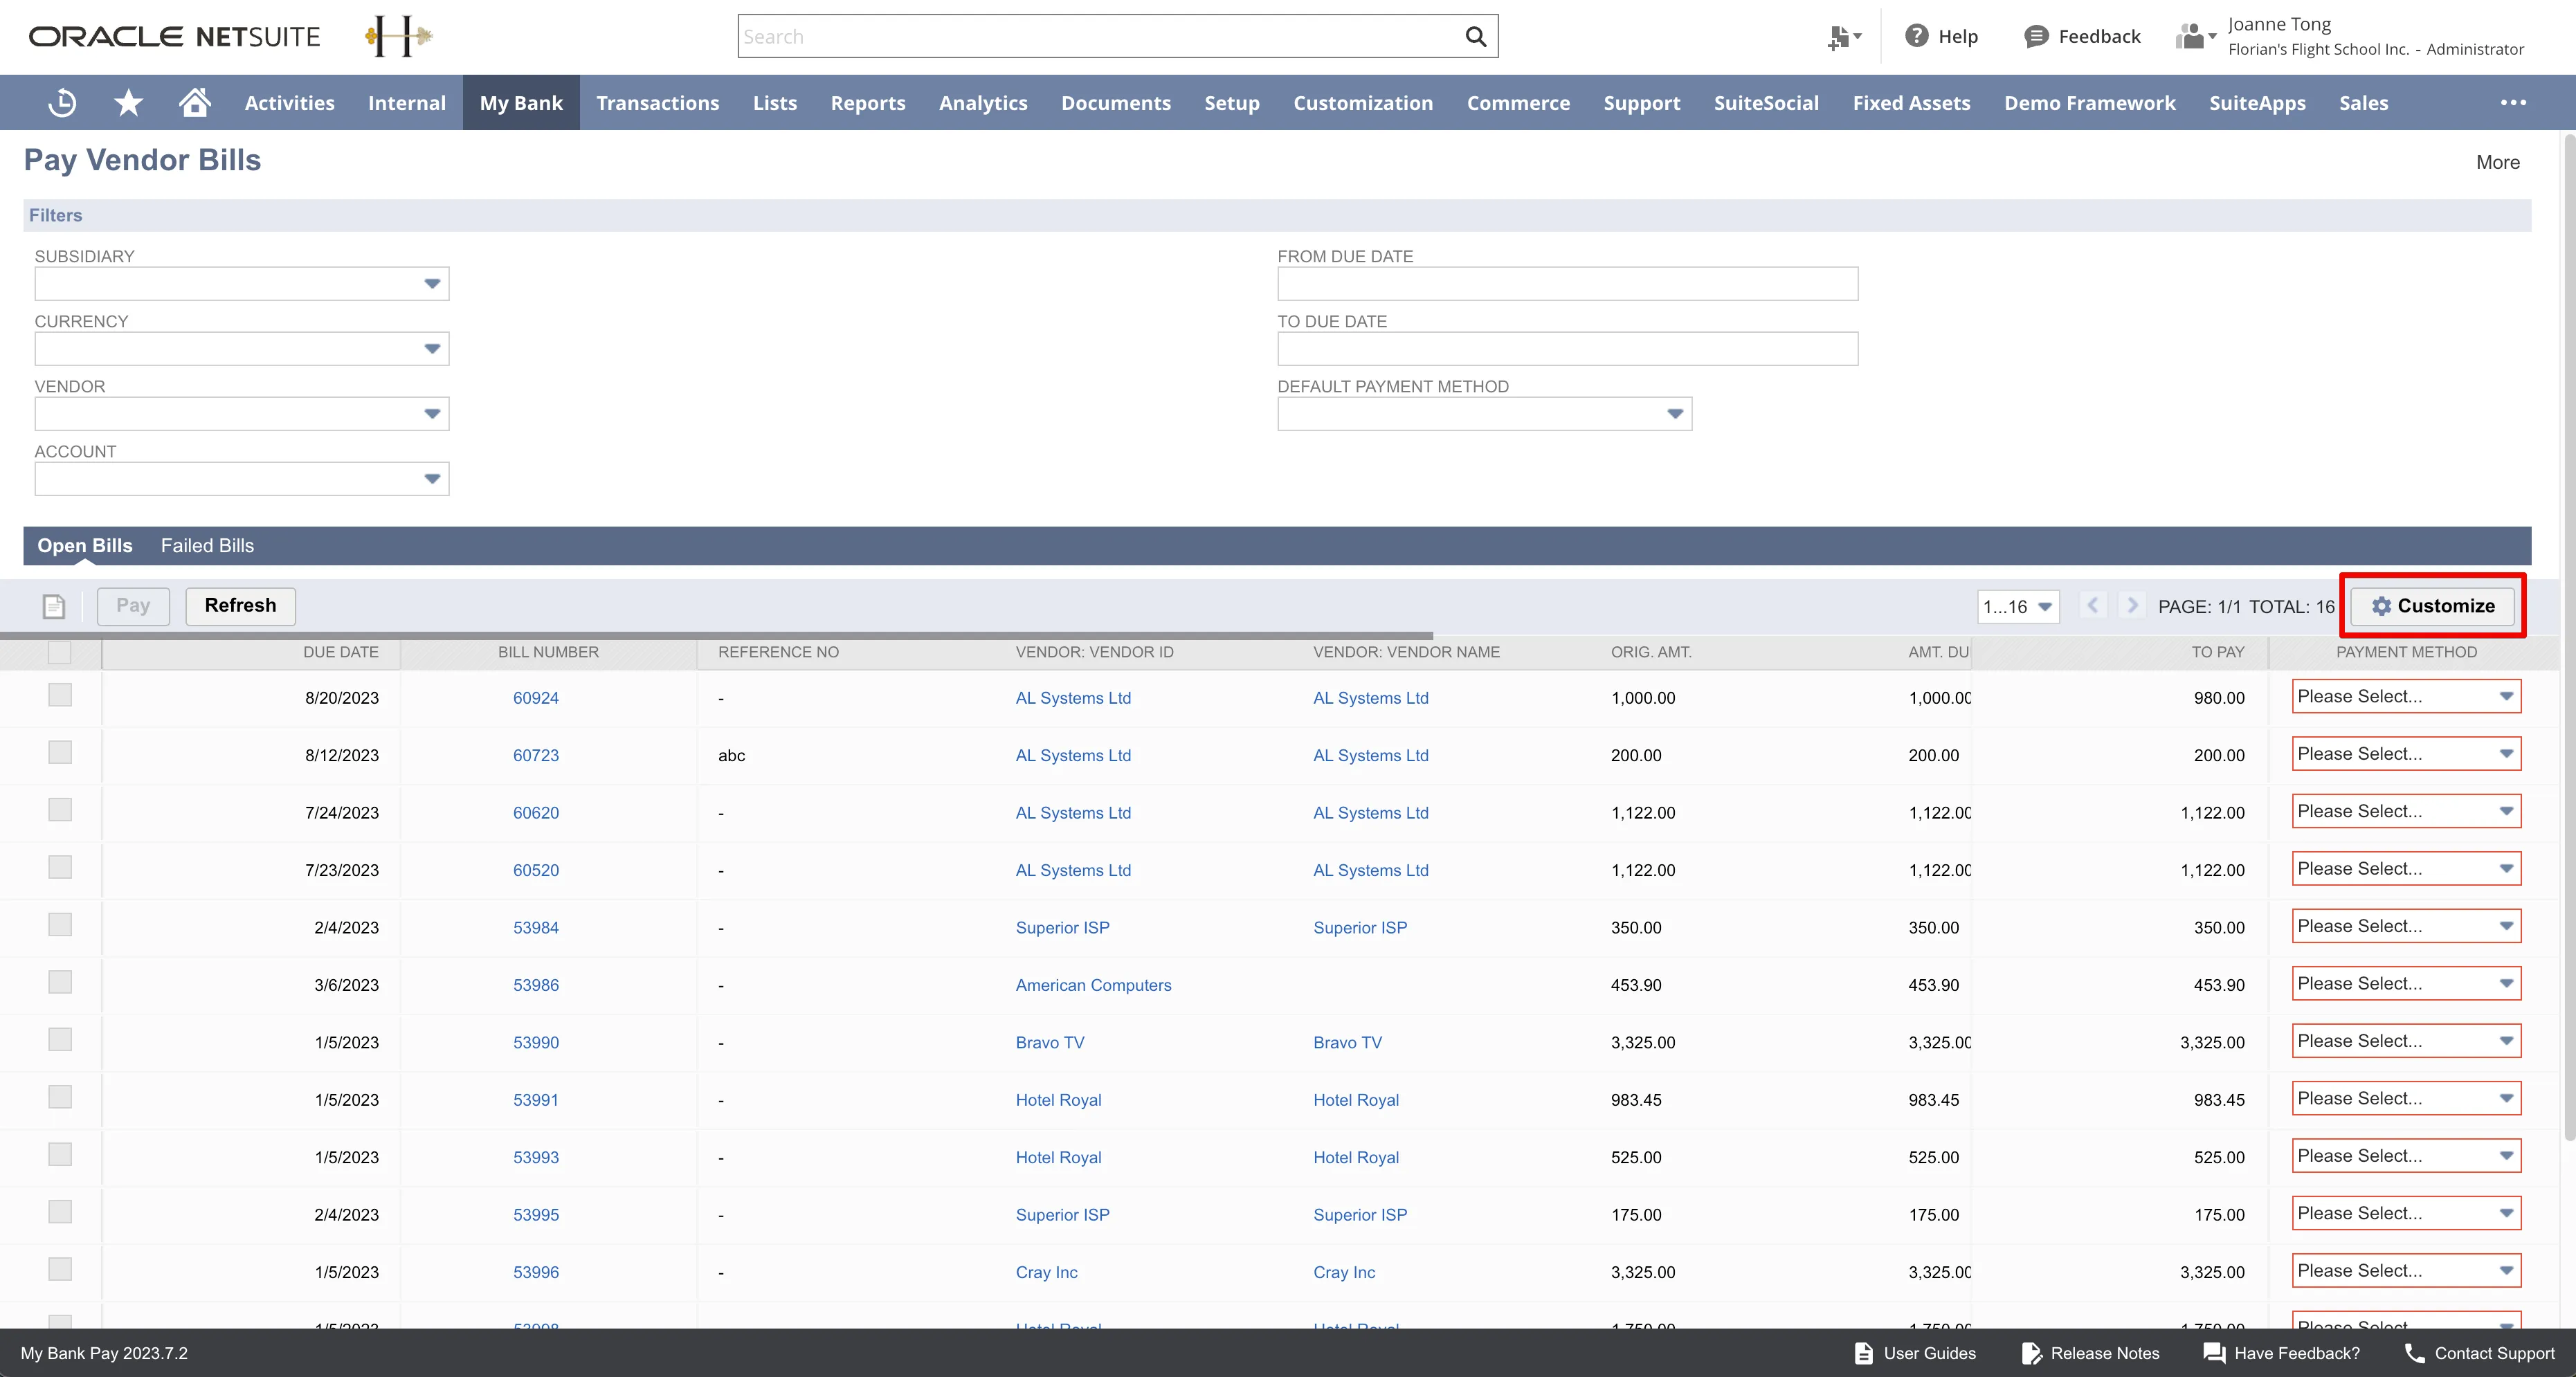
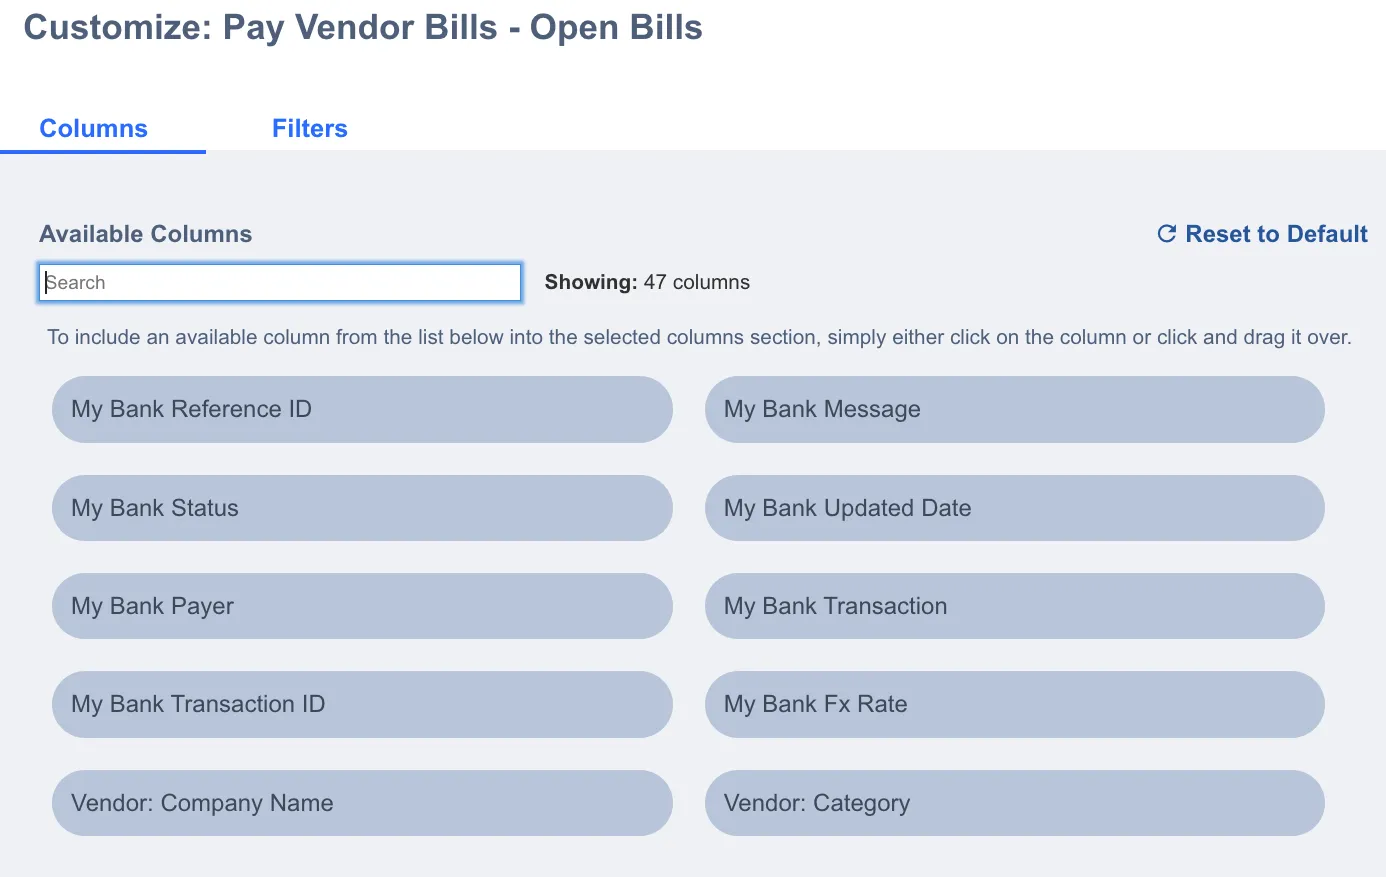
When you click the Customize button while viewing the Open Bills tab, it will take you to the Customize: Pay Vendor Bills - Open Bills page.
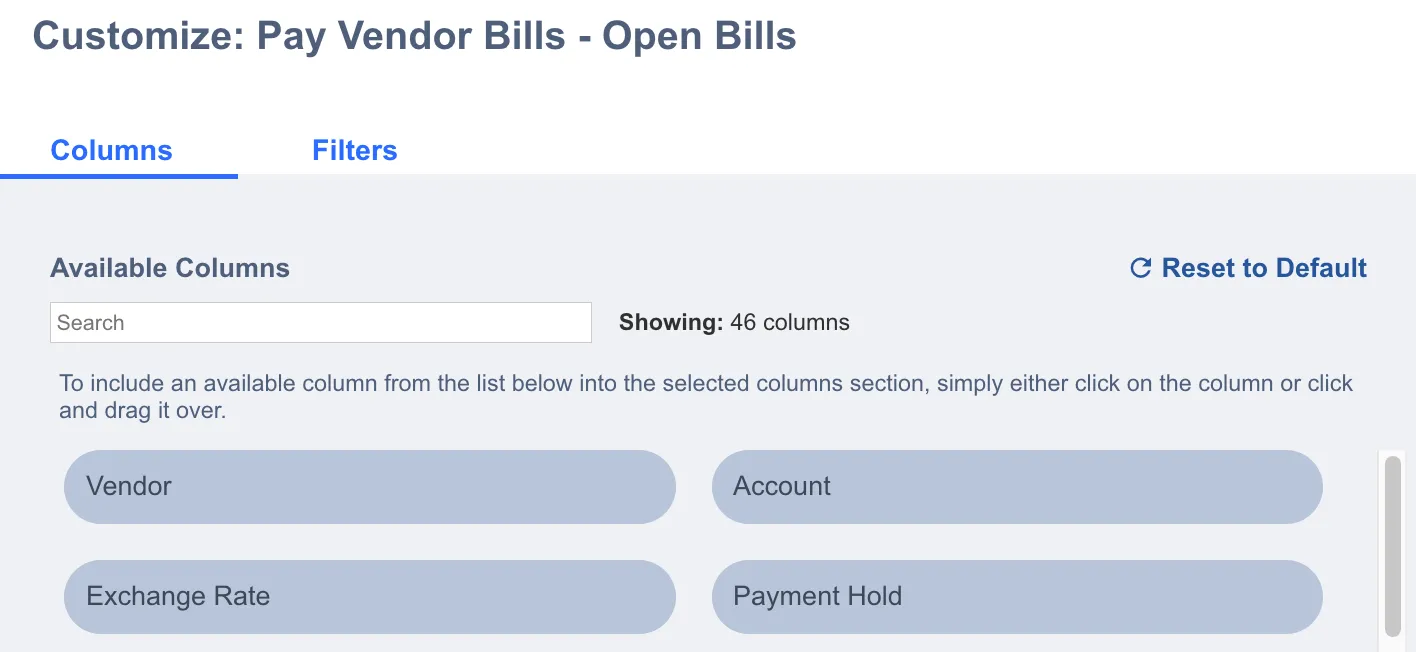
Customize Pay Vendor Bills Page
Here, you can add, rearrange, or remove columns that are displayed on the Open Bills tab of the Pay Vendor Bills page.
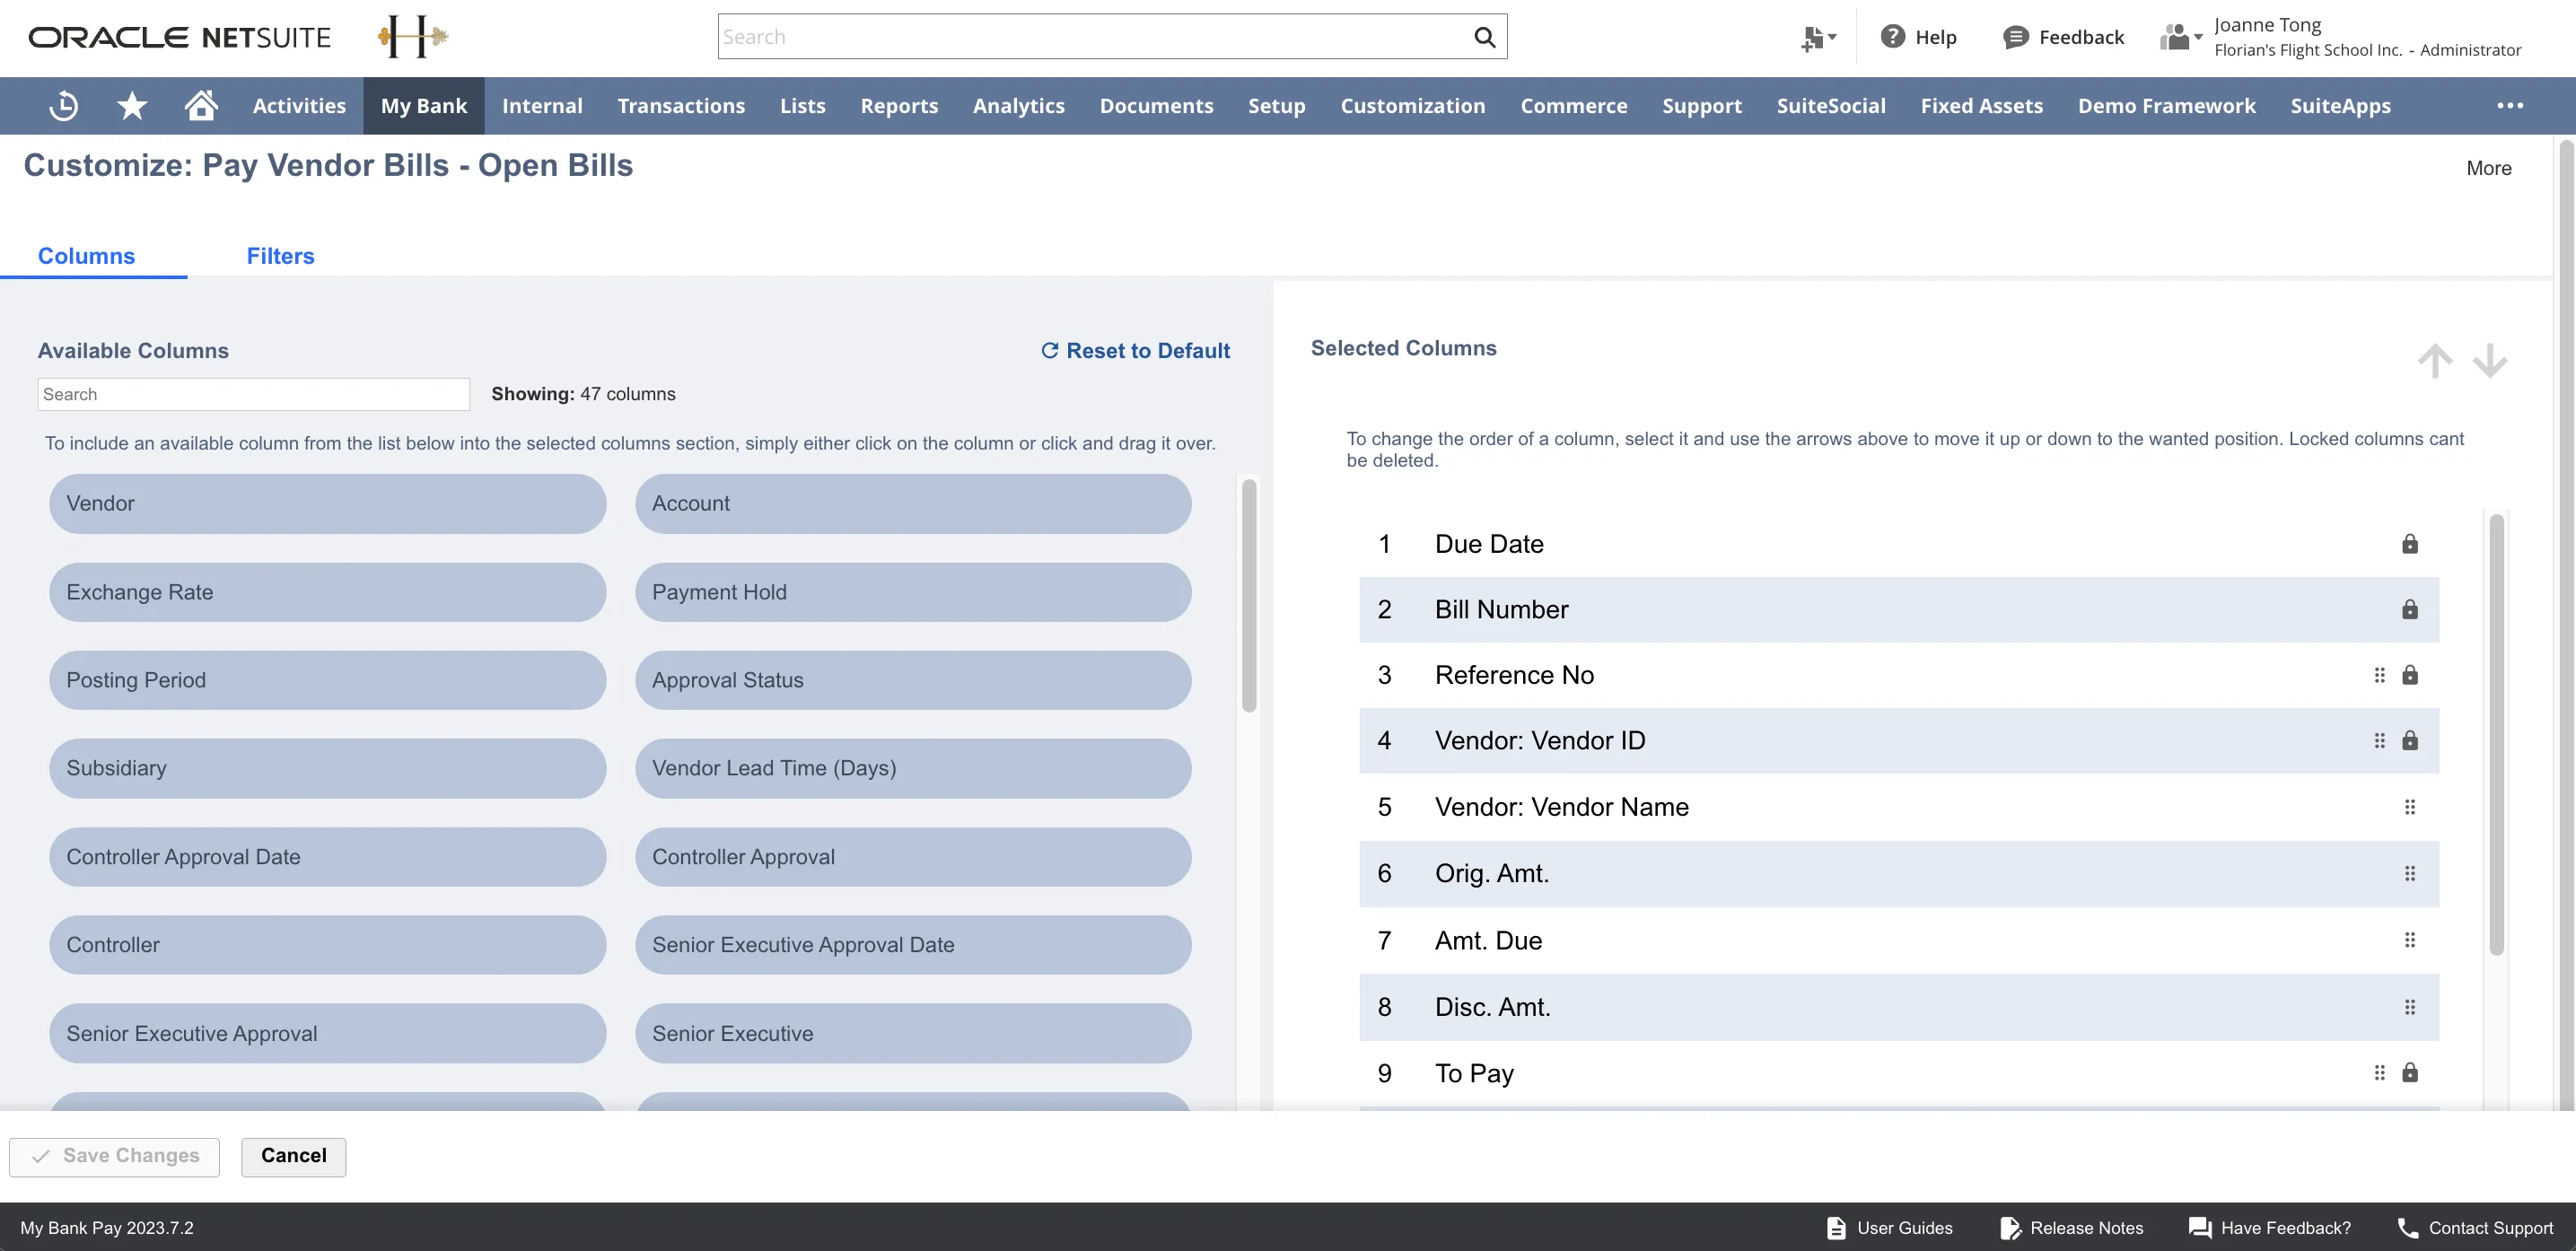
By default, the Columns sub-tab appears first.
Available and Selected Columns
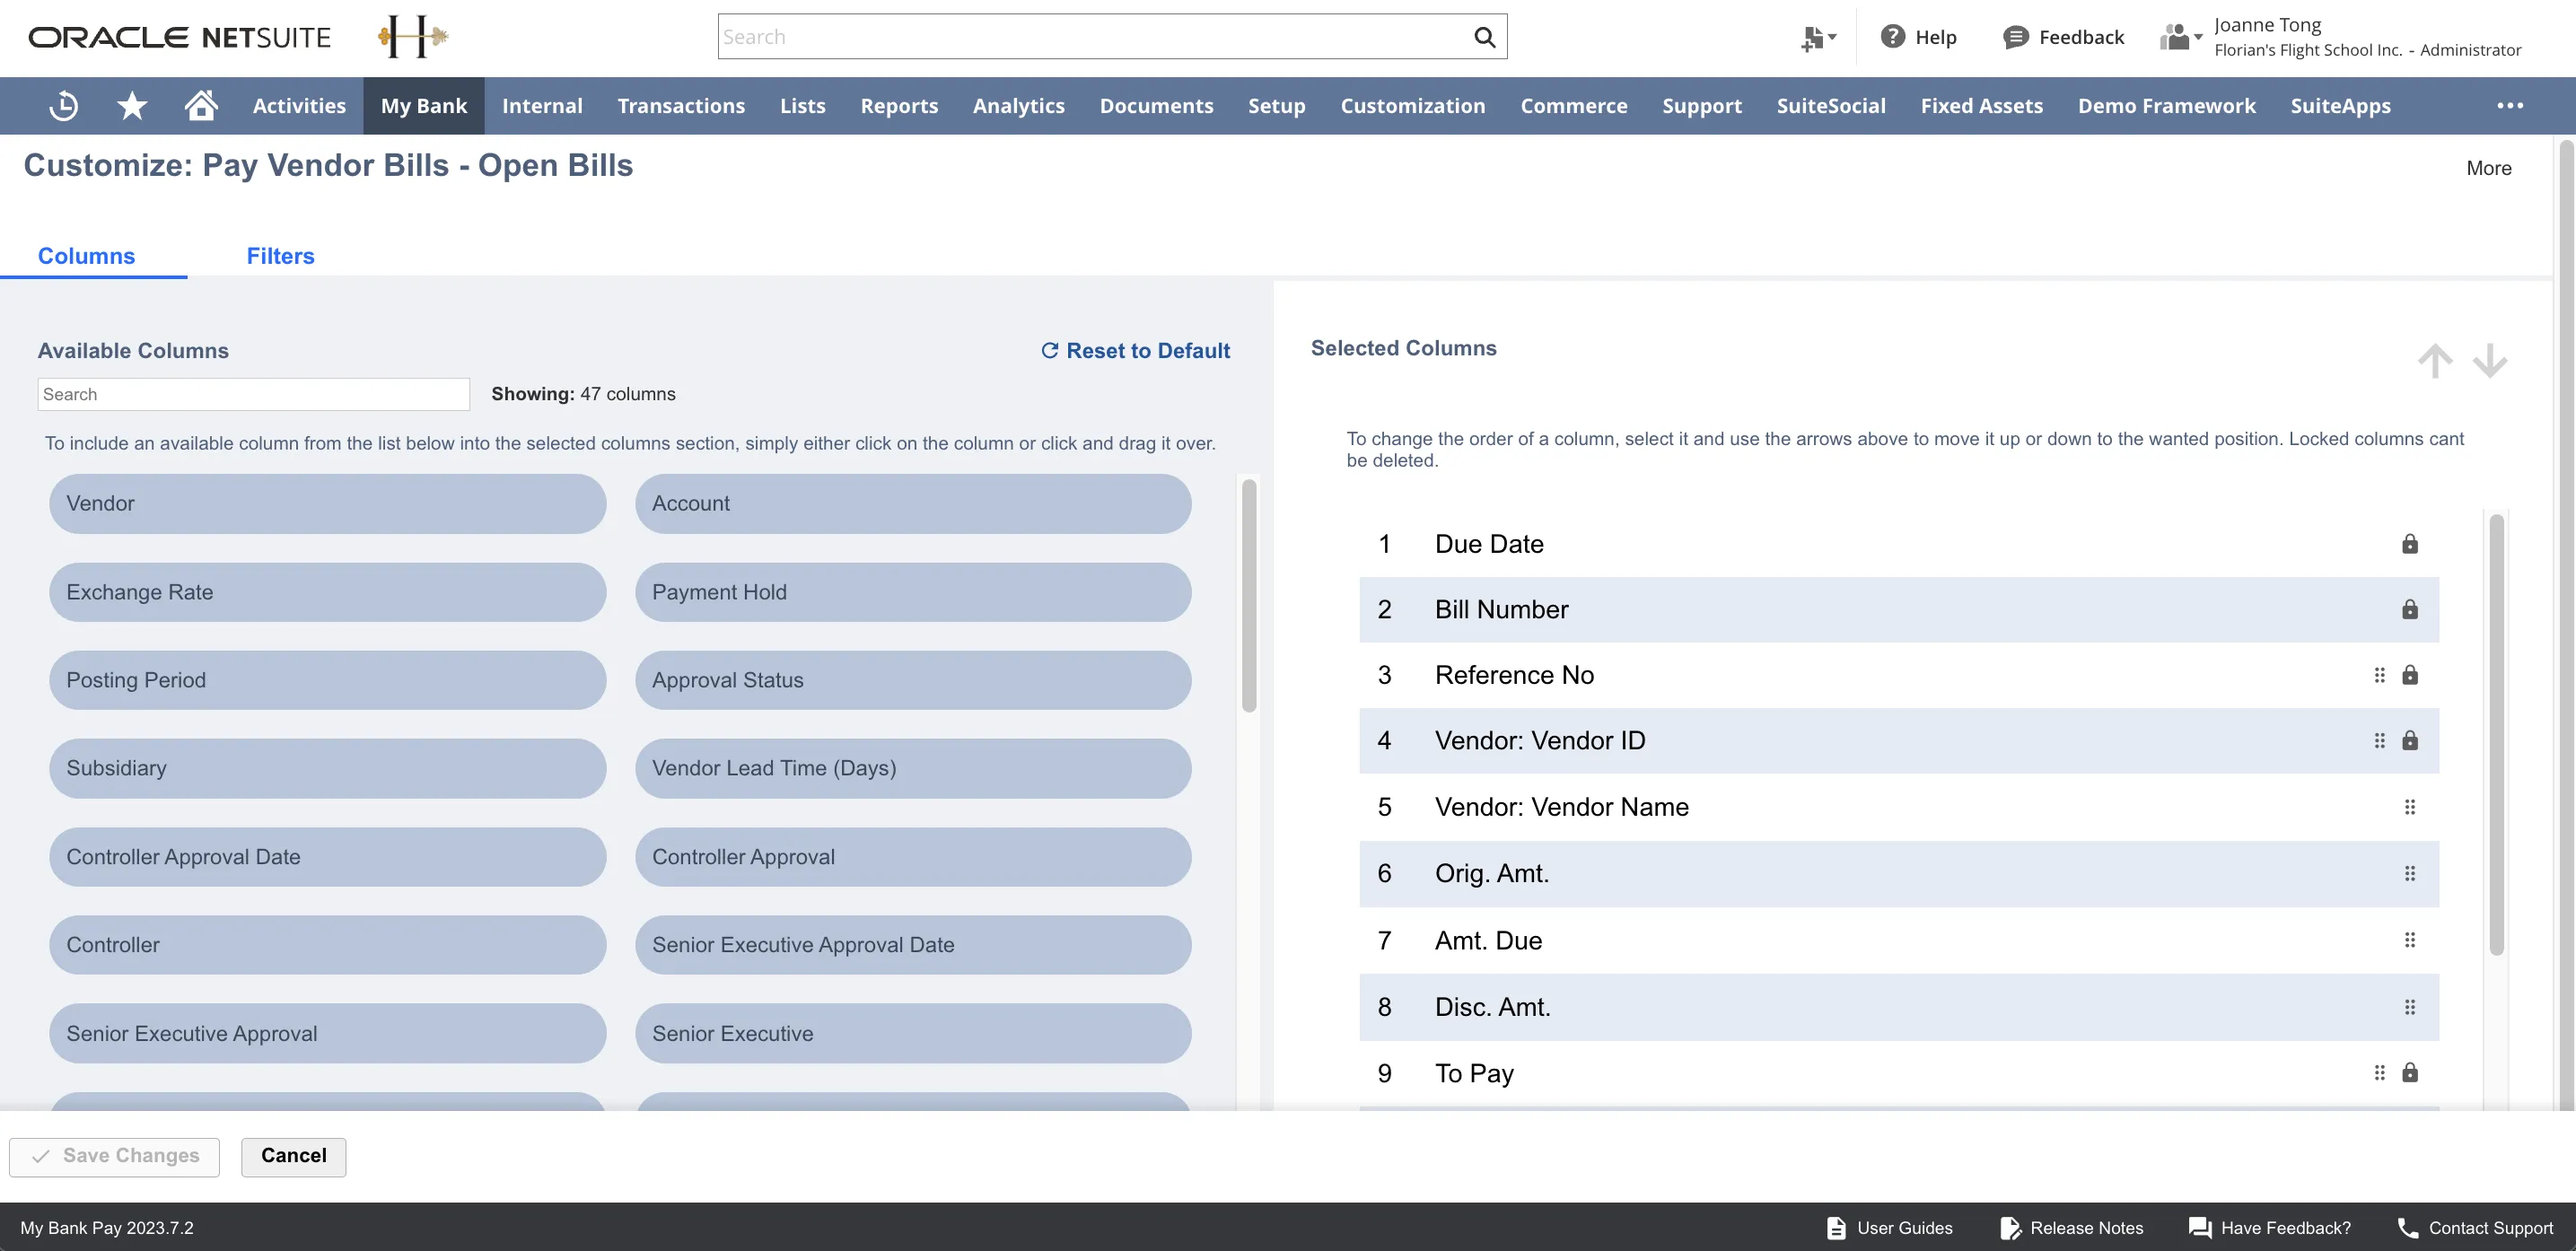
On the Columns tab of either Customize: Pay Vendor Bills - Open Bills or Customize: Pay Vendor Bills - Failed Bills pages, users can see two main sections: Available Columns, Selected Columns.
Available Columns
The Available Columns section, located on the left half of the screen, allows the user to do the following:
- Search for available columns by typing into the search bar.
- See the total number of available columns to be selected.
- Click, or click and drag, available columns to be added to the Selected Columns section of the page.
- Reset columns back to default.
This feature allows users to choose from the standard fields available on both the Bill and Vendor records to display and rearrange columns on the Pay Vendor Bills page.
Additionally, users can choose any custom fields available on the Bill Record, but not any custom fields available on the Vendor Record.
Selected Columns
The Selected Columns section is on the right side of your screen. Here you can do the following with the columns selected:
- View all the columns currently visible on the Pay Vendor Bills page.
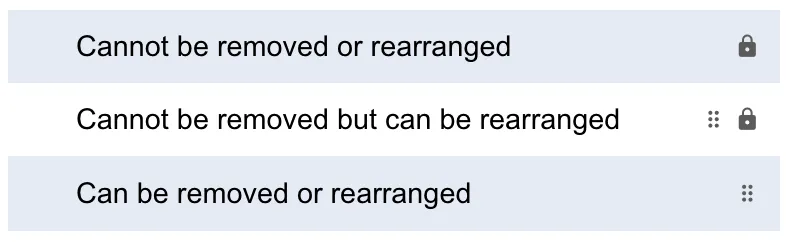
- Rearrange columns:
- Look for the dotted icon. If a column has this, you can drag and drop it, or select it and use the up/down arrows to change its order.
- Columns without the dotted icon cannot be rearranged.
- Remove columns:
- Columns that do not have a lock icon can be removed.
- Hover over the column and click the Remove button that appears. You'll be asked to confirm the removal.
- Columns with a lock icon cannot be deleted.
Making Changes to Columns
To create a personalized view of your vendor bills, use the Customization feature by following these steps.
Locate Customize Option
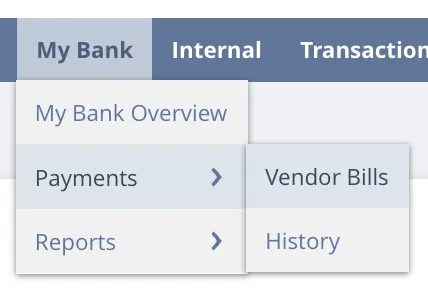
Navigate to Santander Fusion → Payments → Vendor Bills.
To make customizations to columns on the Open Bills tab of the Pay Vendor Bills, click on the Customize button.
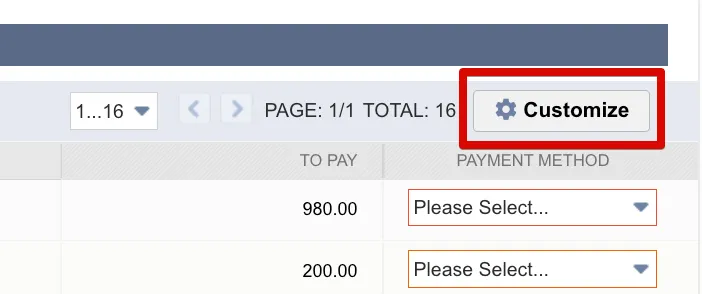
To make customizations to columns on the Failed Bills or Open Bills tab of the Pay Vendor Bills page, click first on the Failed Bills or Open Bills tab, then the Customize button.

Finding Available Columns
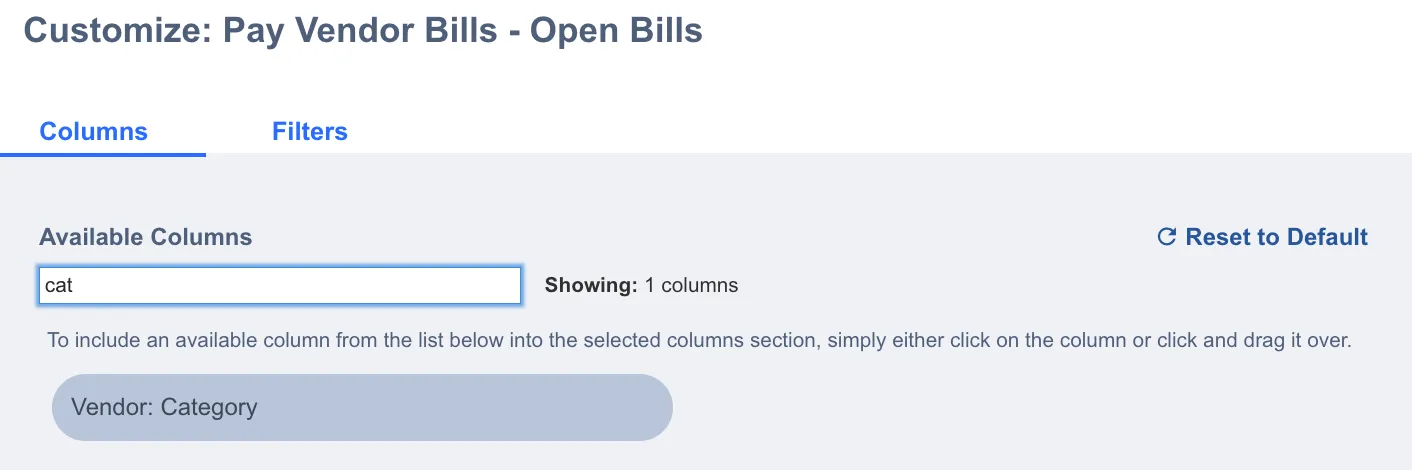
In the Available Columns section of the page, begin typing in the search bar to find the column of your choice, or scroll through the full list to see what column options are available.
Adding and Rearranging Columns
To add a column, click on a column in the Available Columns section to move it to the Selected Columns section.
This will place it in the highest possible position within the Selected Columns section, which is third, just below the columns for Due Date and Bill Number, as these two columns cannot be repositioned. You can utilize the arrows at the top right to further adjust the column's placement.
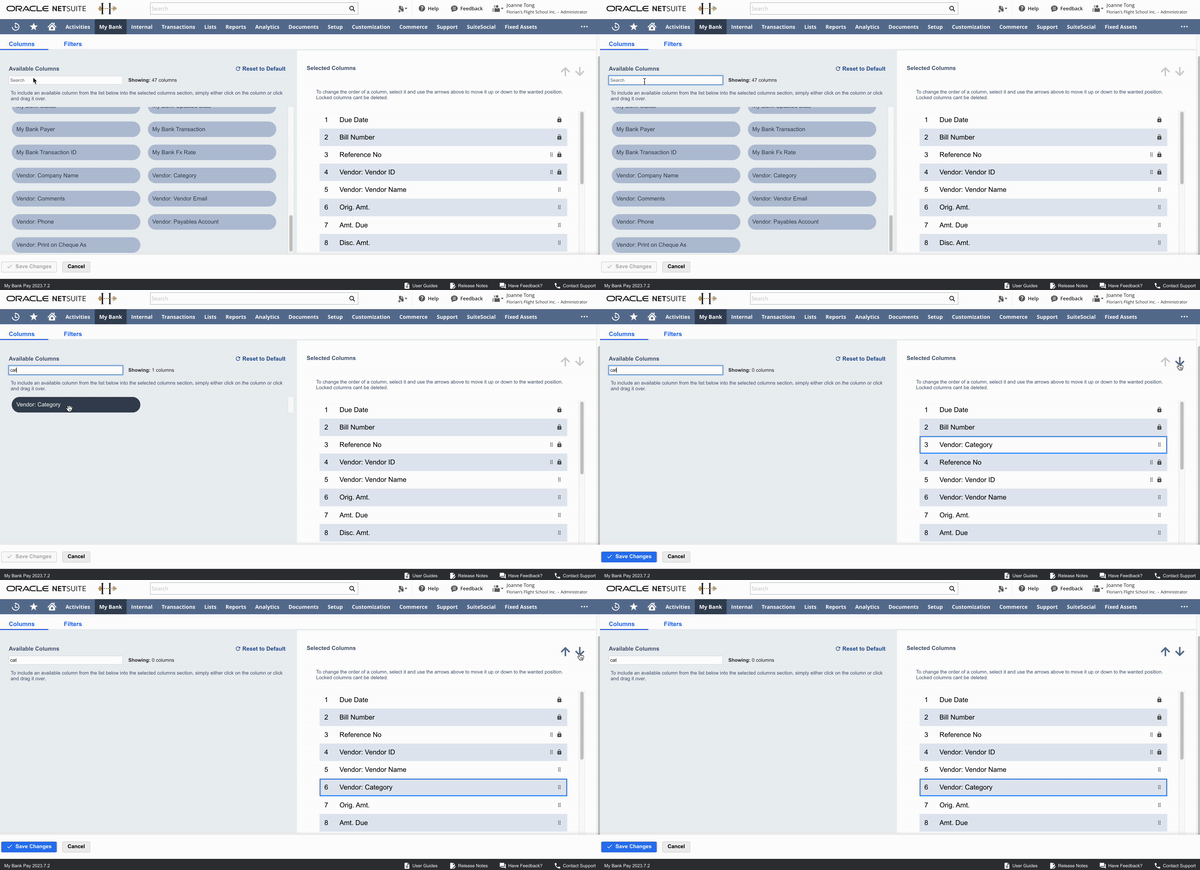
Alternatively, you can click and drag a column from the Available Columns section to the desired position in the Selected Columns section.
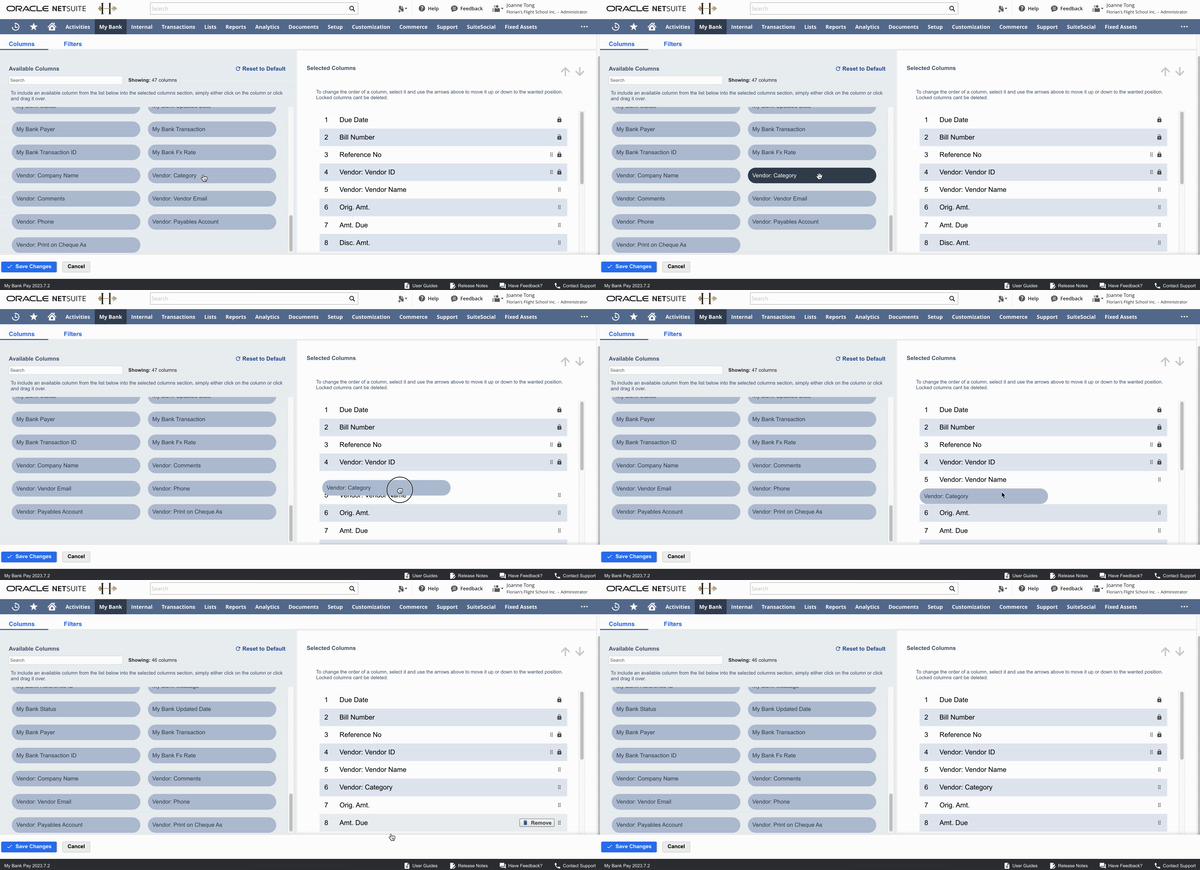
Removing Selected Columns
To remove a column, simply click on the column in the Selected Columns section of the page to bring up the Remove button. It will prompt you to confirm that you wish to remove this column.
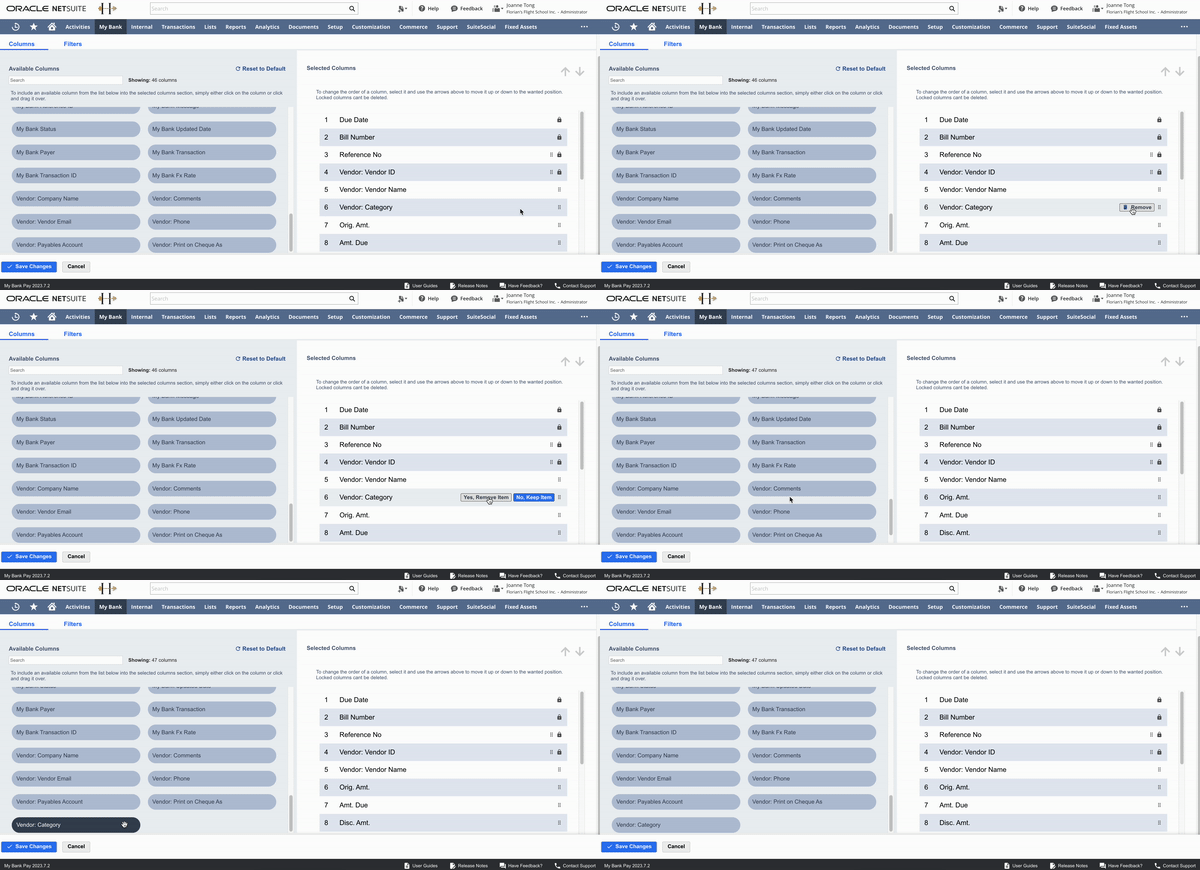
Upon clicking Yes, Remove Item, the column will reappear within the Available Columns section.
Saving Customizations
When you are happy with your changes, click Save Changes at the bottom of the screen to save your customizations.
You may either return to the Pay Vendor Bills page by clicking on Go Back to Pay Bills Page, or you may remain on the current page by clicking Close.
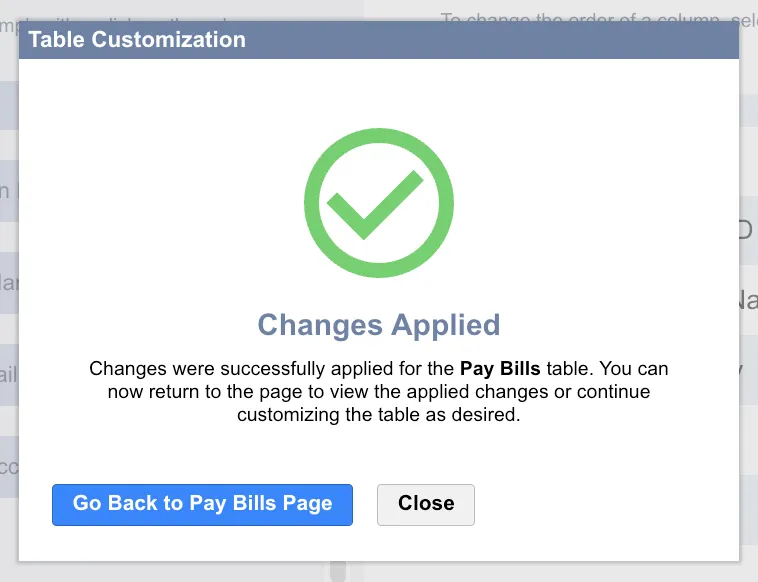
The Open Bills tab of the Pay Vendor Bills page will now reflect column customizations.
Resetting Columns to Default
To reset your columns back to default, click on the Customize: Pay Vendor Bills page, and click on the Reset to Default button.
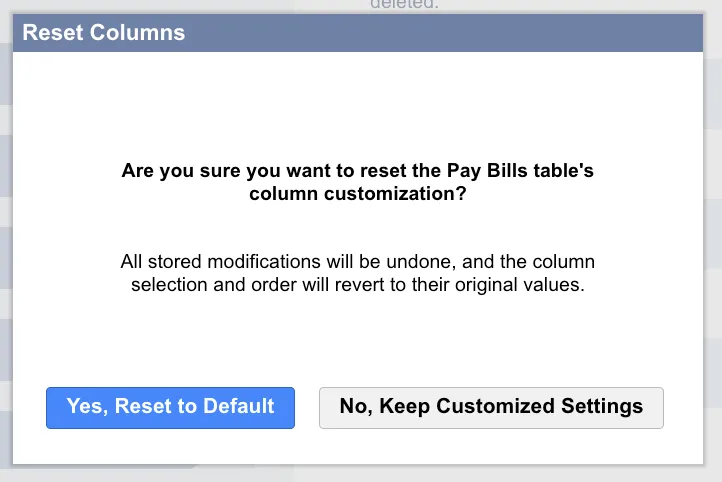
A dialog box will appear, prompting you to confirm whether you really want to reset your column customizations back to default. Click on Yes, Reset to Default to continue.
After clicking Yes, Reset to Default, all column customizations, including any additions, rearrangements, and removals, have been reset to the default selection and position of columns.
You may continue to make more changes from here, or click Save Changes to proceed with the default columns.
Required Permissions
A number of permissions are required for a user to fully access and make customizations to columns and filters:
- Access to the following Suitelet scripts:
- Santander Vendor Bills
- Santander User Customization
- Access to the below NetSuite User/Role Permission:
- Custom Fields (Level: View)
- Subsidiaries (Level: View)
- Accounting Lists (Level: View)
- Set Up Company (Level: View)
- Optional, but ideal for customizable filters
- Manage Accounting Periods (Level: View)
- Optional, but ideal for customizable filters
Suitelet Script Access
After updating the plugin, a NetSuite Administrator is required to grant employees permissions to the Santander Pay Vendor Bills Suitelet script in order for employees to access the page where the “Customize” button is located, as well as the Santander User Customization Suitelet script in order for the “Customize” button to work.
Suitelet script permissions can be accessed by navigating to Customization → Scripting → Script Deployment.
Use the following filters:
- On the Type dropdown select Suitelet
- On the API Version dropdown select 2.1
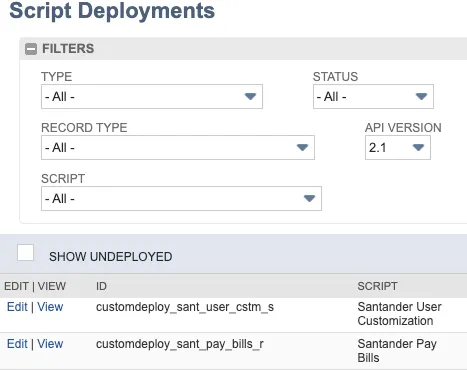
Click "Edit" beside both Santander Pay Vendor Bills and Santander User Customization.
Under the Audience sub-tab, select the appropriate employees, departments, and roles to which you would like to assign permissions. Then, click Save.
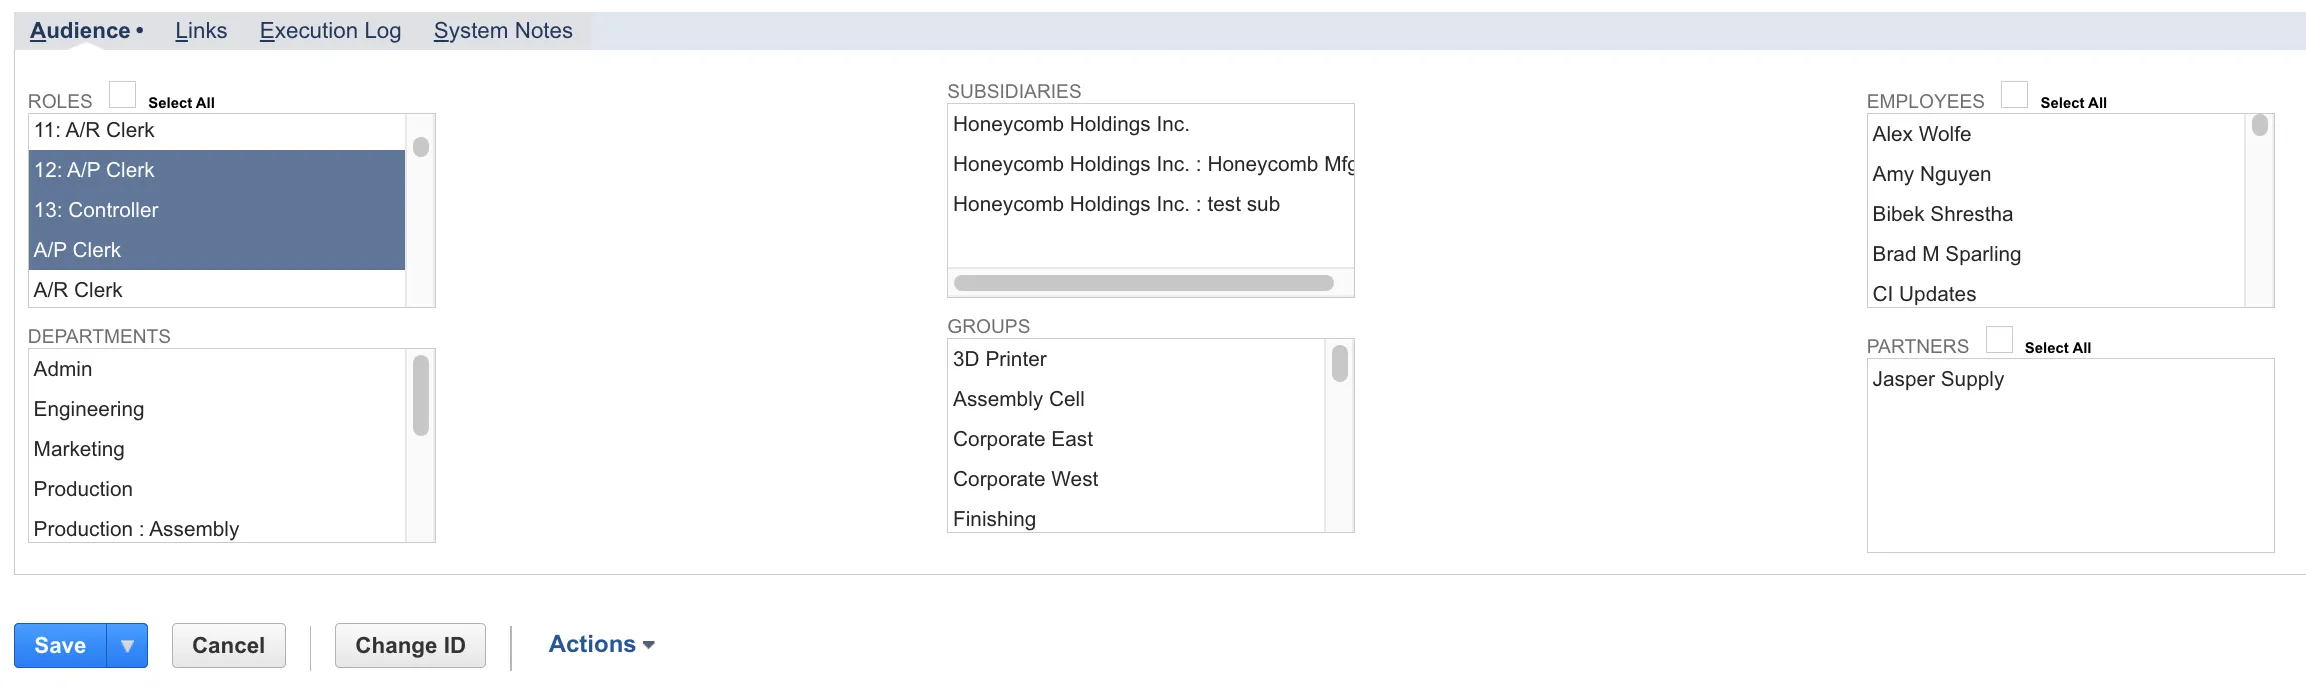
Without enabling a user permissions to the Santander User Customization script, a user who clicks the “Customize” button on the Pay Vendor Bills page will be directed to an error page, stating “You do not have privileges to view this page”.
To use the plugin, you'll need to set up two types of users: a Web Service User and an A/P (Accounts Payable) and/or Accounting User.
Web Service User
This is a generic role designed for accessing and interacting with web services, including your bank plugin in NetSuite. It requires assigning the Bank Integration Web Service Role, to which access tokens are attached for both the Web Service User and the role itself.
While some users choose to assign the Bank Integration Web Service Role directly to a specific person, this creates a risk: if that user loses their NetSuite access or leaves the company, the access tokens will become void. To avoid this, we recommend creating a dedicated Web Services User and assigning the Bank Integration Web Service Role and tokens to them. This significantly reduces the risk of service disruption.
A/P (Accounts Payable) and/or Accounting User Role
This is the role for users who will be performing various plugin functions, such as Vendor Payments, Positive Pay, Cash Management, and Book Transfers.
Configure User Role
To configure the appropriate role, navigate to Setup -> Users/Roles -> Manage Roles.
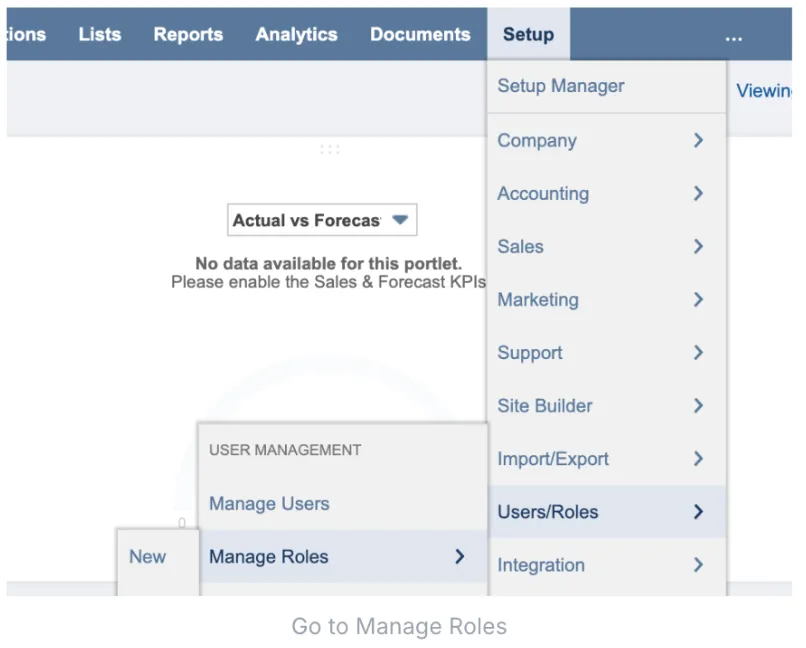
Then, click Edit for the existing role you would like to set up, or click New Role to create a new one.
See the section below for the minimum permissions required for each role.
Bank Integration Web Service Role
Permission Sub-tab | Permission | Level | Detail |
|---|---|---|---|
Transactions | Find Transaction | View (or higher) | Required to void erroneous payments |
Transactions | Make Journal Entry | Create (or higher) | Required to void erroneous payments |
Transactions | Pay Bills | Full | Required to void erroneous payments |
Lists | Accounts | View (or higher) | Required to load accounts in the installation wizard for matching |
Lists | Documents and Files | View (or higher) | Required to access plugin pages |
Setup | Access Token Management | Full | Required to create and manage access tokens |
Setup | Log in Using Access Tokens | Full | Required to generate an Access Token |
Setup | SuiteScript | View (or higher) | Required to access custom scripts |
Setup | SuiteScript Scheduling | Full | Required to schedule payments |
Assign User/Role Permissions
A NetSuite Administrator will also need to grant users permissions to Subsidiaries (Level: View) and Custom Fields (Level: View) so the Customize page can pull in Subsidiaries and any custom fields available on the Bill record.
Locate User/Role Permissions
Navigate to Setup → User/Roles → Manage Roles.
Click Edit beside the role of choice.
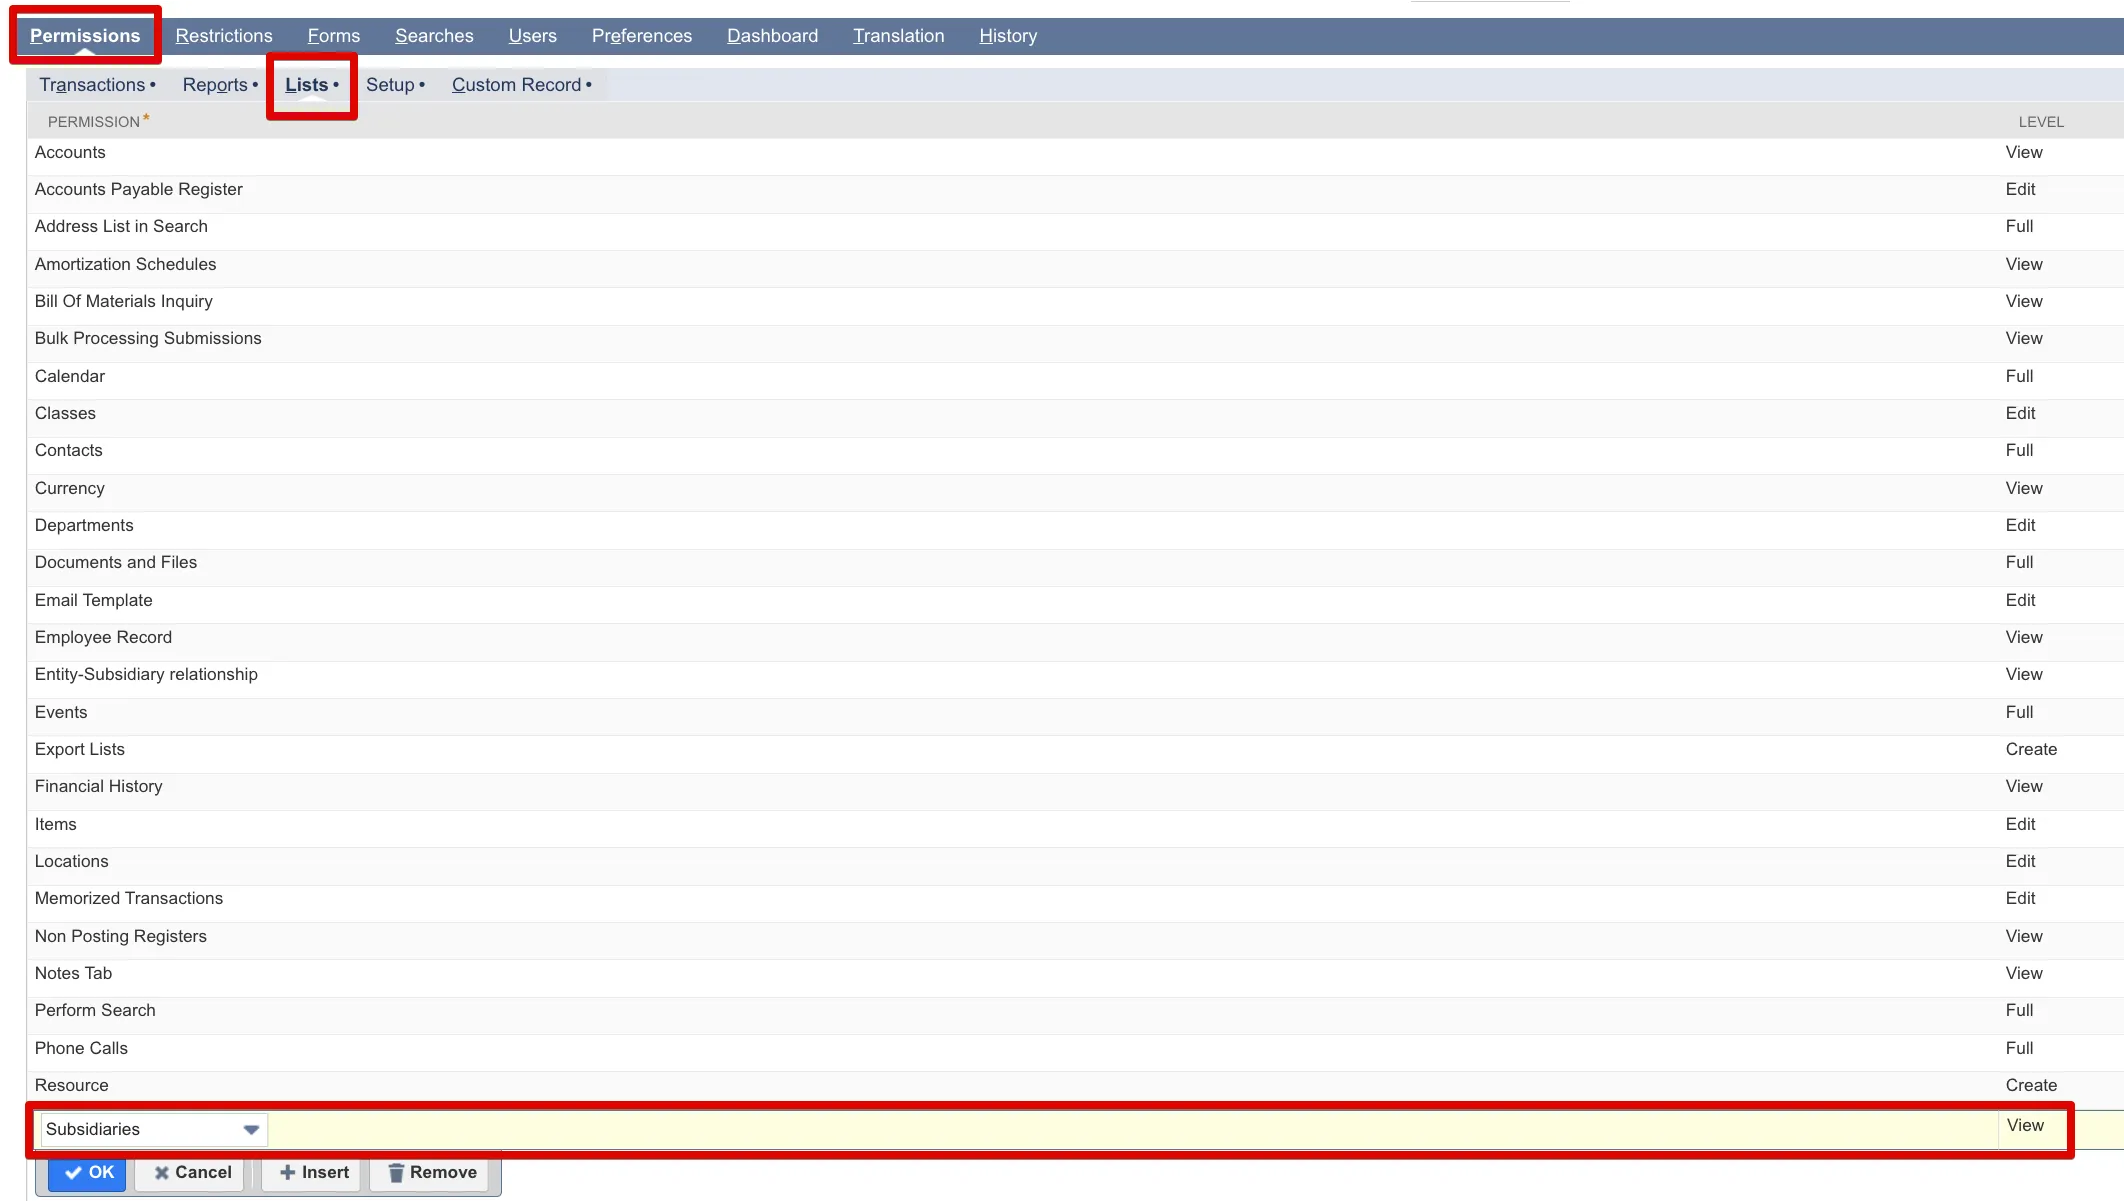
After selecting Edit, go to the Permissions tab → List tab.
Assign Subsidiaries Permissions
Click on the dropdown in the last row of the Permissions table. Scroll through the list or begin typing to find the following permission:
- Subsidiaries (Level: View): Required to add and view subsidiaries as a column option when customizing the Pay Vendor Bills page.
Assign Custom Fields Permissions
Next, click on the Permissions tab → Setup tab. Click on the dropdown in the last row of the Permissions table. Scroll through the list, or begin typing to find the following permission:
- Custom Fields (Level: View): Required to pull in custom fields on the Bill record to be used as a part of customizable columns on the Pay Vendor Bills page.
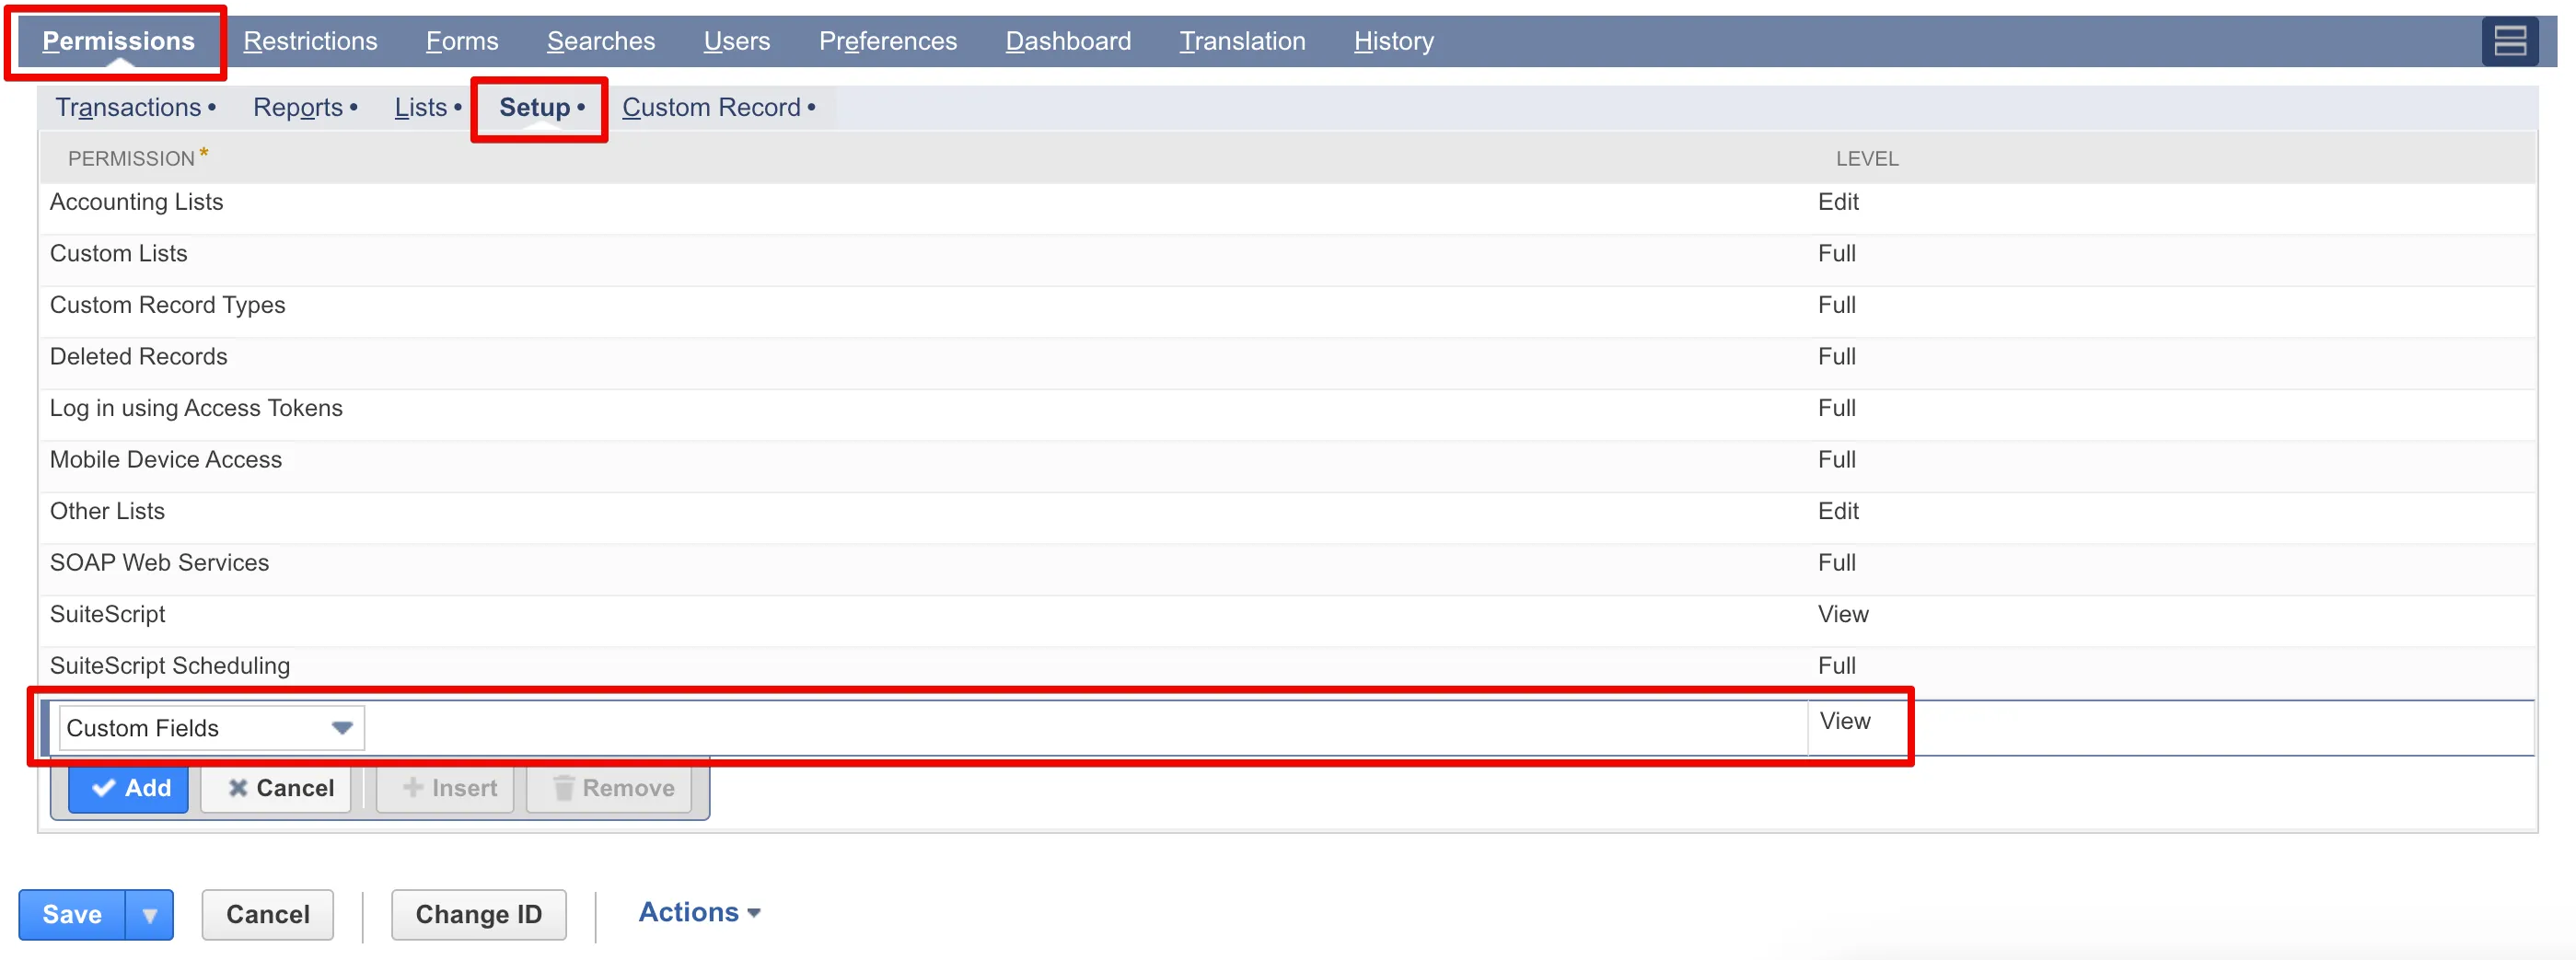
Click Save to save your changes.
NOTE: If Custom Fields (Level: View) permissions are not granted to a Role, the Customize: Pay Vendor Bills page will be stuck on loading and the NetSuite administrator will receive an email titled “SuiteScript Error Summary” or “A User Error has Occurred” that highlights where the error occurred, which user(s) experienced it, and the cause.
The NetSuite administrator will also receive a similar email notification when a user who is not granted permissions for Subsidiaries (Level: View) adds and saves the Subsidiary column to their Selected Columns list. The user will see that their Pay Vendor Bills page will be stuck loading.