FAQ (NetSuite)
Installation & Plugin Setup
Common Errors
Below is a list of common errors encountered during installation and plugin setup in NetSuite. Click on any error message to view the cause and immediate troubleshooting steps for a resolution.
This error appears in a banner. You can see the banner on the bill payments or any of the plugin pages.
This error occurs if the plugin has not been fully connected by completing the installation wizard. Go through the installation wizard again and make sure the token IDs are present.
This error can also happen if you don’t have currencies or the manage authentication field enabled.
This can show up on various pages in the plugin where the current user does not have permission to access it.
To fix this issue, you must have a NetSuite administrator or someone with permissions to configure scripts to assist you with the following steps.
Navigate to Script Deployments
Go to Customization -> Scripting -> Script Deployments
Give Access to Suitelets
Use the following filters:
- Select Suitelet in the Type dropdown
- Select 2.1, in the API Version dropdown
Click Edit on each of the following script deployment Suitelets you wish to edit:
- Wells Fargo Vantage℠ Connect Pay Bills
- Wells Fargo Vantage℠ Connect Paid Bills History
- Wells Fargo Vantage℠ Connect Transfer Funds
- Wells Fargo Vantage℠ Connect Transfer History
- Wells Fargo Vantage℠ Connect Trans Checks (Positive Pay)
- Wells Fargo Vantage℠ Connect Trans Checks History (Positive Pay)
- Wells Fargo Vantage℠ Connect Balances & Transactions
Select the appropriate role, subsidiary, employee, or department you wish to give access to.
Click Save.
If you see this error, you will need to get in touch with a support agent. It is likely that your account either:
- Hasn’t been whitelisted
- Has an incorrect Account ID
- Has a bundle/SuiteApp from a different environment
Common Questions
This list provides answers to common questions that arise during the installation process, to help ensure a smoother setup in NetSuite.
Since the plugin does not auto-update, you must update it manually. The update process depends on how the bank plugin was originally installed.
If the plugin is a SuiteApp:
Navigate to Customization -> SuiteCloud Development -> SuiteApp Marketplace.
Find and click on the bank SuiteApp tile.
Click the Upgrade button in the top-right corner to begin the update.
If the plugin is a bundle:
Navigate to Customization -> SuiteBundler -> Search & Install Bundles -> List.
Find the bank bundle.
Hover over the green icon next to it and select Update.
Permissions must be granted to non-administrators.
Please refer to the Plugin Access Management step in the Plugin Setup -> Installation section of this Support Website.
When a Sandbox Refresh occurs, you will need to complete the onboarding process again. Start by logging into sandbox.fispan.cloud and completing the onboarding steps again.
Cash Management (Information Reporting)
Common Errors
Below is a list of common errors encountered when using the Cash Management (Information Reporting) products in NetSuite. Click on any error message to view the cause and immediate troubleshooting steps for a resolution.
The error is likely due to one of these reasons:
- The system can't access or map the bank account because the information has not been entered into the NetSuite Chart of Accounts.
- To fix this, first update the plugin.
- Then, check your login information before retrying the process.
- Bank account information entered does not match the backend setup.
- Different IDs and environments that we don’t have access to.
The error is likely due to one of these reasons:
- The connecting user in NetSuite lacks the required permissions (e.g., is not an administrator).
- The Consumer Key and Secret were generated incorrectly.
- There are no bank accounts currently configured in your NetSuite environment.
You may have a pop-up blocker enabled on your browser. Please check if the pop-up blocker is preventing the download from appearing, and then try again.
It looks like the account you're trying to use isn't appearing when you use NetSuite's native bank reconciliation feature, Match Bank Data. This usually means the account isn't configured for reconciliation in your Chart of Accounts. You'll need to edit the account settings to enable the reconciliation feature.
Go to Setup -> Accounting -> Chart of Accounts
For the account you need to reconcile, select Edit.
Check the box labeled Use Match Bank Data and Reconcile Account Statement pages.
Click Save.
After following these steps, the account should now be available when you use the Match Bank Data feature.
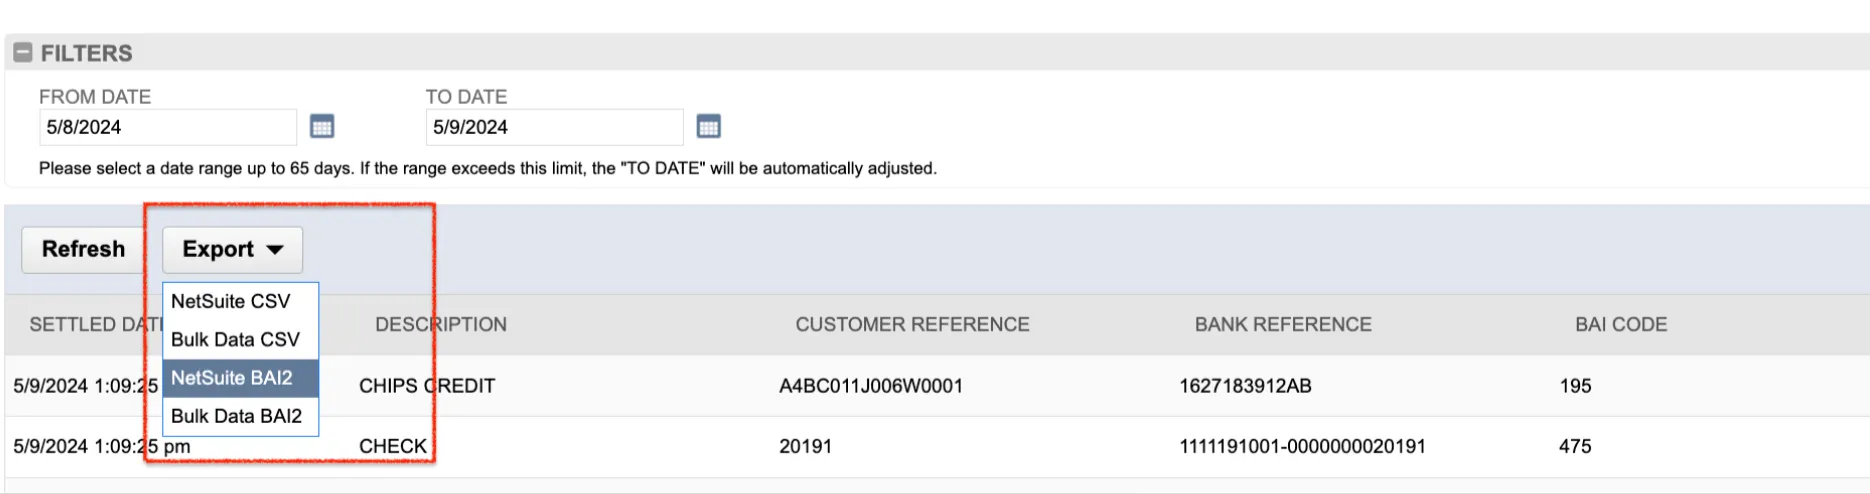
If you are running into this error message when completing a manual import, select NetSuite BAI2 as your Export Format instead.
Common Questions
This list provides answers to common questions that arise when using the Cash Management (Information Reporting) features in NetSuite.
If you are logged in and the plugin is no longer connected, the NetSuite Production may have been refreshed. You will need to re-establish this connection.
Log in to Production
Log in to sys.fispan.live and run through the wizard again.
Deactivate Plugin
If the plugin is still showing as Active or Connected, click on the three dots and select Deactivate.
If you have updated from a Bank plugin version that is older than 2022.2.0, the updated plugin bundle will come with a premade Integration Record.
Define New Token
On the Creating a New Security Token step, you will need to define a new Token ID and Token Secret.
Please refer to 'Create a New Security Token in the NetSuite -> Plugin Setup -> Installation section of this support site for instructions on how to do this.
Revoke Old Tokens [OPTIONAL]
After creating the new Access Token, you may revoke the old ones associated with this bank bundle.
You can do this by following the steps below:
- Navigate to the homepage.
- Find the Settings box on the homepage. By default, this is located on the bottom left.
- Click on Manage Access Tokens.
- Click Edit beside the Token you wish to revoke.
- Click Revoke.
If you are logged in and the plugin is no longer connected, the NetSuite Sandbox may have been refreshed. You will need to re-establish this connection.
Log in to Sandbox
Log in to sandbox.fispan.cloud and run through the wizard again.
Deactivate Plugin
If the plugin is still showing as Active or Connected, click on the three dots and select Deactivate.
If you have updated from a Bank plugin version that is older than 2022.2.0, the updated plugin bundle will come with a premade Integration Record.
Define New Token
On the Creating a New Security Token step, you will need to define a new Token ID and Token Secret.
Please refer to Create a New Security Token of the NetSuite -> Plugin Setup -> Installation section of this Support Site for instructions on how to do this.
Revoke Old Tokens [OPTIONAL]
After creating the new Access Token, you may revoke the old ones associated with this bank bundle.
You can do this by following the steps below:
- Navigate to the homepage.
- Find the Settings box on the homepage. By default, this is located on the bottom left.
- Click on Manage Access Tokens.
- Click Edit beside the Token you wish to revoke.
- Click Revoke.
This is likely the result of Token-Based Authentication not being enabled on this NetSuite Company.
Please refer to Configure NetSuite Feature of the NetSuite -> Plugin Setup -> Installation section of this Support Site for instructions on how to enable.
No, the plugin itself does not send email notifications or support push notification messaging. However, the NetSuite admin who set up the bank feeds for clients in NetSuite can receive email notifications from the native NetSuite account regarding successful import or failure. Please contact your NetSuite administrator to resolve the issue.
Yes. Contact your bank and ask them to enter a unique Account Holder Name for each bank account using the details you provide. If there is an entry in the Account Details -> Account Holder Name field, this name will appear on vendor payments; otherwise, it will default to the Account Label (i.e., Company Name).
For example, if the umbrella company is ACME Holdings, the name on the payments would appear as coming from ACME North or ACME South, etc., based on the bank account used for the payment.
Vendor Payables ---
Common Errors
Below is a list of common errors encountered when using the Accounts Payable features in NetSuite. Click on any error message to view the cause and immediate troubleshooting steps for a resolution.
This is an error generated by NetSuite when the subsidiary on the payee (i.e. Vendor) does not match the subsidiary the bill is associated with.
Users are recommended to use the Subsidiary filter on the Pay Vendor Bills page when paying bills to a specific subsidiary.
Using the Subsidiary filter will also filter out Source Accounts that users want to use for bill payments in the Confirm Payment window during the final step of making a payment.
This error can be seen on various pages in the bank bundle, such as the Pay Vendor Bills page.
This error is likely caused by Multiple Currencies not being enabled on this NetSuite Company. To confirm whether this is the case, please refer to Step 7 of the NetSuite -> Plugin Configuration -> Installation and Set-up section of this Support Site for how to enable this.
If Multiple Currencies is already enabled, please check the NetSuite Execution Logs by following the steps below:
Navigate to Customizations -> Scripting -> Script Execution Logs
Select ALL in the LOG LEVEL filter
Click the DATE/TIME column to reorder the table so that the most recent logs appear at the top.
Check the SCRIPT and DETAIL columns to see whether the error is related to the bank bundle and where specifically the error occurred.
If the error appears to be related to the bank bundle, please reach out to Vantage Connect support via your WF representative with a screenshot of the above Script Execution Logs.
If you see this error, batching may not be enabled. Get in touch with Vantage Connect support via your WF representative for assistance.
The Address must appear on both the Bill and the Vendor. If you have updated the Address on the Vendor already, NetSuite does not automatically update the address on any open Bills for that same vendor.
You must go into the open bill(s) and update the address:
Go to the Bill record
Click the Billing subtab
Select the Vendor address in the Vendor Select dropdown field
Click Edit
Click Save
You're seeing this error because you're attempting to process a payment for a bill that has already been paid using the plugin. Essentially, there is already a payment recorded against that bill's NetSuite Internal Bill ID. The system is preventing a duplicate payment.
If you need to void the existing payment and then resubmit it, you must follow a specific process through the bank plugin. Please refer to the Voiding and Repaying Bills page within the NetSuite -> Vendor Payables section of this support site for detailed instructions on how to properly void and repay the bill.
The bank payment plugin relies on Custom Records to function correctly. We use a custom record to create and track the bill payment record for you.
If this feature isn't enabled, the plugin cannot create that necessary custom record. This prevents us from correctly marking bills as paid, which ultimately stops you from using the plugin altogether.
Enable this feature by following these steps:
Hover over Setup
Hover over Company
Click Enable Features
Click the Suitecloud tab
Go to the SuiteBuilder section
Check the Custom Records box
This is an error generated by NetSuite when there is a mismatch between the mandatory fields required for a Bill in comparison to a Payment. The error may appear if you try to pay a bill under a different subsidiary than your source (disbursement) account.
To resolve this, follow these steps:
Go to Transaction Forms
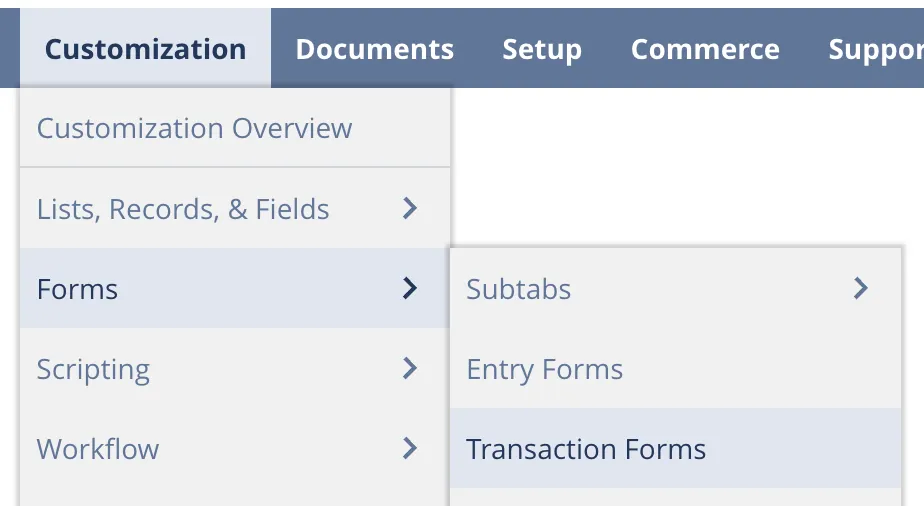
Navigate to Customization → Forms → Transaction Forms.
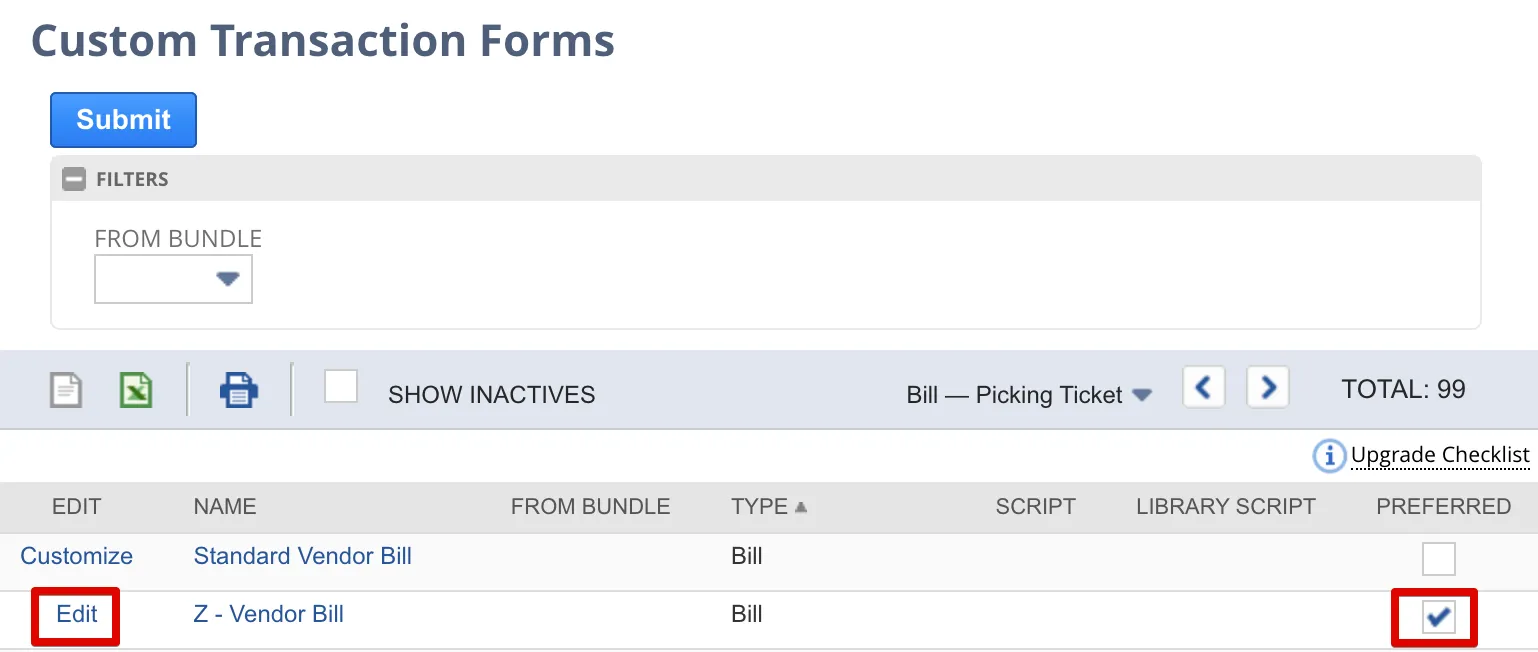
Click Edit beside the Bill form you typically use and that is marked as Preferred.
Locate Department and Location
On the Custom Transaction Form page for the selected Bill form, click on the Screen Fields → Main sub-tabs.
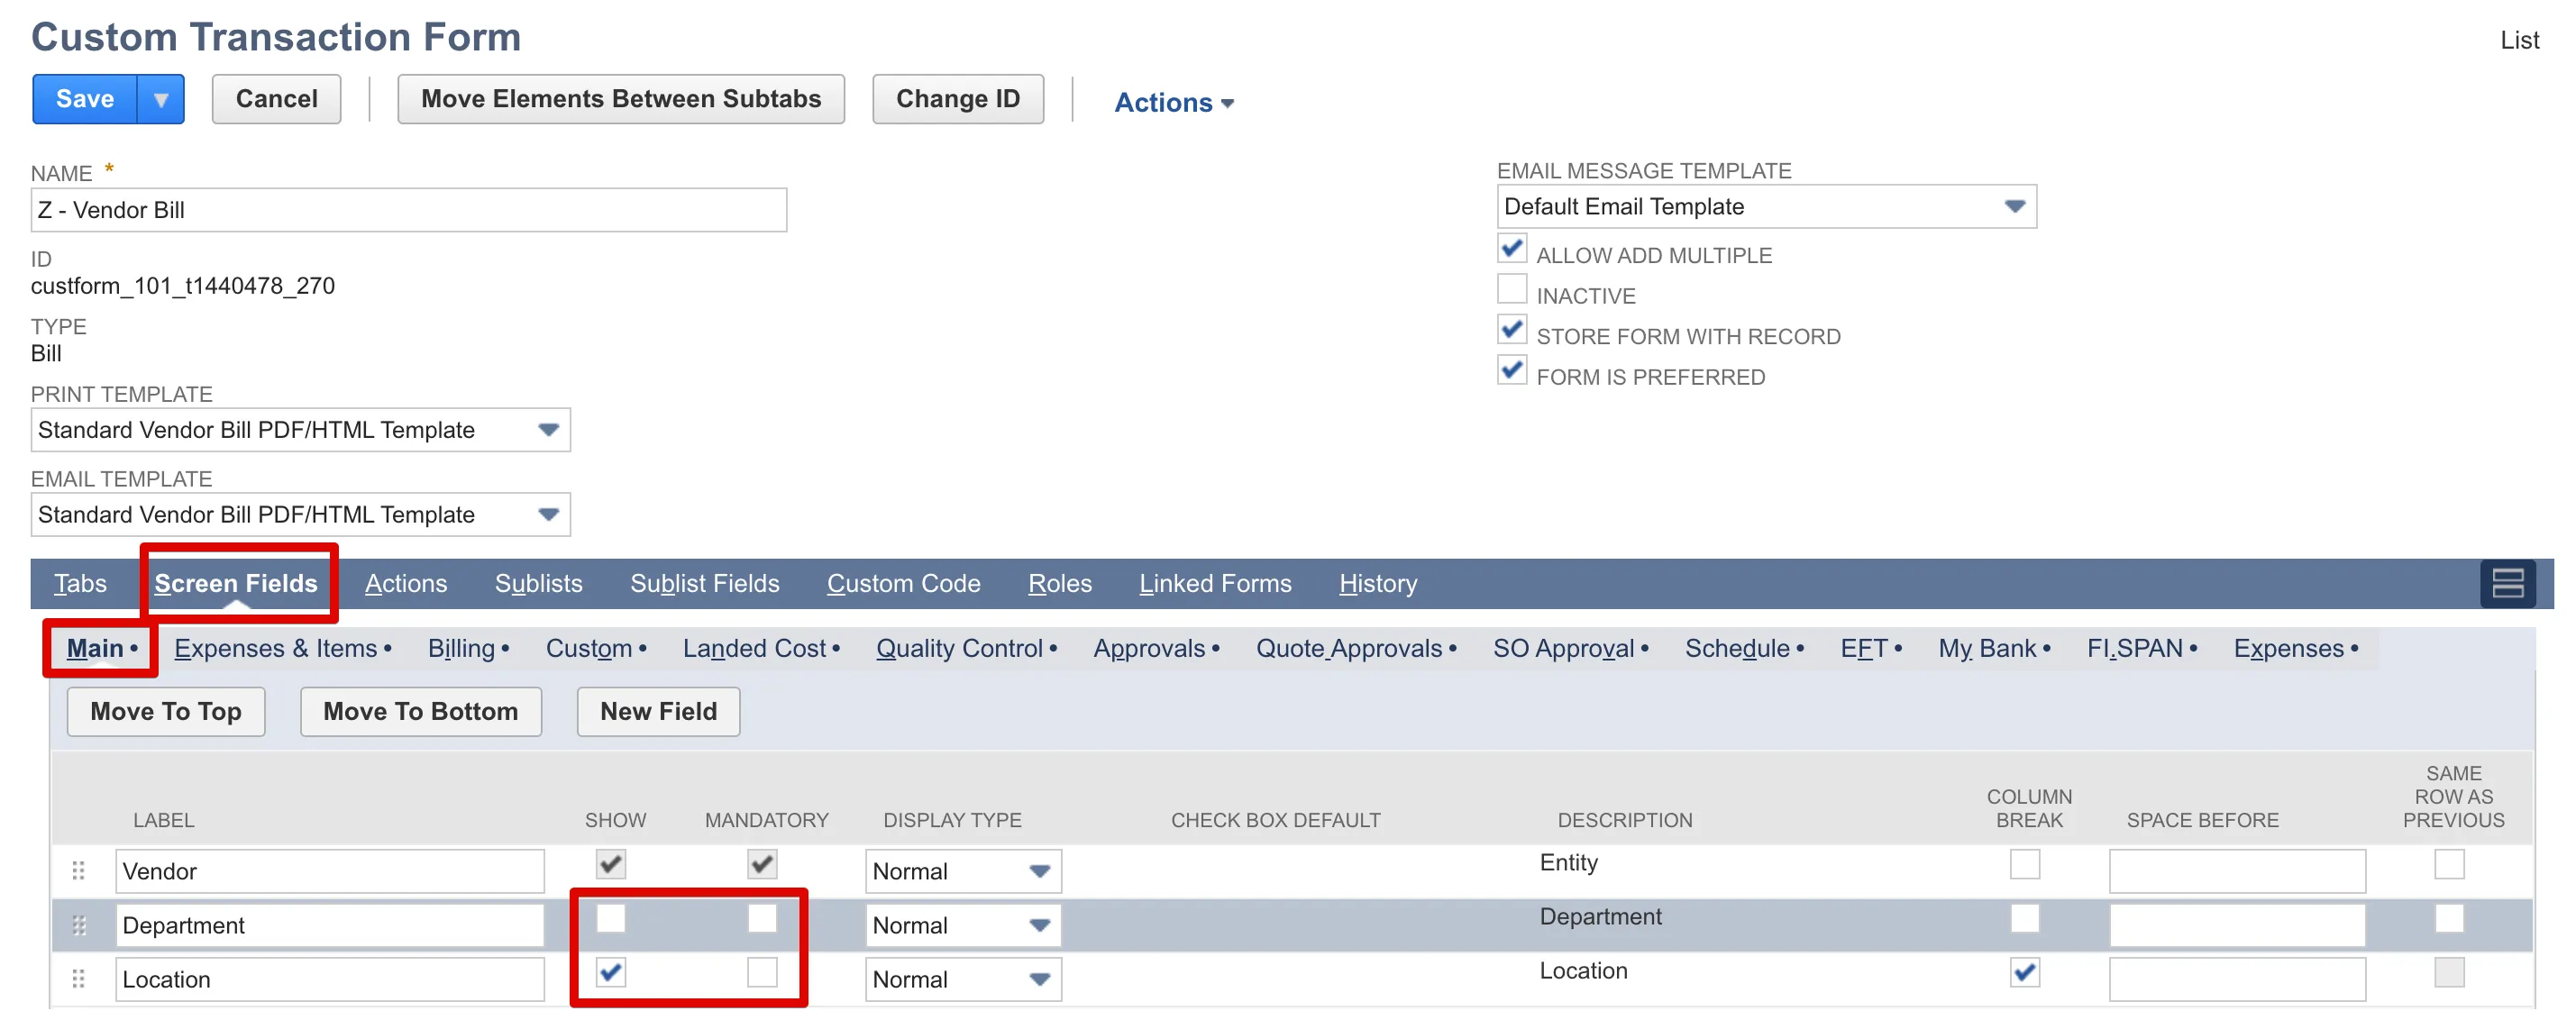
Find the Department and Location fields and make note of whether they have Show and/or Mandatory enabled.
If Department and Location cannot be found under the Screen Fields list, check the Sublists sub-tab.
Match Bill Form and Bill Payment
Navigate back to the Transaction Forms page, and click Edit beside the Bill Payment form you typically use and that is Preferred.
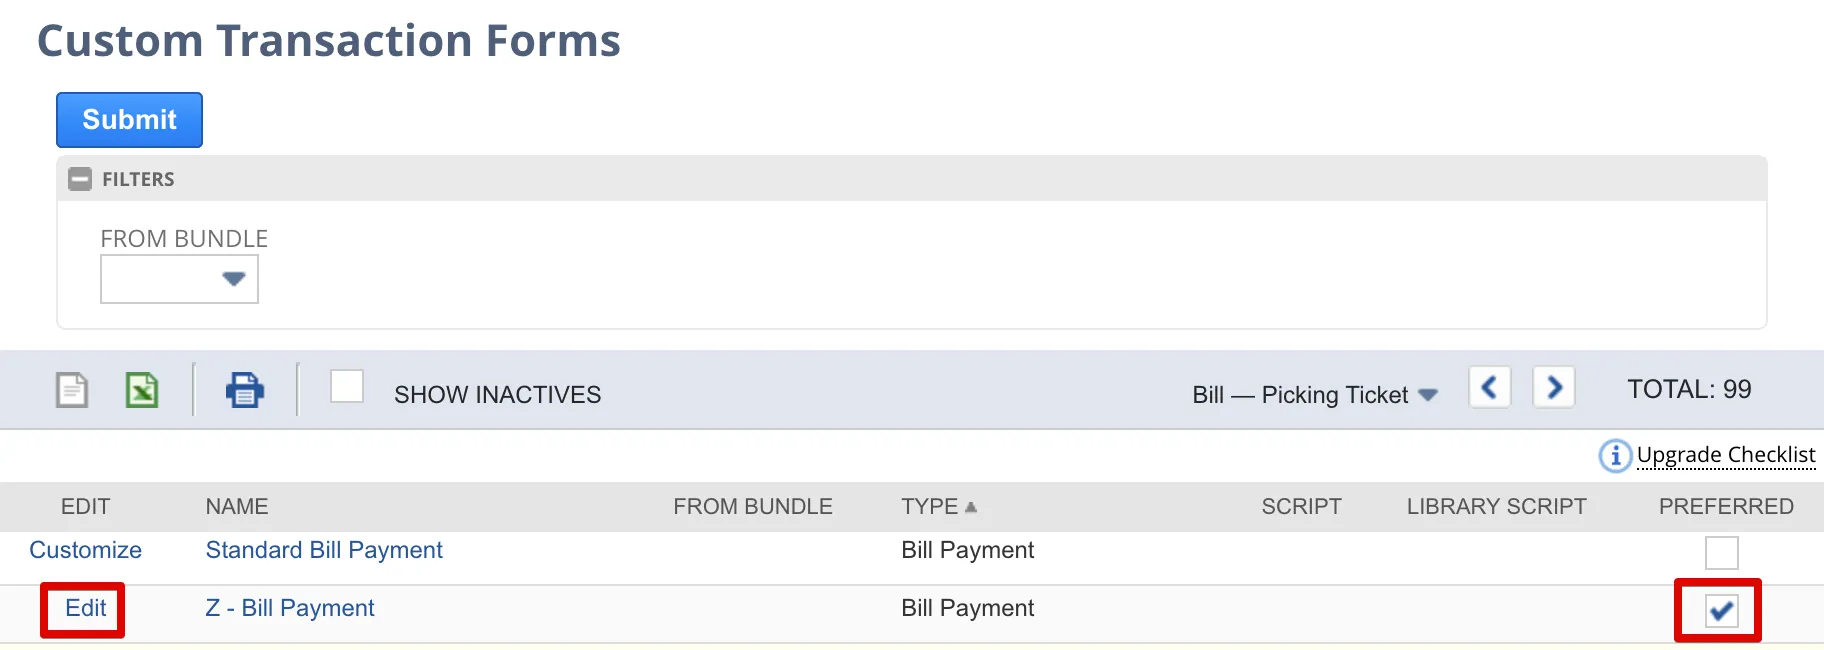
On the Custom Transaction Form page for the selected Bill Payment form, click on the Screen Fields → Main sub-tabs.
Like with the Bill form previously, find the Department and Location fields. Check if Show and/or Mandatory is enabled and whether they match the Show and Mandatory selections on the Bill form.
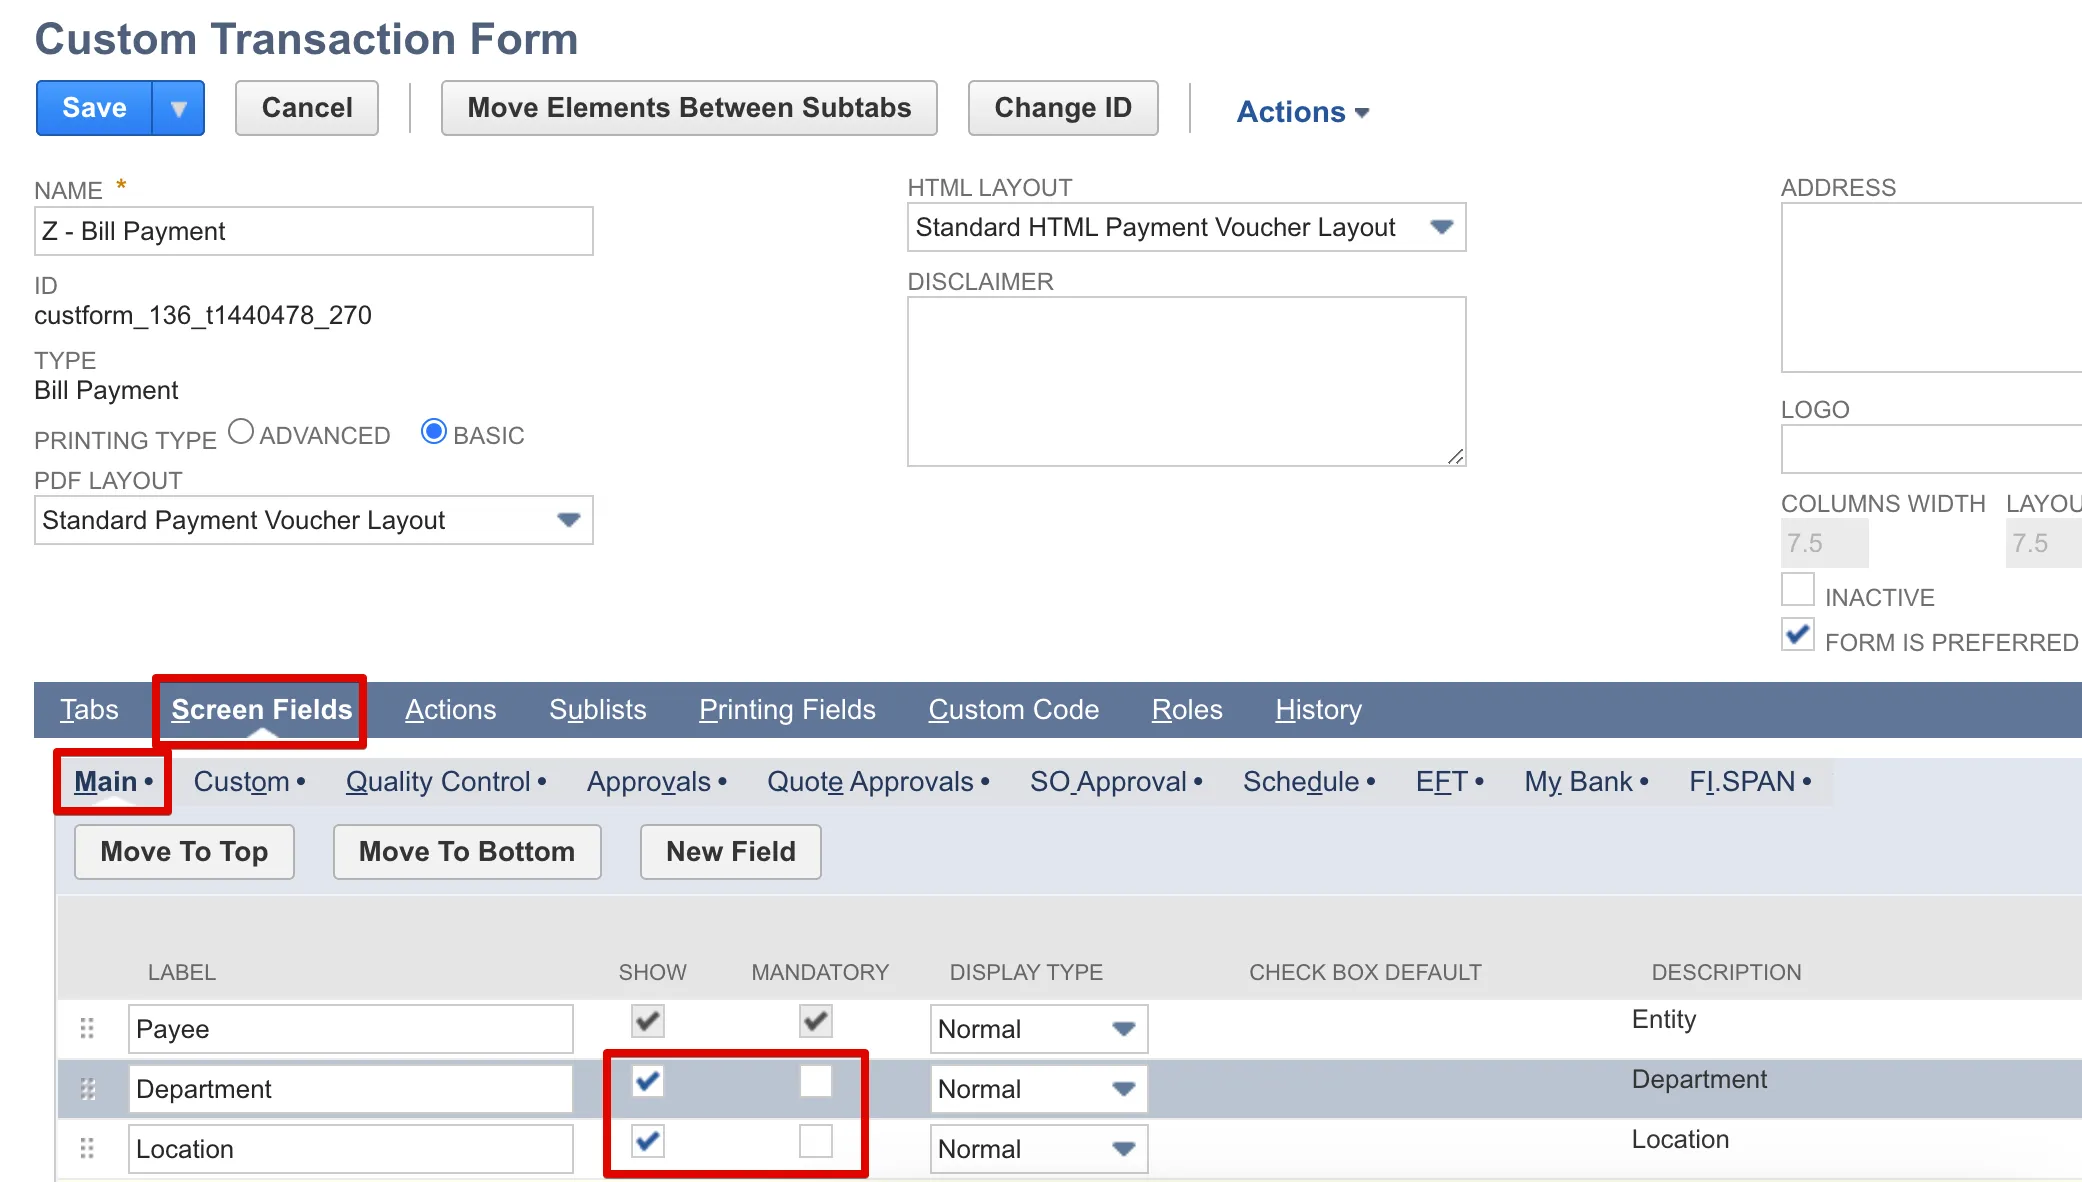
Make the appropriate changes on the Show and Mandatory fields on Department and Location on the Bill Payment form to match the same field selections for Show and Mandatory fields on Department and Location on the Bill form.
If you execute a checkprint request using an account that is not set up for making checkprint payments you will see this error.
Options to deal with the issue:
- If you would like to add check functionality to this account, reach out to your bank.
- You can ask a customer support agent to check the SOWs/Enrolment forms we got from the bank to make sure we didn’t make a mistake.
- You can confirm which accounts are set up for checks with customer support and make payments with these accounts instea
Common Questions
This list provides answers to common questions that arise when using the Accounts Payable features in NetSuite.
Yes, you can enable this feature by going into the Vendor, selecting Edit, and ticking the box for Group Bills for Payment under the Bank tab. This feature will group all selected bills for a single vendor into one lump sum payment.
This Processing status can take between 3 to 4 business days to clear, even if the bill payment has failed. If the bill appears again on the Open Bills tab on the Pay Vendor Bills page, you may safely retry this bill payment.
If your bill remains open after payment, check these potential causes:
- The required bundles, either the Entity Bank Details bundle (ID 323878) or NetSuite's Electronic Bank Payments bundle, may not be installed. Verify their installation status.
- Your current role might lack the permissions needed for the bank plugin or associated scripts. See the Plugin Access Management and NetSuite Role Permission steps in the NetSuite -> Plugin Setup -> Installation section of our website.
- You may be attempting to pay a bill that is locked because the relevant Accounting Period has already been closed.
To find out if the bill/account is locked:
Open the bill in question
Click the Open Bills tab
The bill will have a lock symbol on the top left corner if the bill is locked,
If the relevant Accounting Period is closed, you should reopen the Accounting Period by following these steps:
Go to Setup -> Accounting -> Manage Accounting Periods
Click Edit on the Accounting Period and enable the Allow Non-GL Changes option.
Your AP team might have some internal controls over the above Accounting Period steps.
Please refer to the Failed Bills page on the NetSuite -> Troubleshooting section of this support site for more details.
Download our free NetSuite bundle, Entity Bank Details (ID 323878). If you cannot find it on the Search & Install Bundles page, please reach out to Vantage Connect support via your WF representative as you may need to be whitelisted.
Applying this Subsidiary filter on the Pay Vendor Bills page impacts what Source Accounts are available, as the Source Accounts must be tied to the selected subsidiary. If no Source Accounts are linked to this subsidiary, no Source Account will be displayed.
Payments are batched and sent to Host-to-Host at 10 minutes to the hour (xx:50). Please check again later.
No, bills paid using CheckPrint are automatically sent with Positive Pay confirmation.
If your files are released by 8pm EST, the checks will be mailed on the next business day.