Pre-Onboarding Checklist (NetSuite)
Prior to beginning installation, please follow the steps below to ensure that the installation process runs smoothly.
An onboarding call may be optionally scheduled by your HSBC representative to support with installation and any missed pre-onboarding steps may result in the onboarding call being canceled and rescheduled. If an onboarding call is required, your HSBC representative will inform you.
You will need an HSBCnet System Administrator when connecting your HSBC bank accounts.
Bring a NetSuite Administrator
The installation process requires a NetSuite Administrator (or someone with sufficient permissions) to be present. The user is required to have the following permissions:
- Install plugin
- Create access tokens
- Configure features for the NetSuite company
- Define permissions on scripts
- Manage users/roles
Review Multiple Currencies Setup
The plugin is built with multi-currency to support growing businesses that scale beyond single-currency operations. In NetSuite, it is mandatory to enable the Multiple Currencies feature. Attempting to use the plugin without this feature enabled will result in a SuiteScript error on every page.
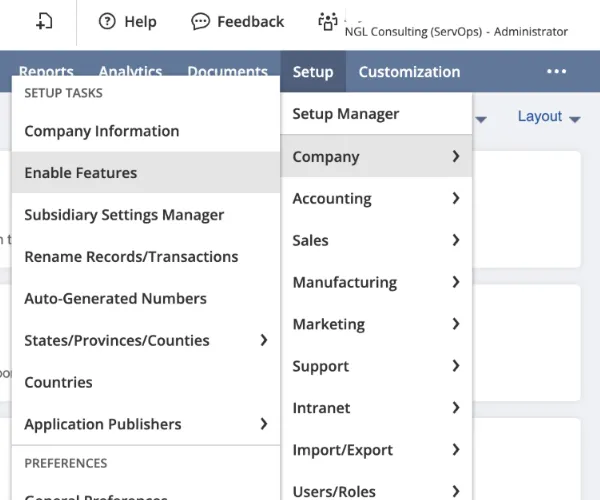
You can verify your Multiple Currencies setup by navigating to Setup → Company → Enable Features.
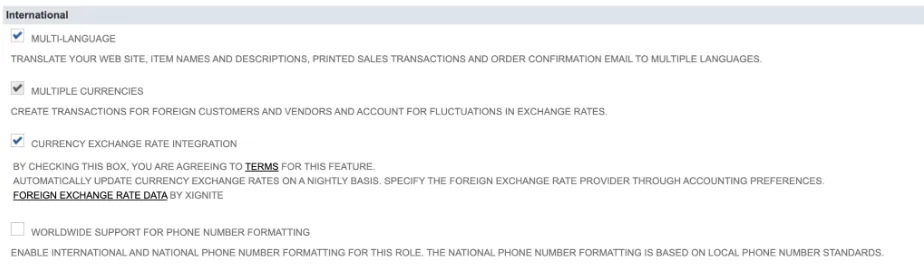
The Multiple Currencies feature can be found within the Company tab.
The Multiple Currencies feature can be found within the Company tab in the International section.
Note Your NetSuite Edition
NetSuite offers OneWorld and non-OneWorld editions. Please check if Subsidiaries are present in your NetSuite environment by navigating to Setup → Company → Subsidiaries. If Subsidiaries are present, you are subscribed to a OneWorld edition.
Book Transfers and other features in your bank plugin may be incompatible with non-OneWorld editions of NetSuite, as they require Subsidiaries to be enabled.
Disable Payment Approvals Inside NetSuite
Applicable if using the Accounts Payable product.
The plugin does not support the Payment Approval workflow inside NetSuite. If you leverage NetSuite’s payment approval currently, we strongly recommend moving that process inside the other payment approval options available to you.
Continuing to use that process blocks the plugin from creating a bill payment record in NetSuite, resulting in a failed bill payment.
Confirm Sandbox Testing
If you use the Accounts Payable product, custom workflows, scripts, or any third-party applications or plugins, we recommend testing in a NetSuite Sandbox environment before moving to Production. This essential step ensures a smoother transition onto the plugin and helps prevent disruption to your service.
Note Any Custom Workflows or Scripts
The plugin works best in NetSuite environments that do not have any customized workflows or scripts that block or alter standard Accounts Payable workflows, such as bill payment creation or the vendor record. Common examples include approval workflows.
Please check with your HSBC representative for what payment approval steps are available to you.
Prior to installing to Production, it is recommended that you test the plugin thoroughly in a NetSuite Sandbox environment that contains custom workflows or scripts that pertain to Accounts Payable.
Note Any Third-Party Plugins or Applications
Other third-party plugins, applications, or integrations within NetSuite may not work perfectly with your new bank plugin.
Prior to installing to Production, it is recommended that you test the plugin thoroughly in a NetSuite Sandbox environment containing relevant third-party applications to avoid any future disruption to service.
Note Where Banking Details Are Stored
NOTE: If you are not an Accounts Payable user, please skip this step.
Make a note of where your payee's bank details are currently stored. Our supplementary Entity Bank Details currently allows users to migrate data from NetSuite's Electronic Bank Payments bundle, while also providing import templates for banking data that may be stored elsewhere.
We strongly recommend using our Entity Bank Details for greater support of additional payment types and for a smoother user experience.
Review Limitations
The NetSuite bank plugin and the supplementary Entity Bank Details are currently not able to support the following:
- Environments without NetSuite's Multiple Currencies feature enabled
- Non-OneWorld NetSuite editions (no Subsidiaries)
- Partial Payments
- Automated reconciliation Transaction data directly into the NetSuite reconciliation module(s)
- Handling of payroll or employee commissions
- User-specific approvals within NetSuite for payments submitted through the bank plugin
- Read from the payee bank data stored outside of our supplementary Entity Bank Details
- Conduct saved searches or run reports on bank information stored in the Entity Bank Details
Have the Invitation Email Handy
You should have received an invitation email from your bank with links to install the Plugin in NetSuite. Ensure that at least one person attending the call has access to this email, whether they were the original recipient, or it was forwarded to them.
Have Your NetSuite Account ID Handy
This can be found by navigating to Setup → Company → Company Information.
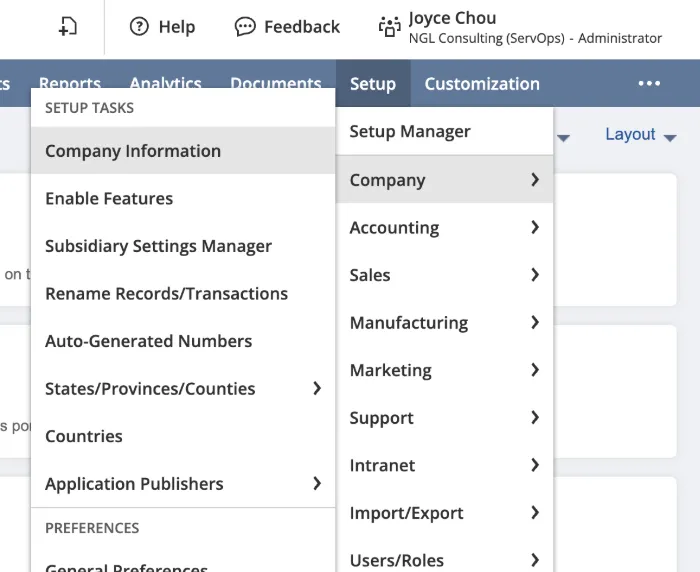
Within the Company Information page, you can find your Account ID. Copy this Account ID somewhere and save it, as we will need this information during the installation process.
Confirm Hardware & Software Requirements
Browser support (minimum versions):
- Chrome: 65
- Firefox: 66
- Safari: 12
- Edge: 79
Operating systems (minimum versions):
- Windows 7
- macOS - El Capitan
Minimum screen resolution:
- 1200x800px
Configure NetSuite Features
While not a mandatory step, configuring your company’s NetSuite features ahead of time will speed up the onboarding process significantly.
Please follow the steps below to enable the required features.
Navigate to Enable Features
In NetSuite, go to Setup → Company → Enable Features.
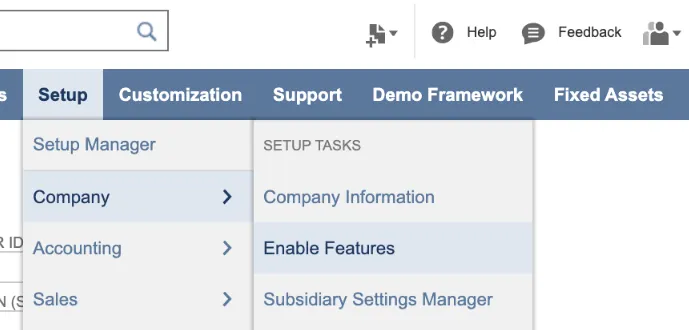
Enable Multiple Currencies
Under the Company tab, select Multiple Currencies.
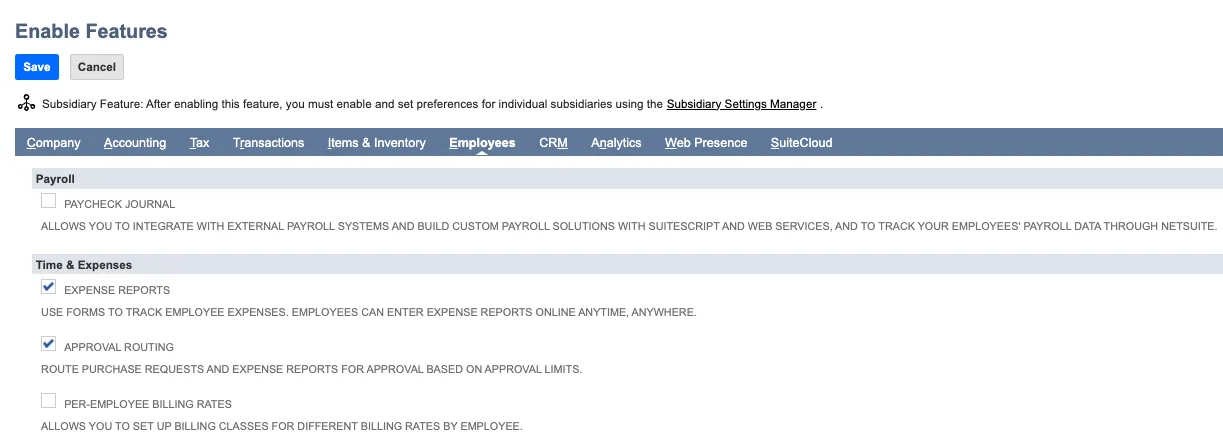
Enable Expense Reports
Under the Employees tab, enable Expense Reports (This is required for Apply Bill Credits functionality).
Enable SuiteCloud
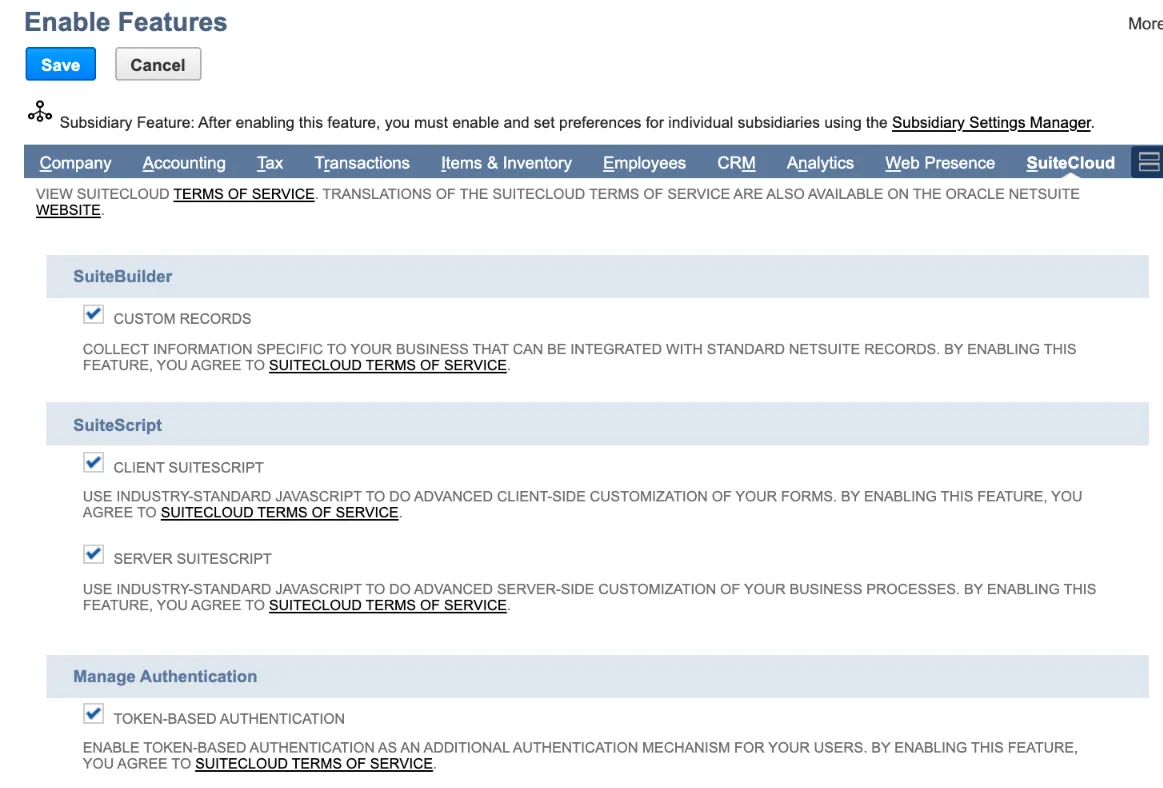
Under the SuiteCloud tab, select the following items:
- Custom Records
- Client SuiteScript
- Server SuiteScript
- Token-Based Authentication
- REST Web Services
Click Save.
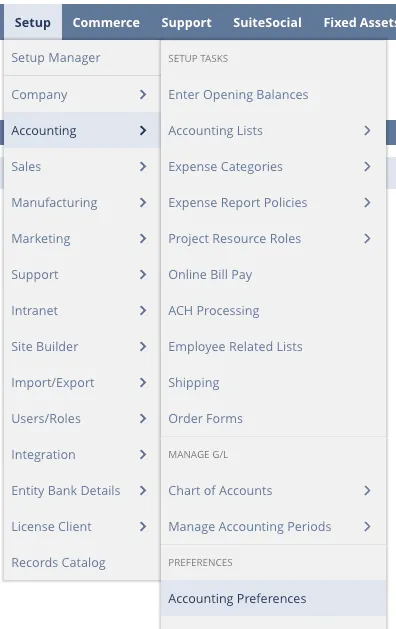
Set Up Accounting Preferences
Go to Setup → Accounting → Accounting Preferences.
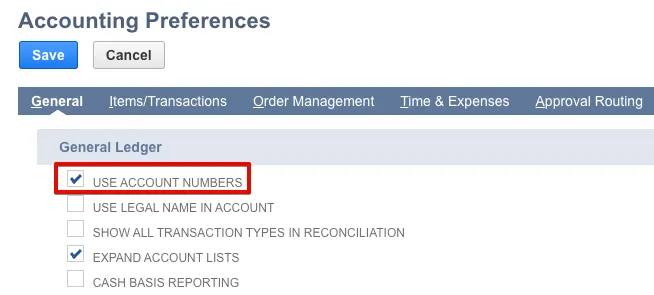
Enable Account Numbers
Under the General tab, select the Use Account Numbers checkbox.
Click Save.