Enabling Bank Feeds (NetSuite)
Bank feeds allow for your settled bank transactions to automatically flow into NetSuite's Match Bank Data module for reconciliation, removing the need to export and import bank statements manually. To enable bank feeds, follow the instructions below.
Please take note of the following field mappings for data received from your bank within the Match Bank Data page in NetSuite.
NetSuite (Match Bank Data) | Transaction Data |
|---|---|
Transaction Date | Settled Date |
Type | Transaction Type |
Transaction Number | Check Number* (if non-null) or Customer Reference* |
Name | Counter-Party Name* |
Memo | Description |
Amount | Amount |
* Information denoted with a star will only be displayed if the transaction includes it. Note that not all transactions will have all the above data.
NOTE: Aside from the custom Connectivity Method and Transaction Parser that is named after your bank, everything else discussed in this guide is owned and managed by NetSuite. This includes, but is not limited to, the following:
- Match Bank Data module
- Financial Institution configuration
- Format Profile configuration
- Banking Import History page
As this process is owned and managed by NetSuite, the timing of when the daily import of bank transactions cannot be customized. NetSuite will randomly assign a time, usually between 4 AM and 7 AM PST.
NOTE: You may not see transactions in the Match Bank Data page upon setup, as our bank feed solution will import all prior-day transactions the day after setup and continue to do so onwards.
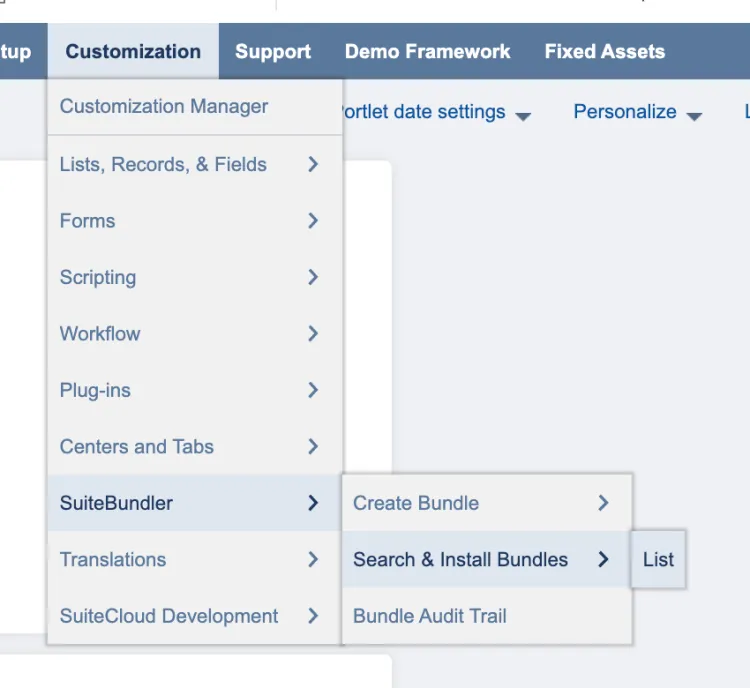
Step 1: Locate Bundle
Go to Customization → SuiteBundler → Search & Install Bundles → List.
Step 2: Update Bundle
Find the CNB Pay bundle from the list. Then, hover over the green icon and select Update.
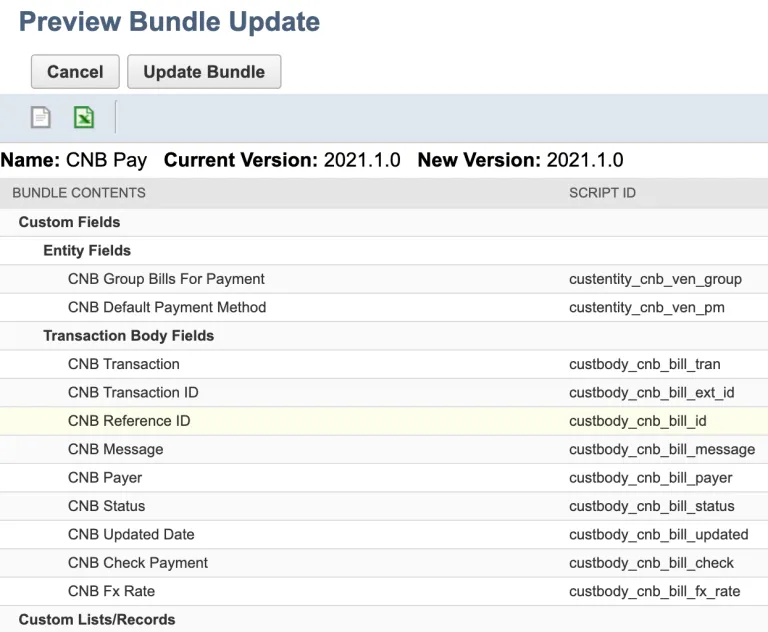
Select Update Bundle, and select OK on the confirmation pop-up.
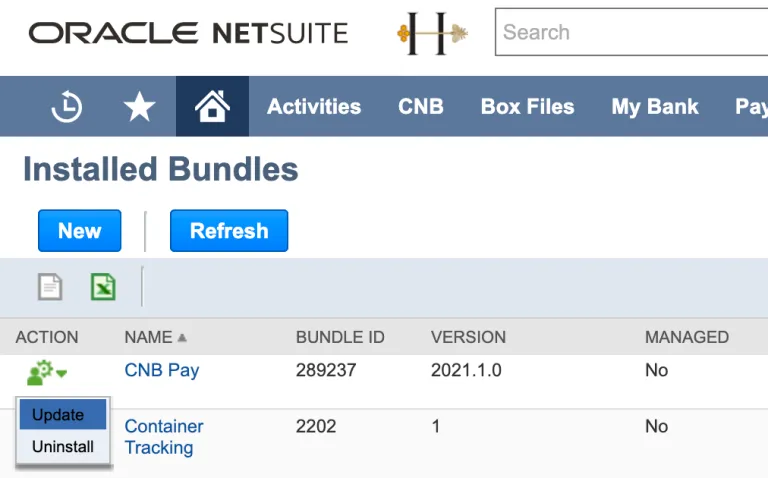
Keeping your NetSuite Bundle up to date with the latest version is crucial for ensuring you have access to all the newest features, important bug fixes, and updates. To update your bundle, please follow these steps.
Note: Non-administrator users who will be setting up and managing Bank Feeds must have the following permission:
- Setup → Financial Institution Records – Level: Full
They must also be added as an audience for the following Script Deployment (can be found under Customization → Scripting → Script Deployments):
- CNB Trans Feed Config (ID: customdeploy_cnb_rpt_feed_s)
Step 3: Create a New Financial Institution
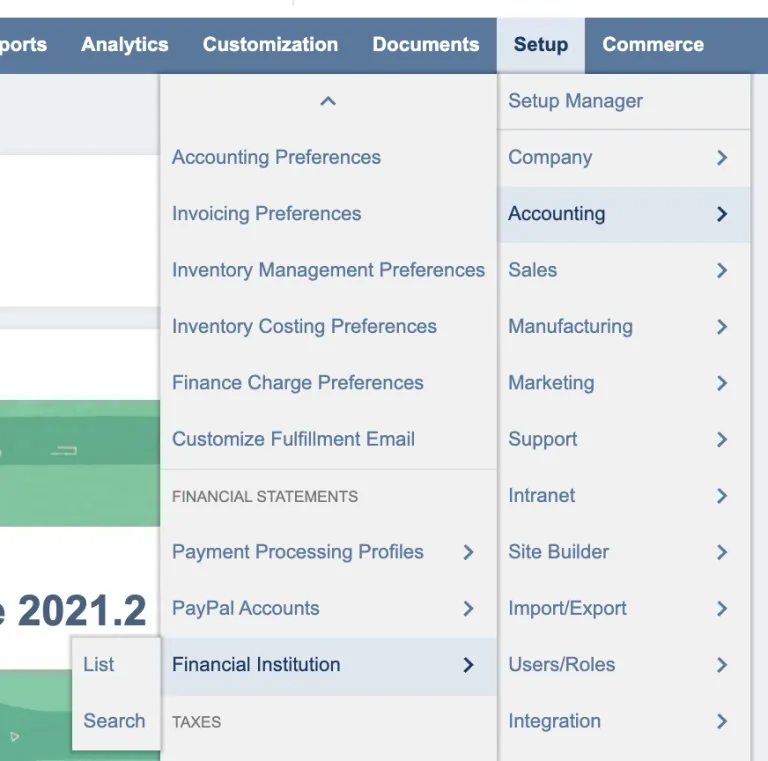
Navigate to Setup → Accounting → Financial Institution.
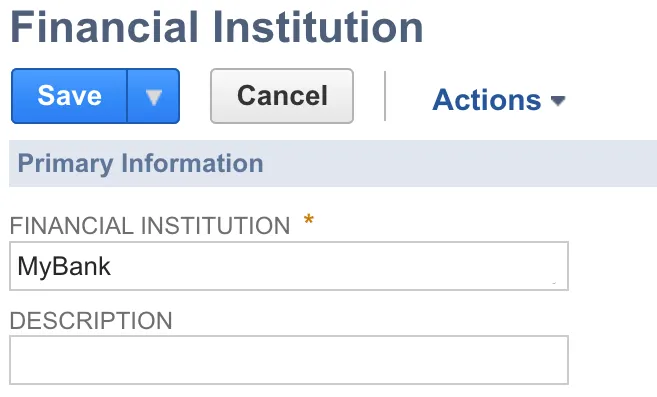
Enter the name of your bank the Financial Institution field. Then, select Save.
Step 4: Create a New Format Profile
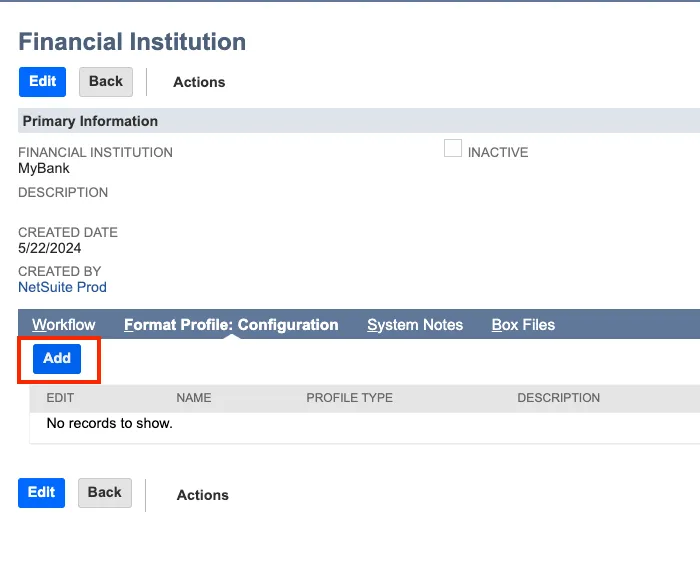
On the Financial Institution, click the Format Profile: Configuration tab and then click the Add button.
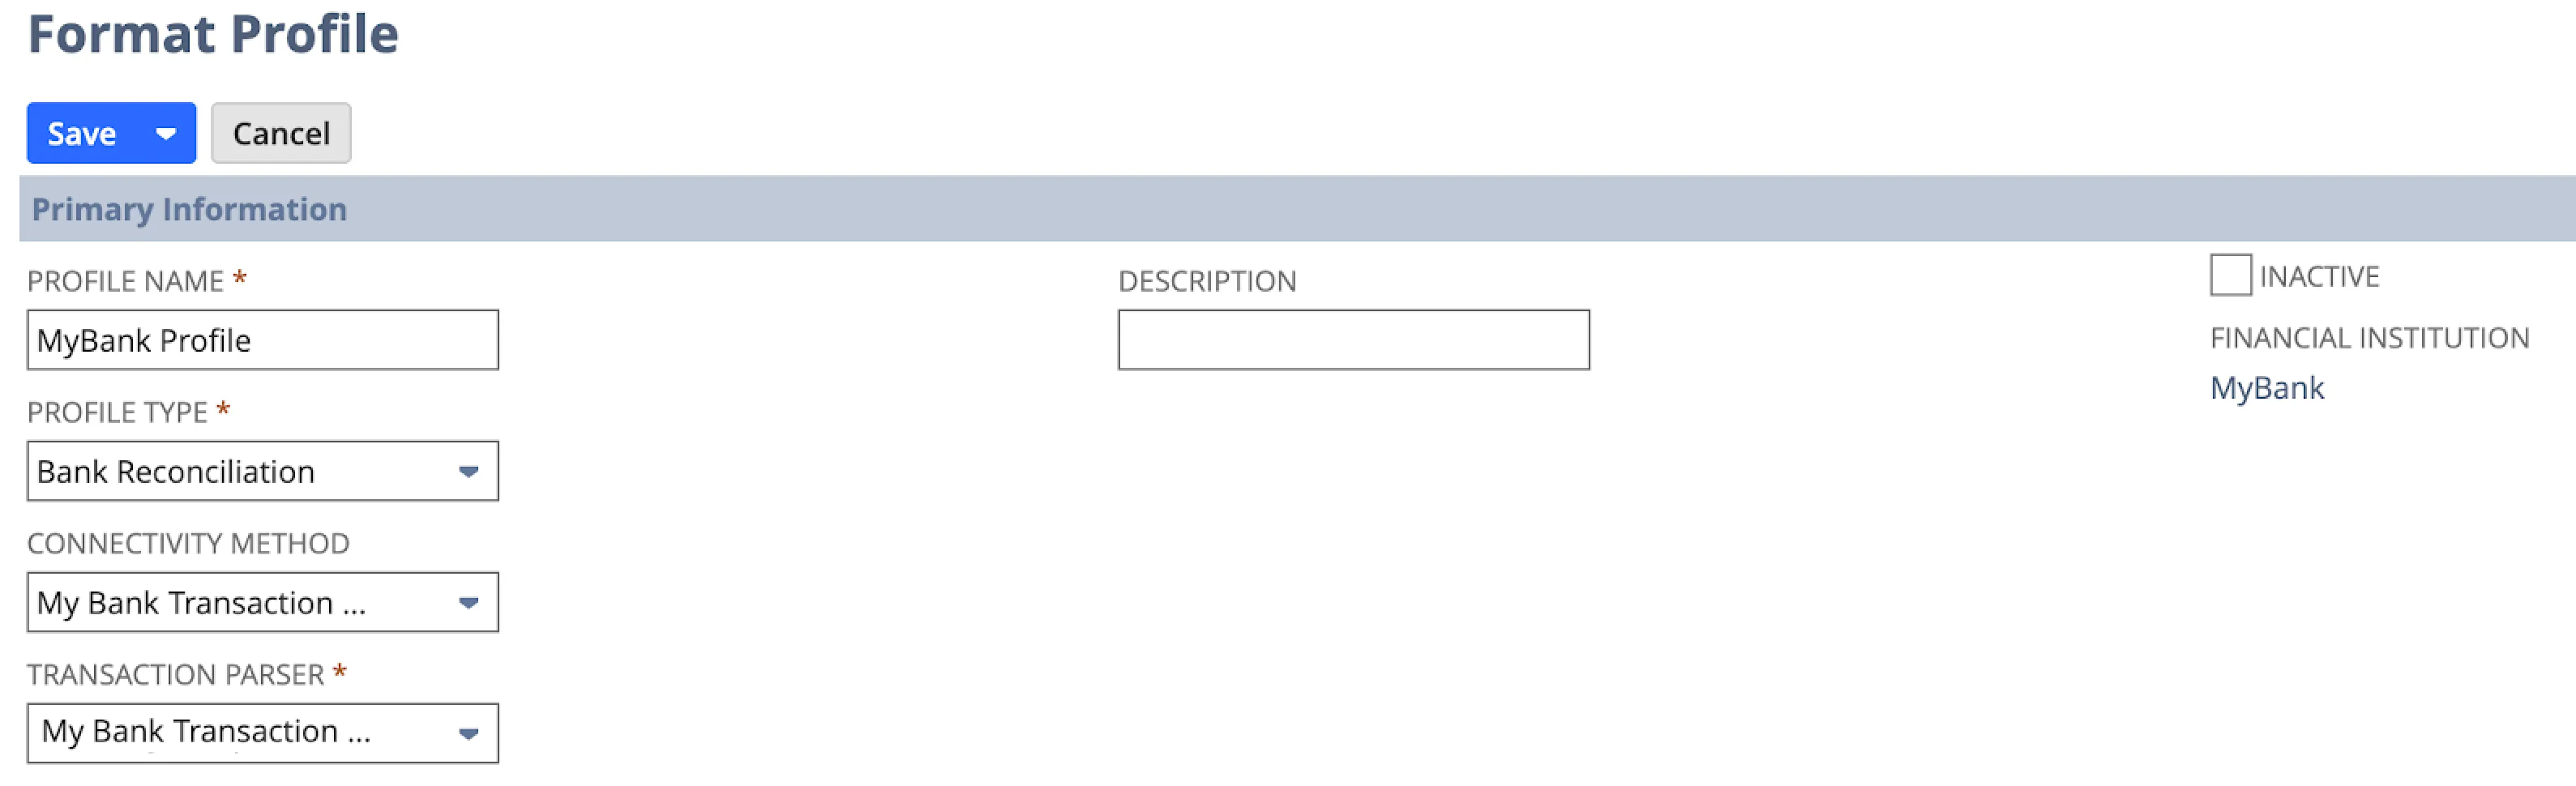
Fill in the following fields under Primary Information:
- Profile Name: Any name, we suggest CNB Pay Profile
- Profile Type: Bank Reconciliation
- Connectivity Method: CNB Pay Transaction Feed
- Transaction Parser: CNB Pay Transaction Feed
Next, click on the Account Linking tab.
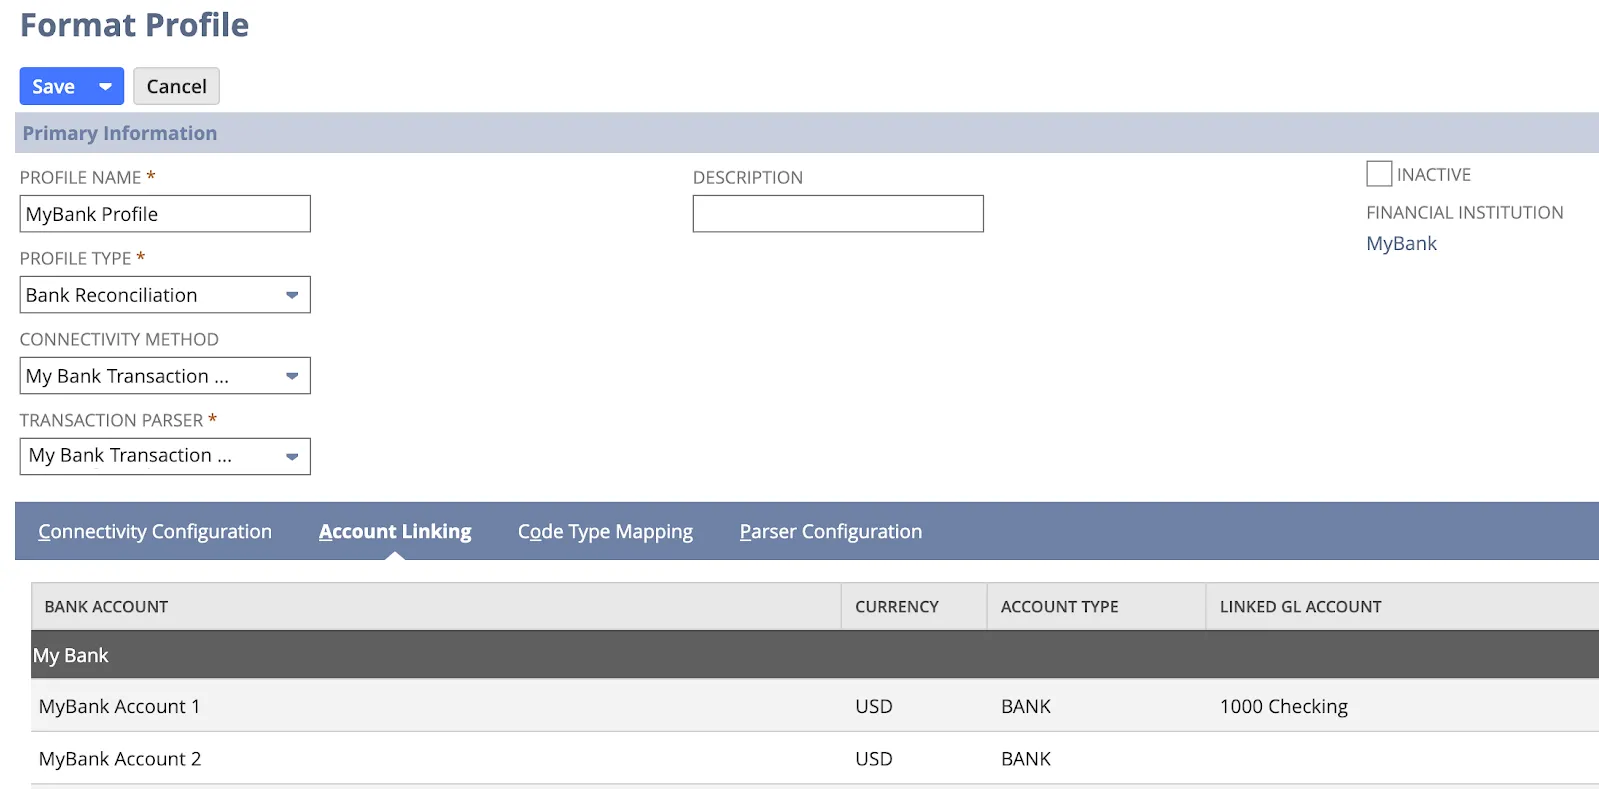
NOTE: Previously, each Format Profile was only able to support one linked bank account. With this new edition of Bank Feeds, a Format Profile can have multiple Bank Accounts and linked GL accounts.
Based on the account seen under the Bank Account column, click on the space below the Linked GL Account to show a dropdown. In this dropdown, select the GL account that maps to the Bank Account.
Repeat this step for all accounts you wish to enable Bank Feeds.
Once all bank accounts have been linked, click Save.
IMPORTANT: Please ensure you link all of your bank accounts on the same day to avoid missing transactions for any unlinked bank accounts.
Set up the Transaction History Date
On the Account Linking subtab, use Earliest Transaction Date for Import (All Accounts) to control how far back NetSuite should reach when it first pulls transaction history.
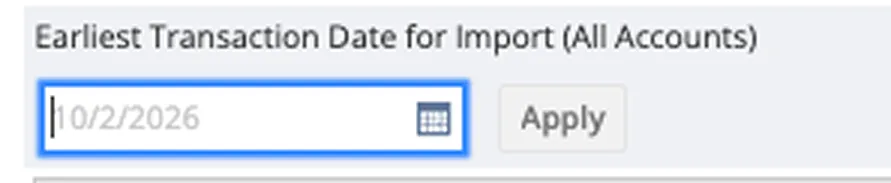
- This date applies to all bank accounts by default.
- To set a different start date for one account, edit that row's Earliest Transaction Date for Import column directly.
- To force every account back to the same date (overwriting any per-account overrides), enter a date and click Apply Date to All Bank Accounts.
- If left blank, NetSuite defaults to importing the last 60 calendar days of available history.
- You can select a start date up to 60 days in the past.
IMPORTANT: Once the first import for an account has run, this date is locked in. If you need to change it afterward, you'll need to unlink and re-link that bank account to select a new date — editing the field alone won't retroactively change what was already imported.
Configure the Import Schedule
Once your accounts are linked, open the Import Schedule subtab on the format profile to control when NetSuite pulls transaction data from your financial institution.
Complete the following fields:
- Unit of Time: Choose the interval unit (e.g. Day) for how often imports should run.
- Repeat Every: Set the frequency within that unit (e.g. 1 day for a daily import).
- First Scheduled Import Date: The date the first automated import should run.
- First Scheduled Import Time: The time of day the import should kick off.
- Time Zone: The time zone your scheduled time should be interpreted in.
Click Save once these are set.
Step 5: Monitor Bank Import Process
NOTE: You may not see transactions in the Match Bank Data page upon setup, as our Bank Feed solution will import all prior-day transactions the day after setup and continue to do so onwards.
As soon as the Format Profile is saved, a blue banner will appear to notify you that NetSuite is beginning the bank import process.
Select Track your status in the blue banner that appears, or go to Transactions → CNB Pay → Banking Import History.

If the import is successful, you will see Completed under the Import Status column.

If the import fails, you will see Failed in the Import Status column. Select the plus (+) sign to expand the failure reason details.
Please take a screenshot of the error message and download the CSV provided from the link in the error message. Then, email this information to FISPAN Support.
WARNING: This set of instructions covers the setup of our new bank feeds solution as of bank plugin version 2024.1.0.
If you are an existing user of our legacy bank feeds solution, please refer to Upgrading Bank Feeds (NetSuite) switching to the new solution.
If you are looking for instructions for our legacy bank feeds solution, please refer to Enabling Legacy Bank Feeds (NetSuite). Our legacy bank feeds solution will no longer be supported as of the bank plugin version 2024.2.0.
Troubleshooting
Identifying Errors
In the situation where a bank data import fails, the failure reason can be found on the Banking Import History page.
Navigate to Transactions → CNB Pay → Banking Import History.
Find the line item that shows the Import Status as FAILED, accompanied by a red caution icon.
On that line item, click on the small plus icon on the far left to expand the row.

After expanding the row, the Failure Reason is provided.
Unrecognized Bank Transaction Codes
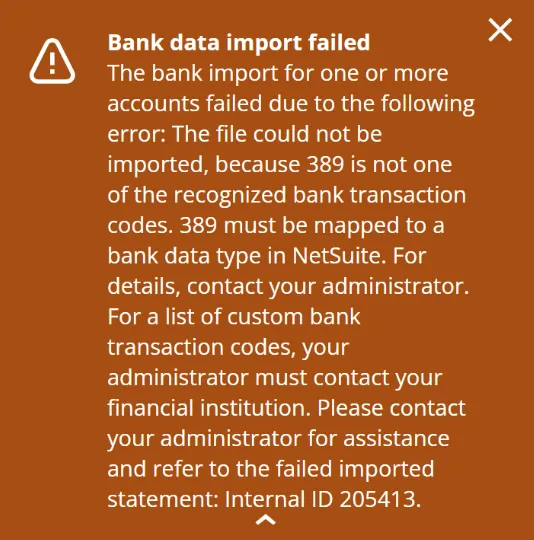
In the event that a bank data import fails due to an unrecognized bank transaction code, you will need to do the following:
- Map any missing BAI2 codes
- Retrieve Statement IDs from Connectivity Method / Parser Execution logs
- Contact a FISPAN representative with the following:
- Statement IDs from impacted accounts
- The date the import failed
- The date of the transactions that are missing
Please refer to the sections below for instructions on how to proceed.
Mapping Bank Transaction Codes
Locate the Financial Institution
Navigate to Setup → Accounting → Financial Institution.
Click Edit on the Financial Institution that you have created previously.
Select the Format Profile: Configuration tab and select Edit on the Format Profile that you have also created previously.
Fill in the Bank Transaction Code Details
Fill in the following fields for the bank transaction code that was unrecognized:
- Bank Transaction Code: The three-digit code from the error message seen on the Banking Import History page, or on the Match Bank Data page.
- Description: Fill in with the code's description, which can be found here: BAI.org Cash Management Balance Reporting Specifications, page 10
- Bank Data Type
- Credit / Debit
Bank Data Type and Credit / Debit values will be the same. They both must be either Credit, Debit, or N/A. This can also be found on BAI.org Cash Management Balance Reporting Specifications, page 10, or by referring to the table below:
Type Codes | Description |
|---|---|
001-099 | Account status type codes |
100 | Total Credits summary type codes |
101-399 | Credit summary and detail type codes |
400 | Total Debits summary type codes |
401-699 | Debits summary and detail type codes |
700-799 | Loan Summary and detail type codes |
900-999 | Customized Type Codes |
Customized type codes should fall within the following ranges:
Type Codes | Description |
|---|---|
900-919 | Account Status Codes |
920-959 | Credit Summary and Detail |
960-999 | Debit Summary and Detail |
For any codes between the 900-999 range that are continuing to fail, please reach out to City National Bank support.

Save the Code Details
Once you have entered the missing BAI2 code information, click Save on the Format Profile.
IMPORTANT: NetSuite will attempt to re-import bank transactions, but they will not yet appear on the Match Bank Data page. You will still need to retrieve the Statement IDs and contact City National Bank Support with affected dates to request a re-sync.
Retrieving Statement IDs from Execution Logs
In the case of a failed import, you will need to retrieve Statement IDs from the Execution Logs from either the Connectivity Method or the Transaction Parser prior to reaching out to our Support Team to resync transactions.
NOTE: NetSuite will only store 30 days' worth of Execution Logs and, by default, will only display the past 24 hours' worth of logs.
Locate the Financial Institution
Navigate to Setup → Accounting → Financial Institution → List
Click Edit on the Financial Institution that you have created previously.
Select the Format Profile: Configuration tab and click on the Name of the Format Profile you have created previously.
Open Transaction Feed
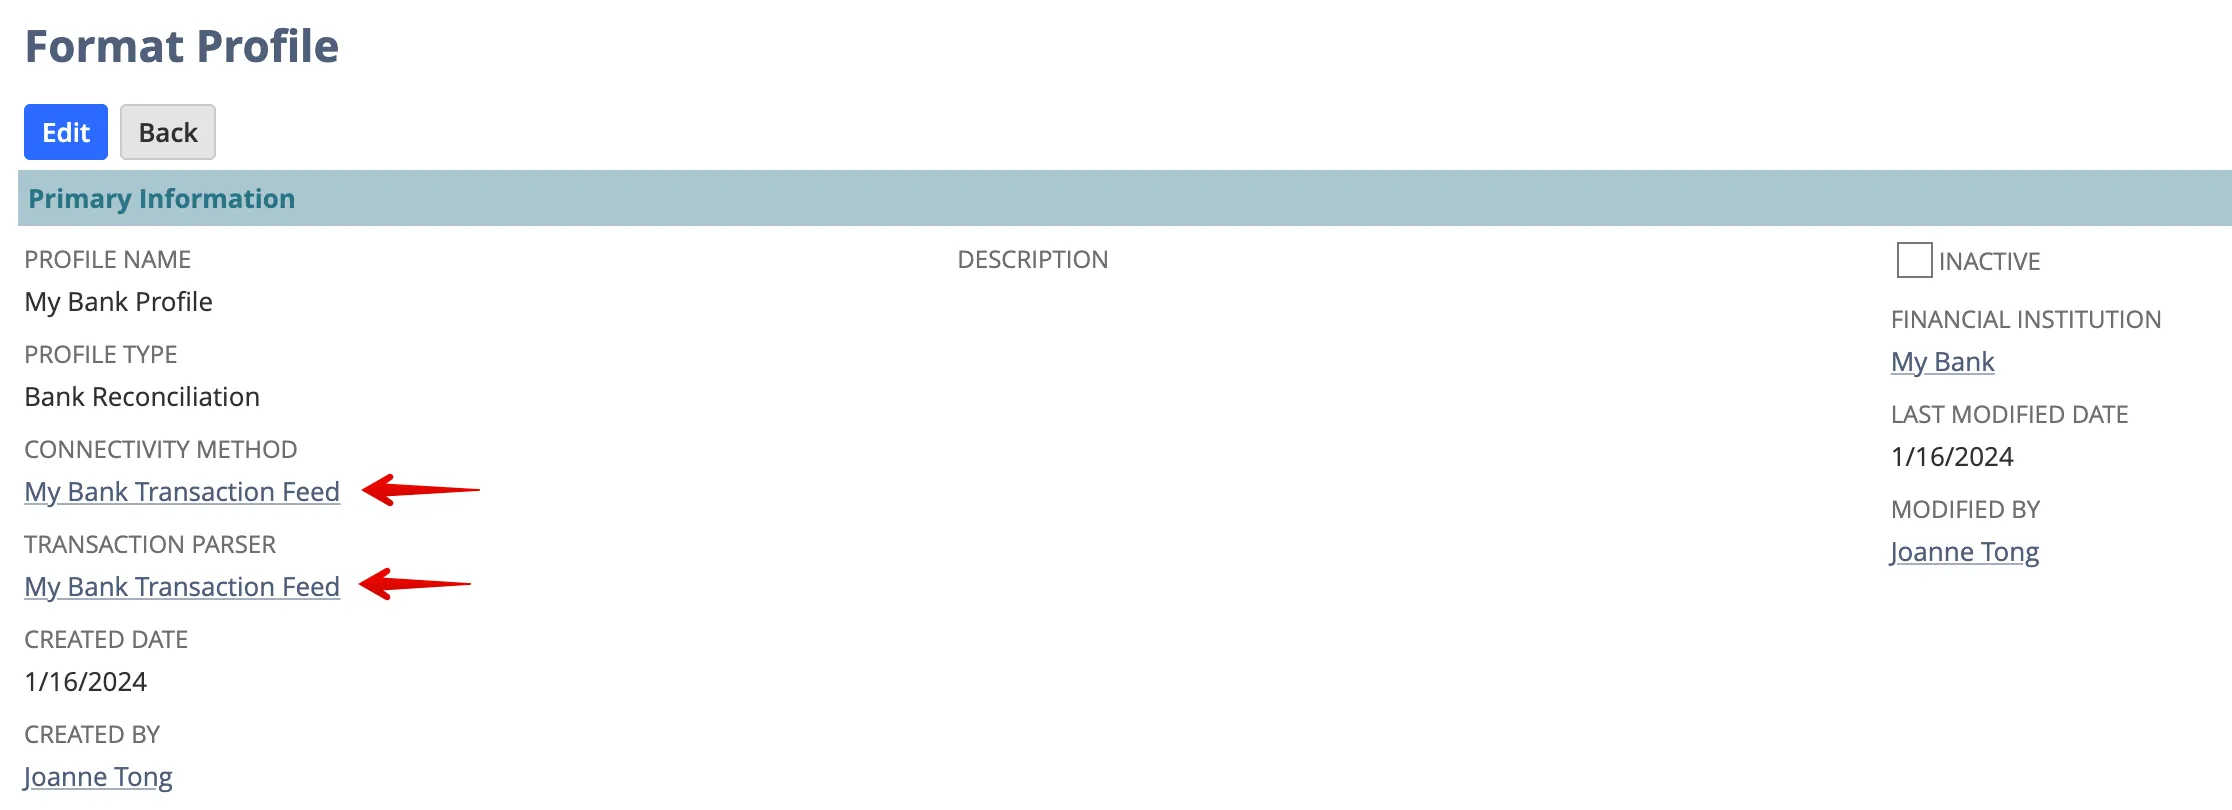
On the Format Profile, under Connectivity Method, click the hyperlinked Bank Transaction Feed, and open it in a new browser tab.
Under Transaction Parser, also click the hyperlinked Bank Transaction Feed and open it in a new browser tab.
Locate Execution Logs
In both of the new tabs that were opened for the Connectivity Method and Transaction Parser, click the Execution Logs tab in the sub-menu.
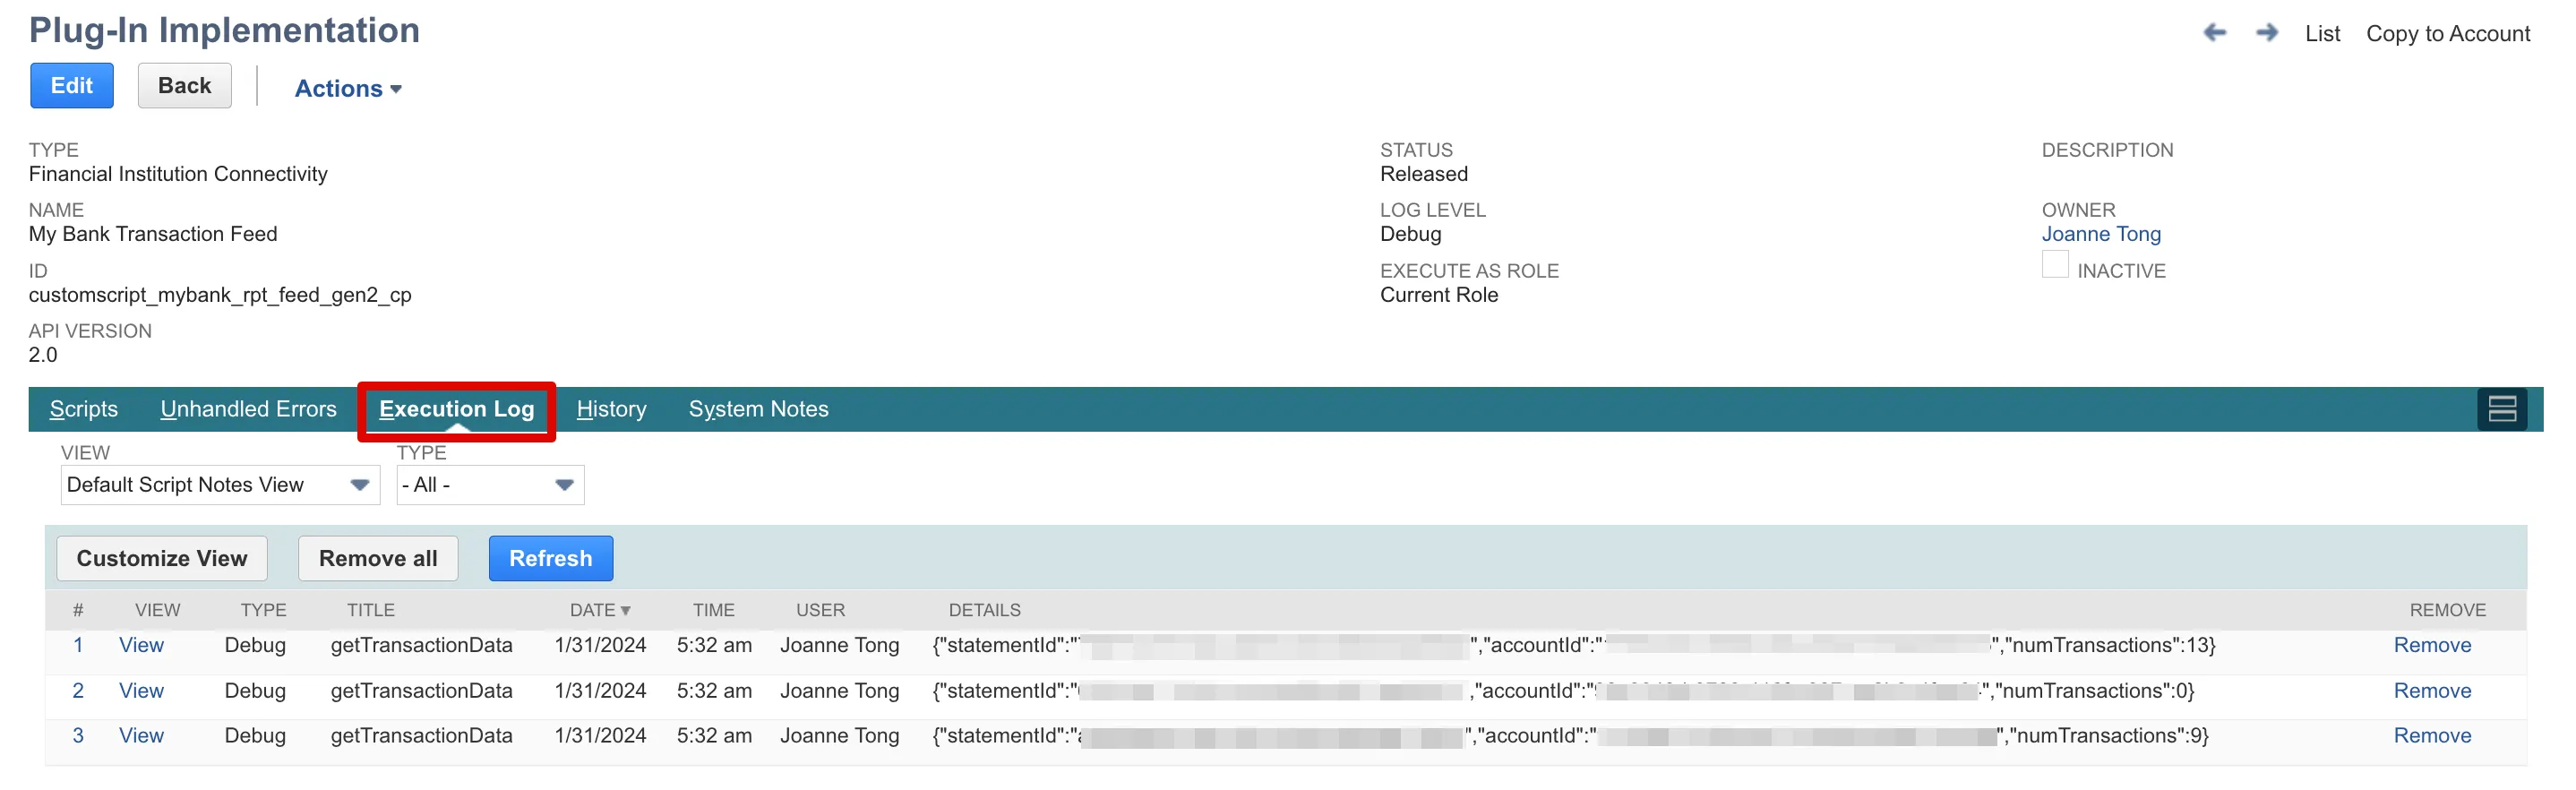
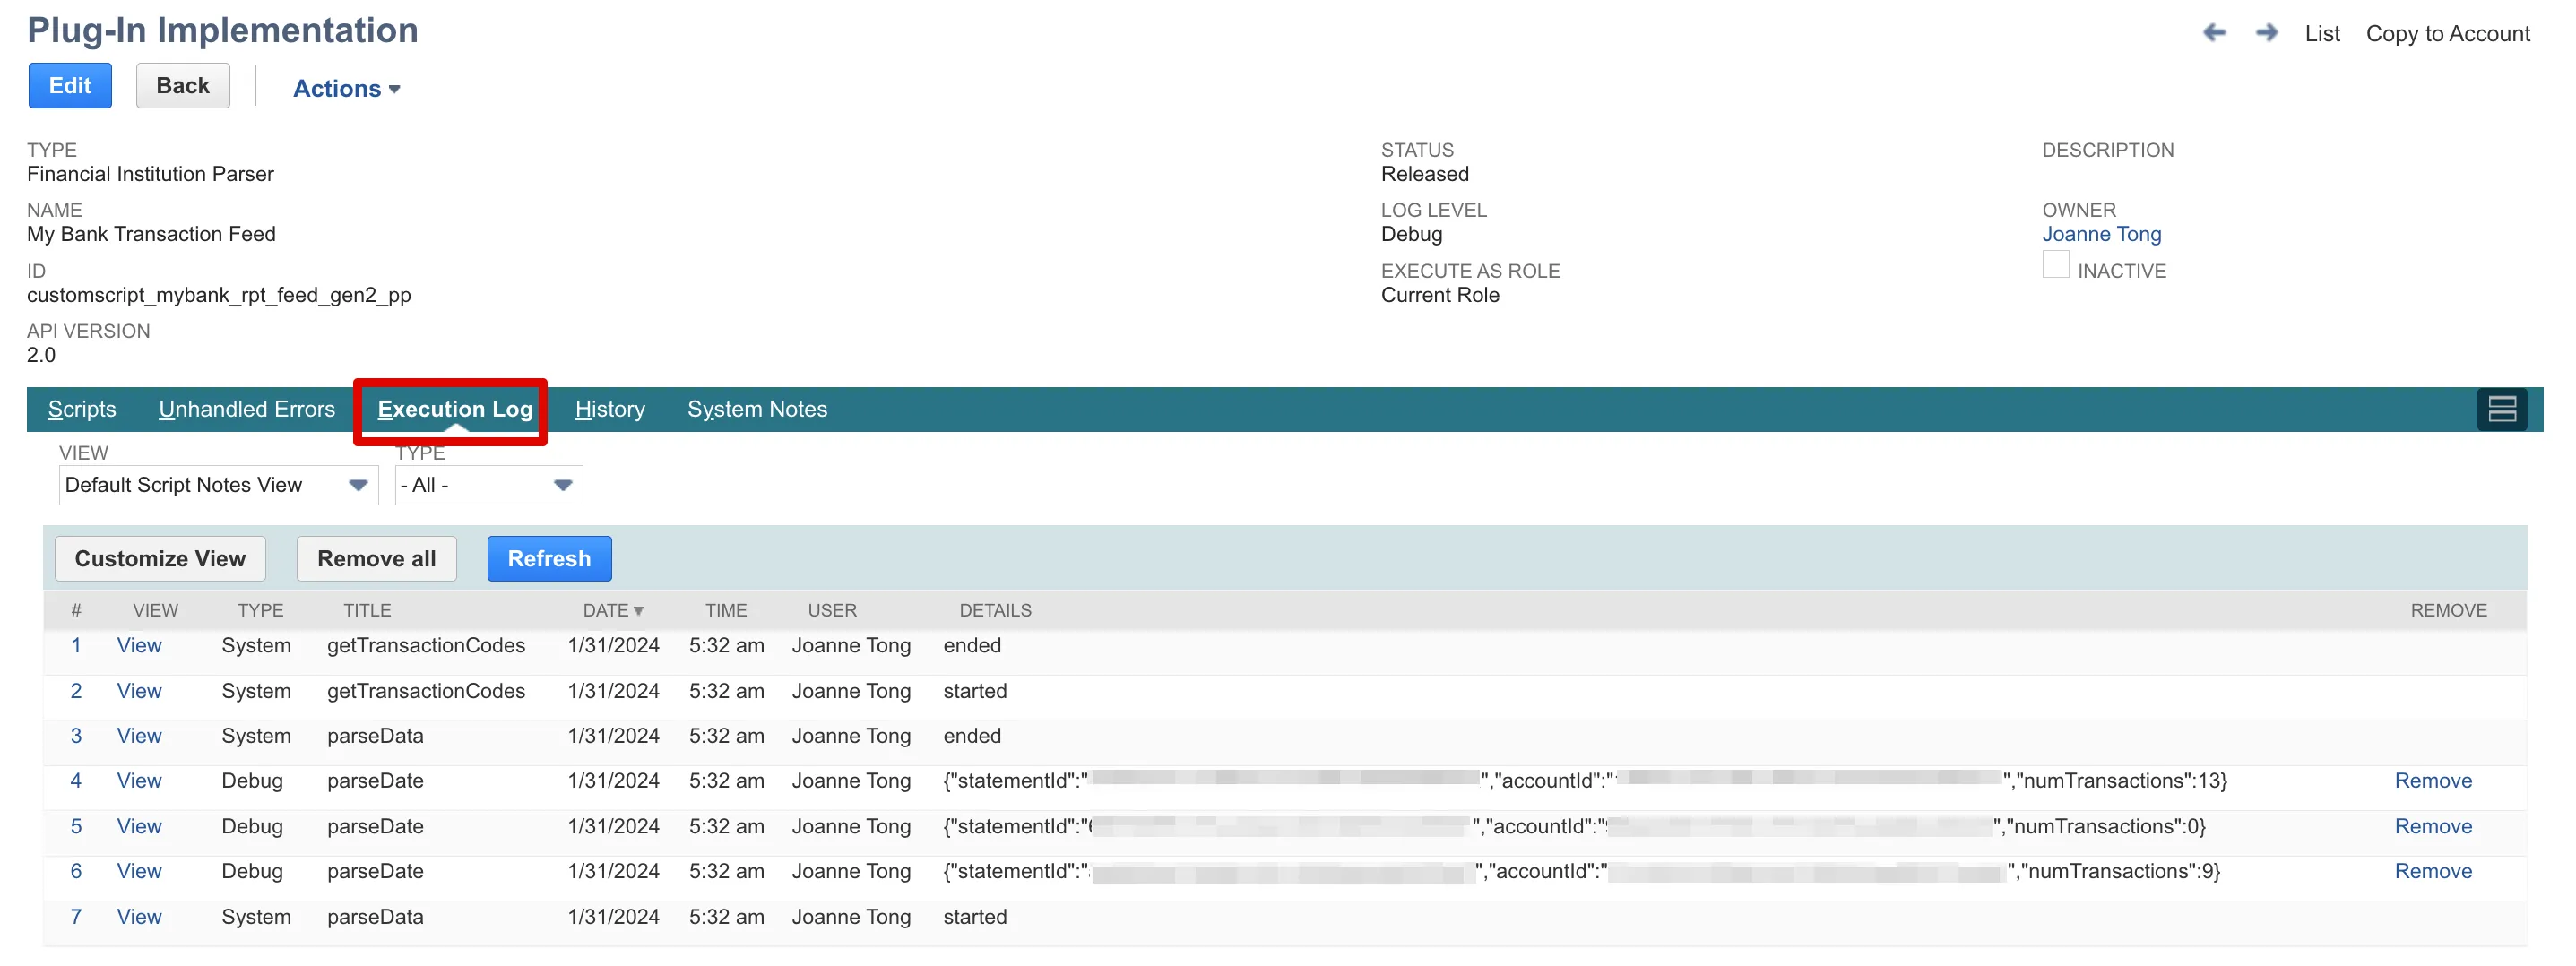
The Statement IDs, Account IDs, and Number of Transactions should be identical between both the Connectivity Method and Transaction Parser. Each row corresponds to a bank account linked with the new bank feeds service.
NOTE: The Connectivity Method (Financial Institution Connectivity) downloads bank transactions from FISPAN. The Execution Logs here will display any errors relating to connectivity issues with FISPAN.
The Transaction Parser (Financial Institution Parser) pushes the downloaded bank transactions from FISPAN into the Match Bank Data page in NetSuite. The Execution Logs here will display any errors relating to missing BAI2 codes or other formatting issues in the bank transaction data.
Unable to see Execution Logs?
If you are unable to see any Execution Logs from the past 24 hours, you will need to add a Date filter as a Custom View. Please note that any logs that are older than 30 days are not stored by NetSuite.
Customize View
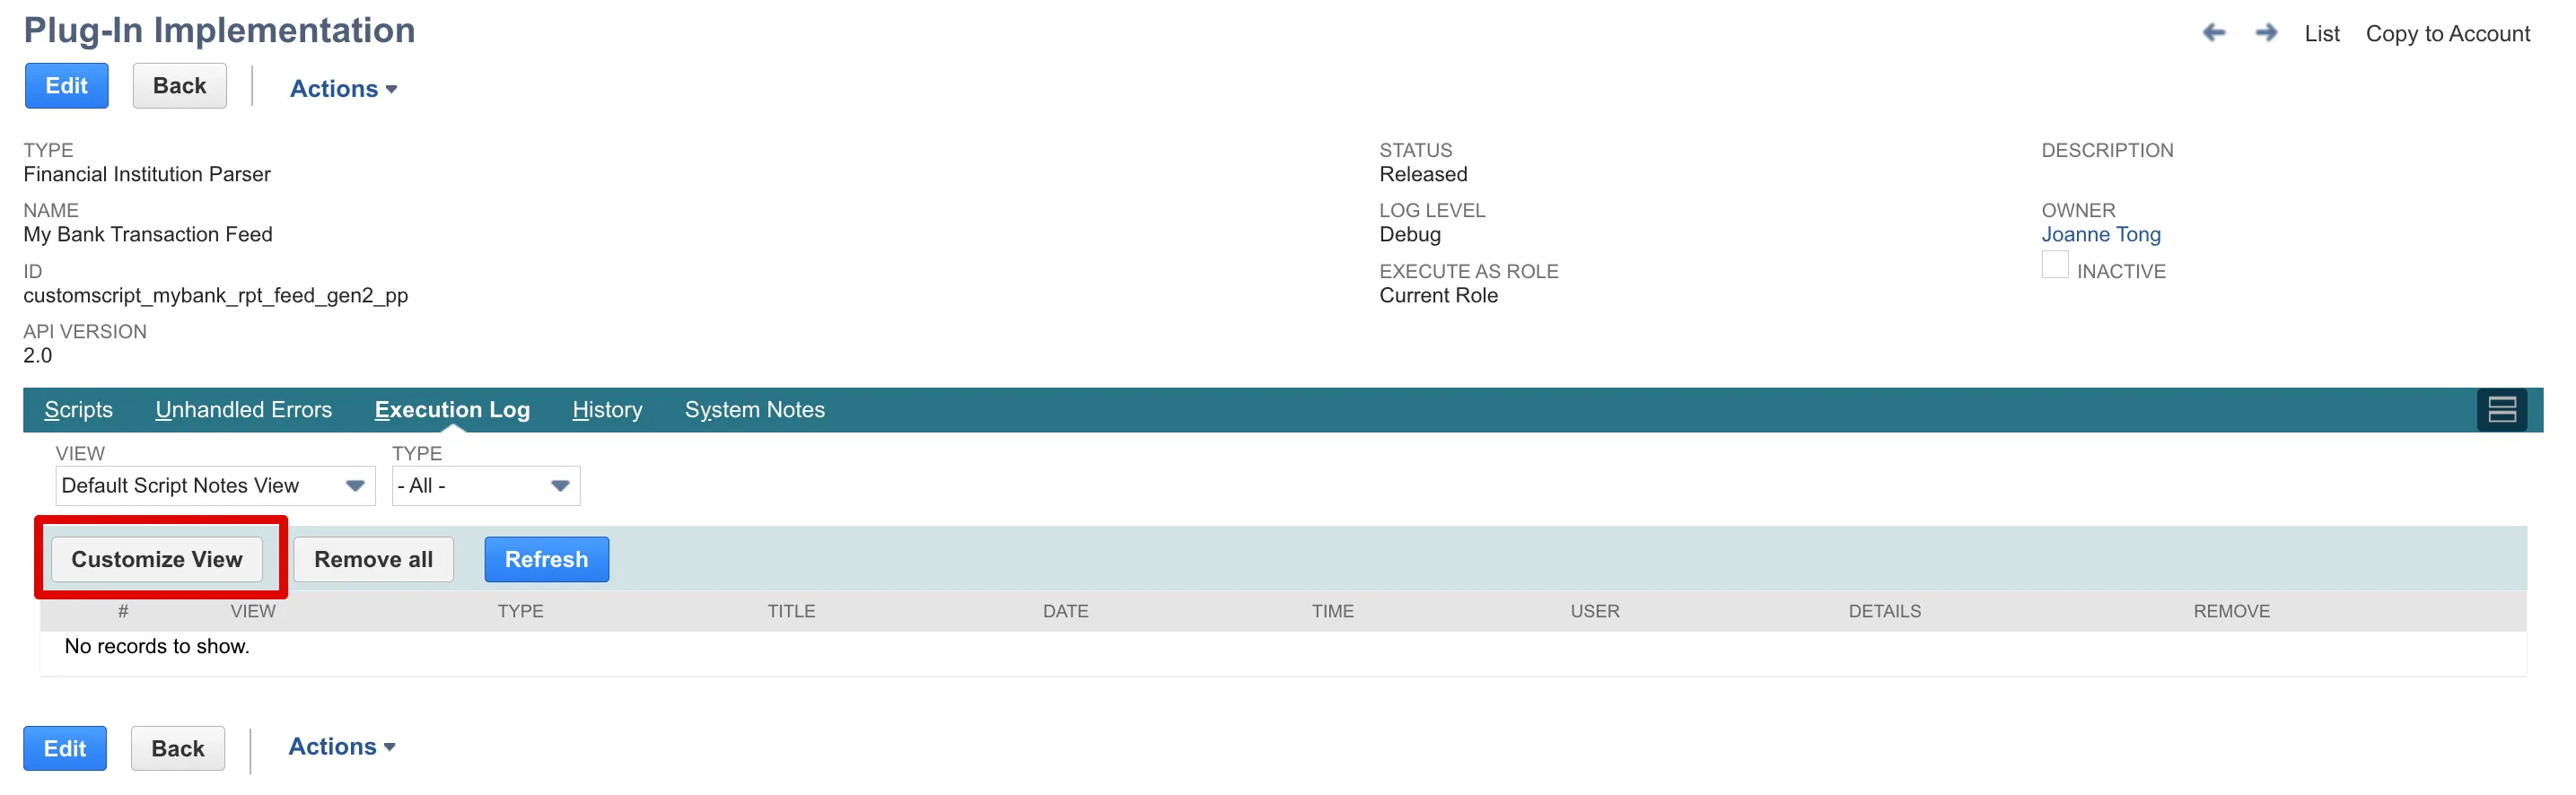
From the Plug-In Implementation page that you were on for either the Financial Institution Connectivity or Financial Institution Parser, click on the Customize View button.
Create Custom View
On the Customize Script Server Script Log Search Results page that just opened, rename the Search Title to [BANK] Bank Feeds - Execution Log Dates.
Next, click on the Available Filters sub-tab.
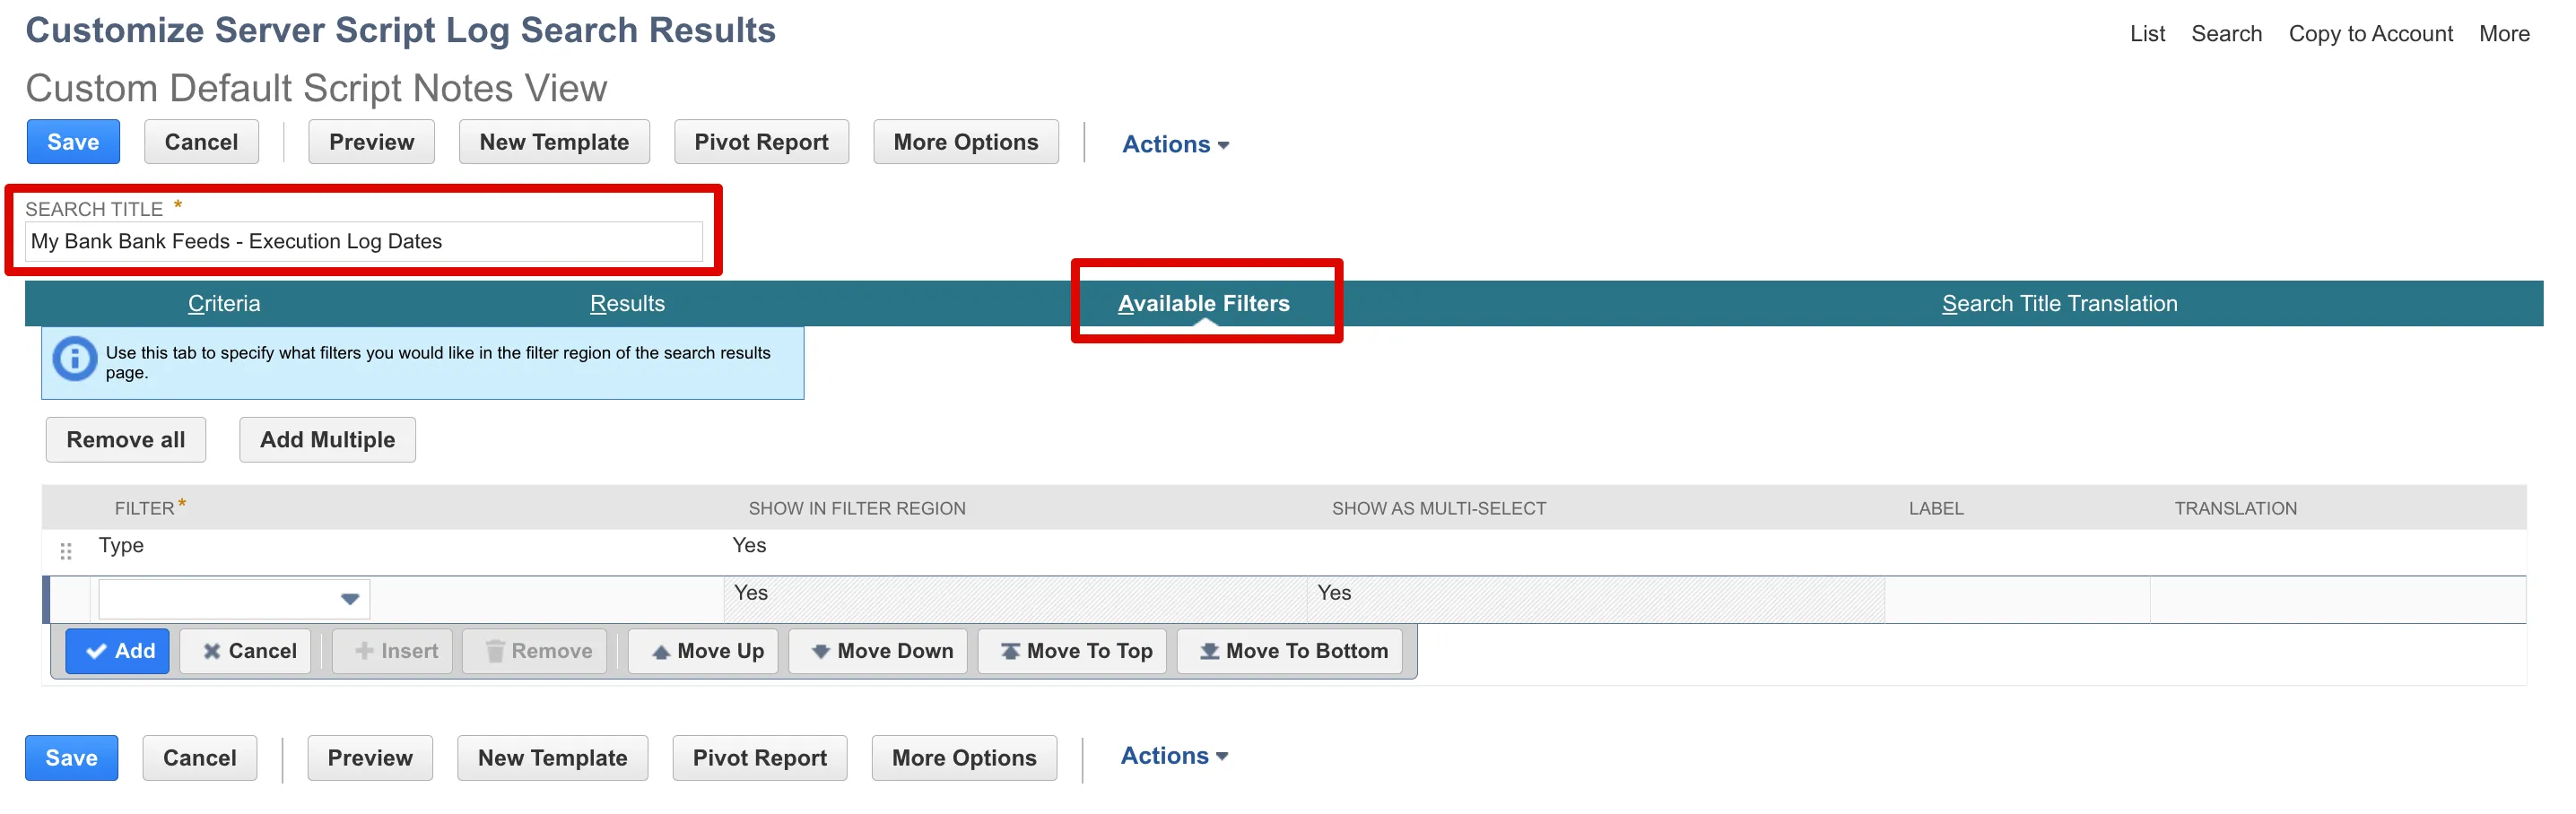
Click the dropdown in the last row of the table. Select a Date from the options.
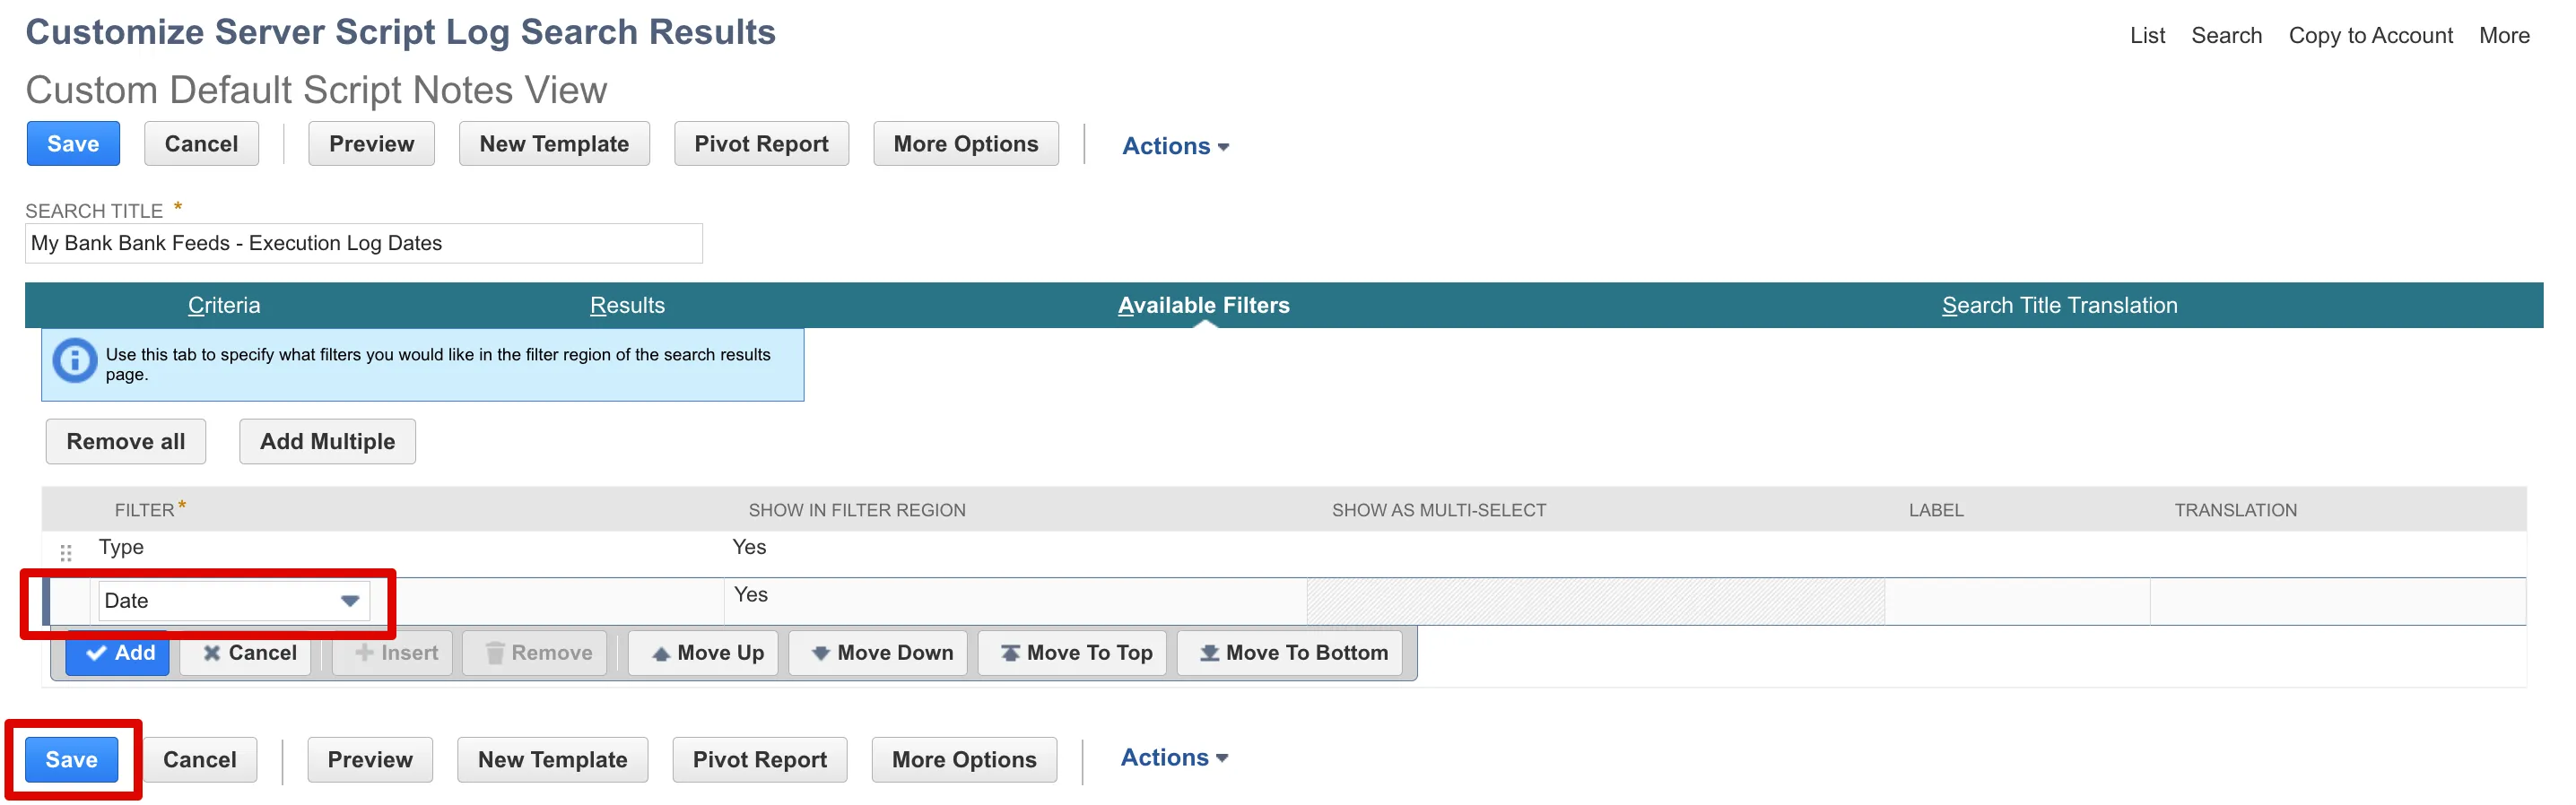
Once you have added the Date, click Save.
This Custom View will now be available on both the Financial Institution Parser and Connectivity Method logs.
Access the Custom View
Clicking Save will take you back to the Plug-In Implementation page.
From here, click on the Execution Log tab.
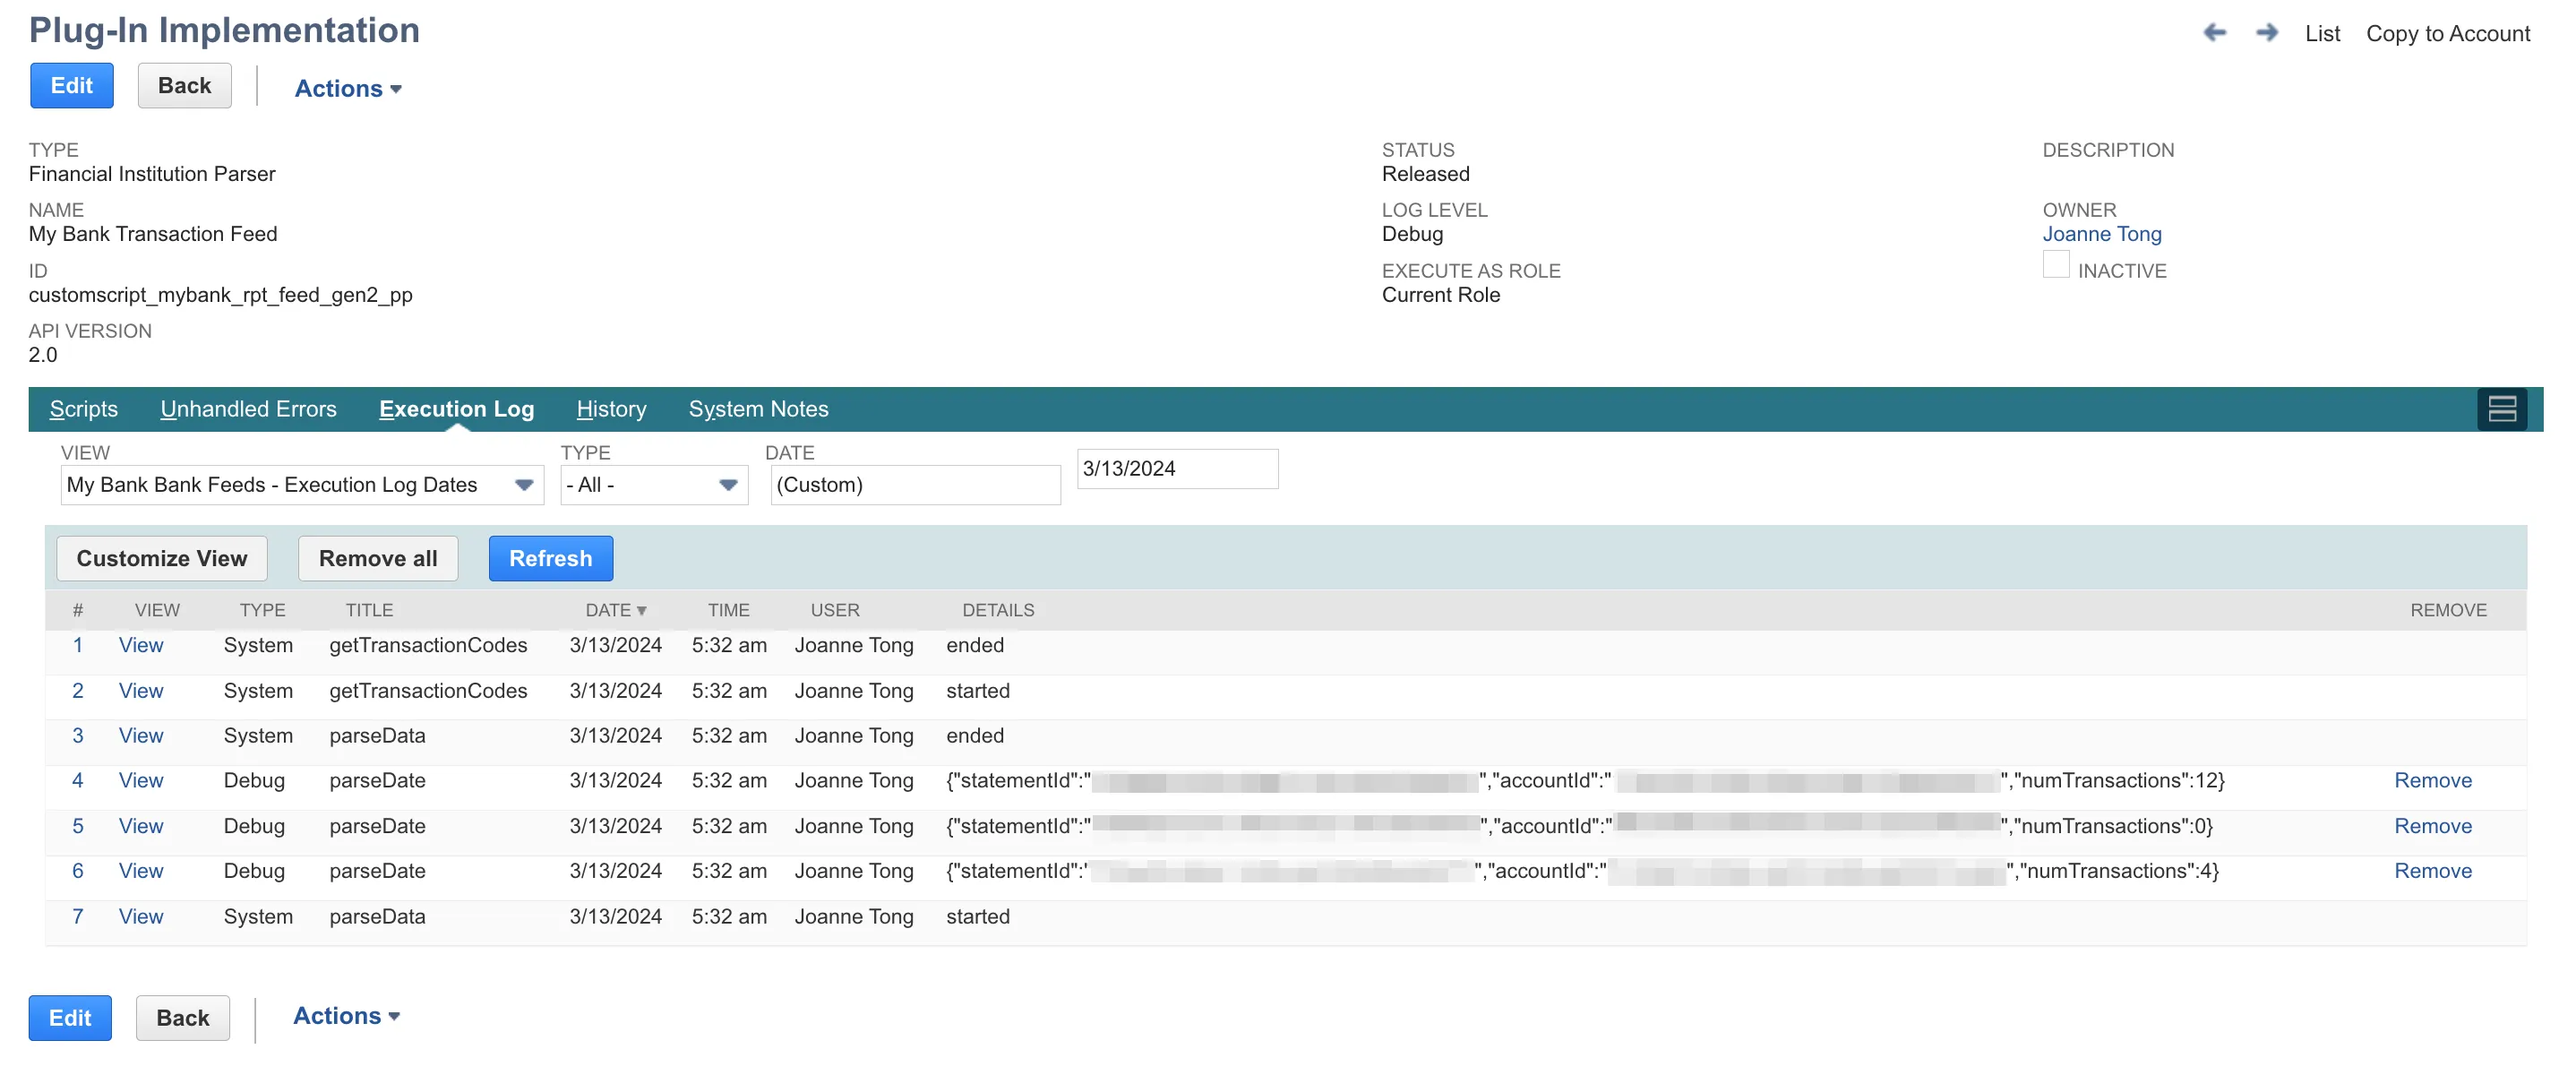
There will be a new option under the View dropdown, which is the Custom View you have just created. When the new Custom View is selected, a Date filter will now appear.
Locate Execution Log
Using the new Date filter, find the date the error occurred on. This should be the same date you are missing transactions for.
Once a date within the past 30 days has been selected, the table will populate with several rows containing Statement IDs, Account IDs, and the Number of Transactions for every bank account linked with the bank feeds service for the selected date.
Copy the contents of the whole table and paste into an email addressed to FISPAN Support. Ensure the following is included in your message
- Execution Log table contents (containing Statement IDs from impacted accounts)
- The date the import failed
- The date of the transactions that are missing
With this information, our FISPAN Support will be able to retrieve your missing transactions and resync them as part of your next morning's automatic import.